Jim's Jobs - User Manual
Welcome to Jim's Jobs Web!
What is Jim's Jobs Web?
Jim's Jobs Web is an online system developed by Jim's Group of Companies. It is the online version of the original computer management system, Jim's Jobs Classic, that is designed to manage the customers, jobs, and finances of a servicing business.
Jim's Jobs Web is focusing primarily to support the mowing, cleaning, dog wash, and handyman businesses, while still being broad enough to be used by our many other divisions.
This manual is not intended as an exhaustive manual for the online system. Rather, it is designed to provide you with an introduction to the basic functions to get you up and running as quickly as possible. We’ve tried to make Jim's Jobs as intuitive and as user-friendly as possible. Hopefully, many of the functions can be easily understood without the need to continually refer back to documentation.
Feel free to provide constructive feedback using the Feedback links in the system.
Video Tutorials
- Adding a Client
- Adding a Job
- How to add Purchases
- Using Clients Function
- Creating an Invoice
- Creating a Quote
- Using the Diary
- Further Information
More to Come!
1. Getting Started
System requirements
Any modern PC from within the last 10 years or so, running an up-to-date version of any of the following browsers1 will be capable of running Jim's Jobs Web:
- Google Chrome (Recommended)
- Mozilla Firefox
- Microsoft Edge
Safari(Partially supported)
The following is recommended as a minimum for running Jim's Jobs Web:
- PC display larger than a tablet (recommended 1600 pixel wide resolution)
- Jim's Jobs Web has been designed for use & display on a PC's browser window and compatibility is not guaranteed on a tablet.
- Jim's Jobs Mobile has been designed for use & display on smartphones and compatibility is not guaranteed on a tablet.
- "Tablet compatibility" is in the backlog and may be released in future Jim's Jobs updates.
- Printer if invoices are required
- A reliable internet connection.
1 Internet Explorer will not be supported, as it is not being supported in the marketplace from January 2020.
Important Browser Settings
- Firefox users
If you are using Firefox, under General Settings, please make sure you have set the Applications Portable Document Format (PDF) to Preview in Firefox. This is to enable previewing of Reports in Jim's Jobs.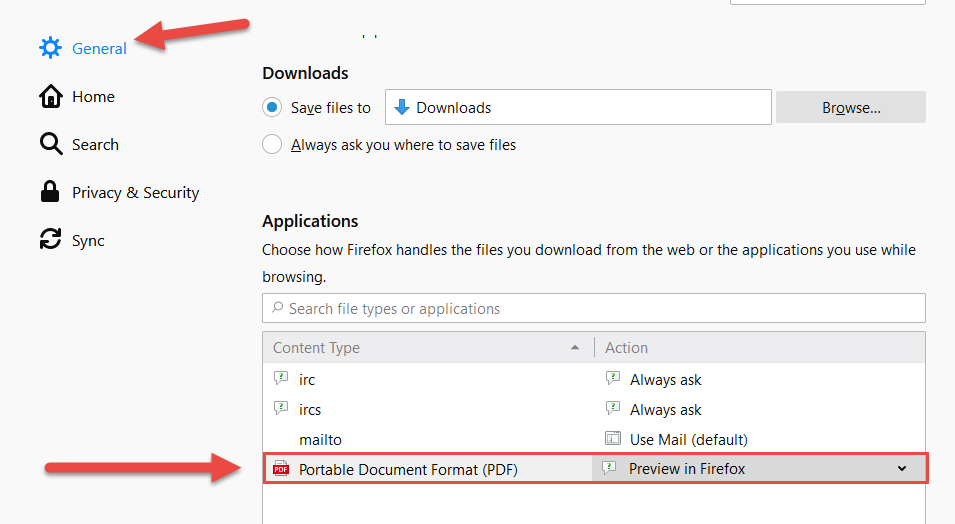
- Microsoft Edge users
Embedded previewing of Reports is not supported by Microsoft Edge in Jim's Jobs. You will still be able to download reports. DOC and.PDF format, but not preview.
Switch to Google Chrome or Firefox browsers to take advantage of the Jim's Jobs print preview feature.

Getting hold of Jim's Jobs Web
Access to Jim's Jobs Web is available to all Franchisees at https://jobs.jims.net/.
Use your Jim's Online username and password to log in.
Installation
Step 1. WEB - Do this first
WEB:
Log in at - https://jobs.jims.net. The username and password are those of Jim’s Online
(Email infotech@jims.net if you need your password reset)
There is no installation required on your computer for Jim's Jobs Web as it is completely web-based and accessible from https://jobs.jims.net/.
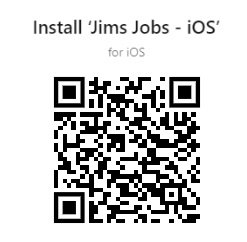
Step 2. Mobile
iOS
- Click HERE to download the iOS app
- Or Scan below QR Code:
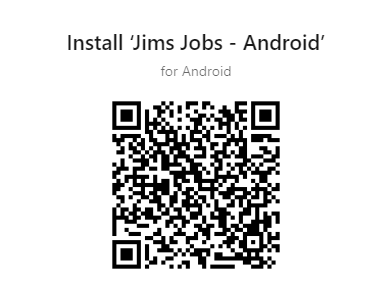
Android
Note for Android users:
Before downloading, open Settings > Device & Privacy > Unknown Source Installation and turn it on for Chrome and File Manager. Note, that the location of these settings can vary from phone to phone. Please search settings, or contact Infotech if you’re having trouble finding it for your phone.
- Click HERE to download the Android app
- Or Scan below QR Code:

Watch a brief video on using the mobile app here.
Online access
Jim's Jobs Web is only available online. There is no offline capability, so you will need an internet connection to access all functions in the system - much like any other online application.
Log in here - https://jobs.jims.net/
Initial setup tasks
Like any new software package, there are a few initial setup tasks to do before you get stuck into using Jim's Jobs Web:
| Area | Information |
|---|---|
Your personal and Business Information | It is advised that you check your personal information on the Settings→ Business Information page.
|
| Items & Services Provided | By default, there are Standard Services set up for you (all linked to the single GL001 account) that represent the Services available in your Jim's Division. Any Leads that will be provided to you from Jim's Group will always refer to a Standard Service, not your Custom Services. |
| GL Accounts | By default, there is a single General Ledger account set up for you (GL001). If you wish to set up your own, please review the setup on the Settings→ General Ledger Accounts page. |
| Payment Methods | There are a few Payment Methods set up for you. Please review these and ensure that they are all applicable to you and add/delete them as required on the Settings→ Miscellaneous-List/ Payment methods page. |
| Employees | By default, there is a single Employee (yourself) that is added to your Employee list. You will need an Employee set up to add in a Job, so either leave yourself as the default employee if you are a single employee Franchisee or otherwise add in all your Employees on the Settings→ Employees page. |
| Banks | By default, there are a few Banks to List set up for you. Please review these and ensure that they are all applicable to you and add/delete them as required on the Settings→ Banks page. |
| Holidays | Public holidays and personal holidays can be controlled to ensure that your job schedule for clients avoids these dates. You can edit any holiday on the Settings→ Miscellaneous-list/holidays page. |
| Schedule Frequencies | There are a few Schedule Frequencies set up for you. Please review these and ensure that they are all applicable to you and add/delete them as required on the Settings→ Miscellaneous- List/Schedule Frequencies page. |
| Countries | You can add a new Country where your business is located. To select a country go to Settings→ Miscellaneous- List/Countries page. |
| SMS Templates | You can edit your templates for SMS. To create or edit an SMS go to Settings→ SMS/templates page. |
| E-mails Templates | You can edit your templates for E-mails. To create or edit an E-mail goes to Settings→ Email/templates page. |
| Auto Follow-Ups | You can choose how many days to wait before a reminder for payment or Quotes. To set this up go to Settings→ Client/ Settings page. |
| Xero integration | You can integrate Xero with Jim's Jobs. Go to Settings→ Financial-settings/accounting-integration page. |
| Xero Logs | You can check out the log record from Xero. Go to Settings→ Financial-settings/accounting-integration-logs page. |
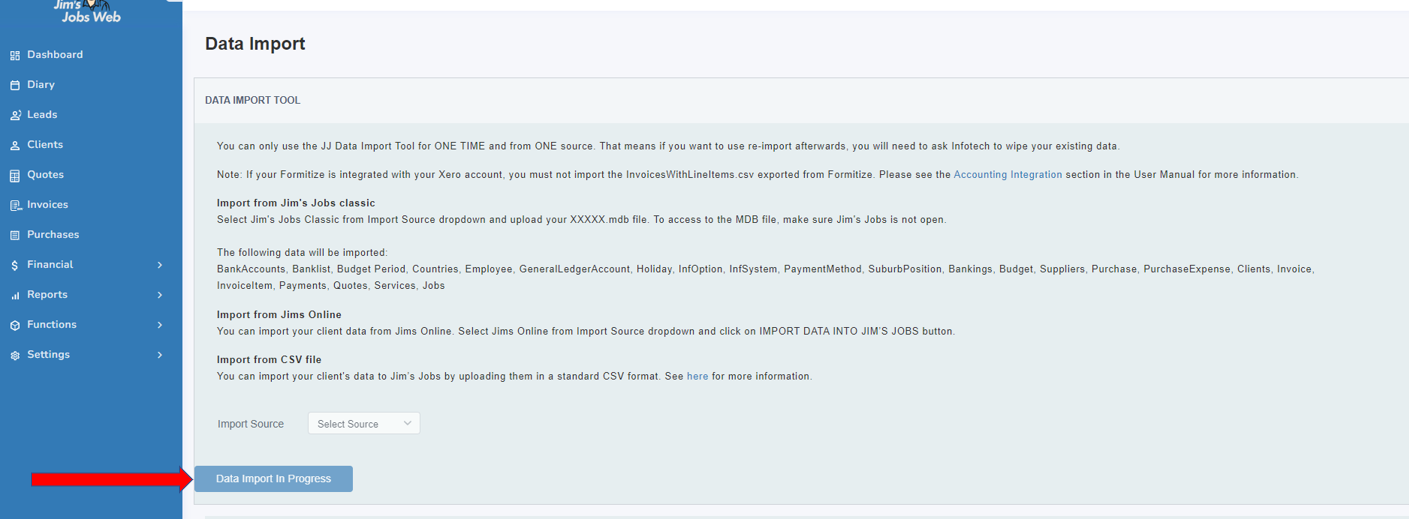
| Data Import | You can only use the JJ Data Import Tool ONE TIME and from ONE source. That means if you want to use re-import afterward, you will need to ask Infotech to wipe your existing data. Go to Settings→ Setup/data-import-tool page. |
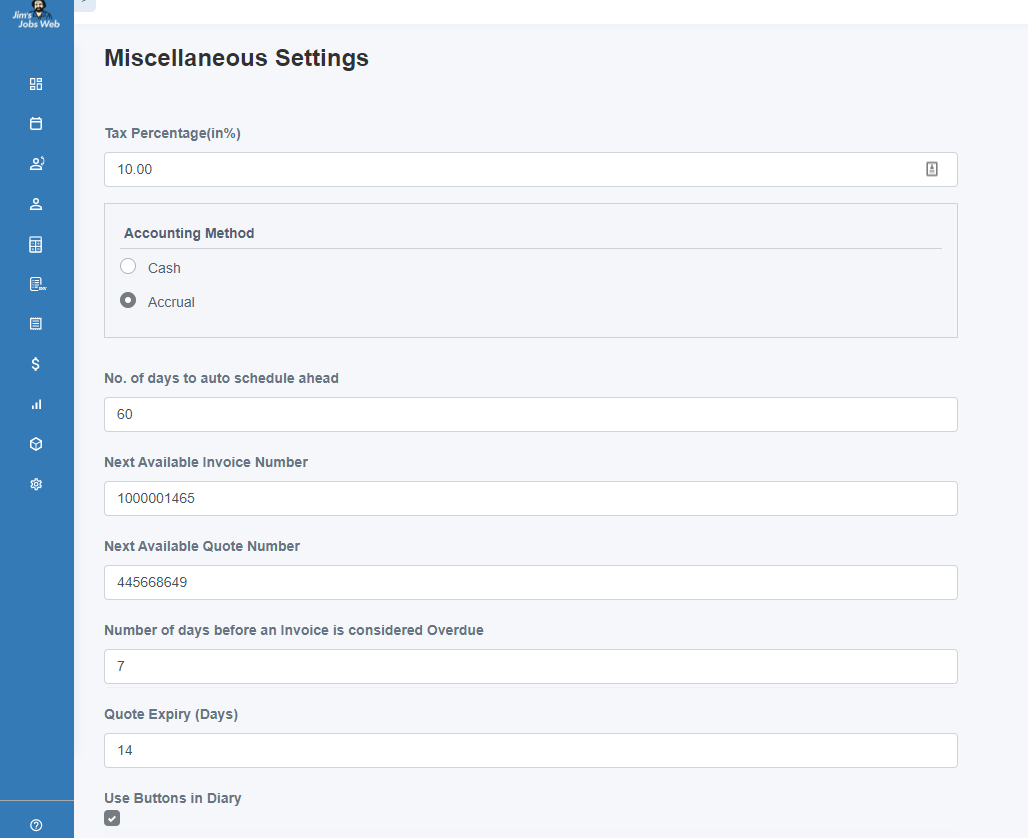
| Miscellaneous Settings | You can change the Tax Percentage, Auto schedule ahead of days, Invoice expiry days, and Quote expiry. Go to Settings→ Ssetup/miscellaneous-settings page. |
Data Import
- You can only use the Jim's Jobs Data Import Tool for ONE IMPORT and from ONE source. It means a one-off use for this tool:
- That means if you want to use re-import afterward, you’ll need to ask infotech to wipe your existing data.
- If there were invoices imported that have been created for payment records without any invoice. They will get -1 as the invoice number so you can distinguish them.
- To start the data import process:
- Log in to Https://jobs.jims.net on your computer (not a tablet or a phone).
- Click on Settings
- Click on Data Import
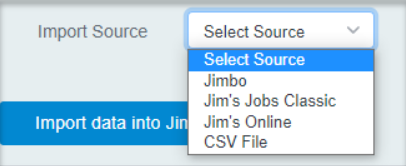
- Click Select Source.
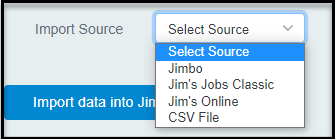
- Continue reading below for more information regards each import source.
Import from Jim's Jobs classic
Select Jim’s Jobs Classic from the Import Source dropdown and upload your XXXXX.mdb file. To access the MDB file, make sure Jim's Jobs is not open.
The following data will be imported:
bank accounts, Banklist, Budget Period, Countries, Employee, GeneralLedgerAccount, Holiday, information, InfSystem, PaymentMethod, SuburbPosition, banking, Budget, Suppliers, Purchase, PurchaseExpense, Clients, Invoice, InvoiceItem, Payments, Quotes, Services, Jobs.
Import from the Jimbo app
You can import your Client data, Jobs, and Custom services from Jimbo. Select Jimbo from the Import Source dropdown and click on the IMPORT DATA INTO JIM’S JOBS button.
Import From Jims Online
You can import your Client data from Jims Online. Select the Import Source dropdown and click on the IMPORT DATA INTO JIM’S JOBS button.
Import from CSV
You can import your client data to Jim's Jobs. Select CSV from the Import Source dropdown and upload your CSV file in this format.
Import from Formitize
Select Formitize from the Import Source dropdown and upload your CSV files exported from Formitize as follows:
Exporting data from Formitize:
You only need to export the files you want to get imported. You won't have to upload all of the below files into Jim’s Jobs except the contacts.csv file which is mandatory.
Important: Read Note 1 if you use Xero.
Export your Contacts data from Formitize through CRM>Reports>Contacts>Download CSV. Filename must be EXACTLY contacts.csv and must be uploaded into JJW without any changes to the column's name. You can only modify the rows if you wish to modify the contact's data or remove duplicates, but you must not add/remove any column to the CSV file.
Export your Quotes data from Formitize through CRM>Reports>Quotes>Download CSV with Line Items. The Filename must be EXACTLY QuotesWithLineItems.csv and must be used without any change.
Export your Purchases data from Formitize through CRM>Reports>Purchases>Download CSV with Line Items. The filename must be EXACTLY ExpensesWithLineItems.csv and must be used without any change.
Export your Jobs data from Formitize through CRM>Reports>Jobs>Download CSV. The filename must be EXACTLY jobs.csv and must be used without any change.
Export your Leads data from Formitize through CRM>Reports>Leads>Download CSV. The filename must be EXACTLY Leads.csv and must be used without any change.
Notes:
1- If your Formitize account is integrated with your Xero account, you must not import the InvoicesWithLineItems.csv exported from Formitize. Please see HERE for more information to integrate Jim's Job with Xero.
2- After data import, firstly review your data in Jims Jobs web. You can see the source data in the Note section under each imported item and modify that item via Jims Jobs if you wish.
3- While reviewing your Jobs and Diary on Jims Jobs Web, you'll need to select the right status for a Job with Undefined status.
2. Dashboard
Jim's Job dashboard displays 6 different boxes with data from :
- Job remaining today
- Unpaid invoices
- Active quotes
- Uncontacted Leads
- Revenue Forecast
- Profit & Loss
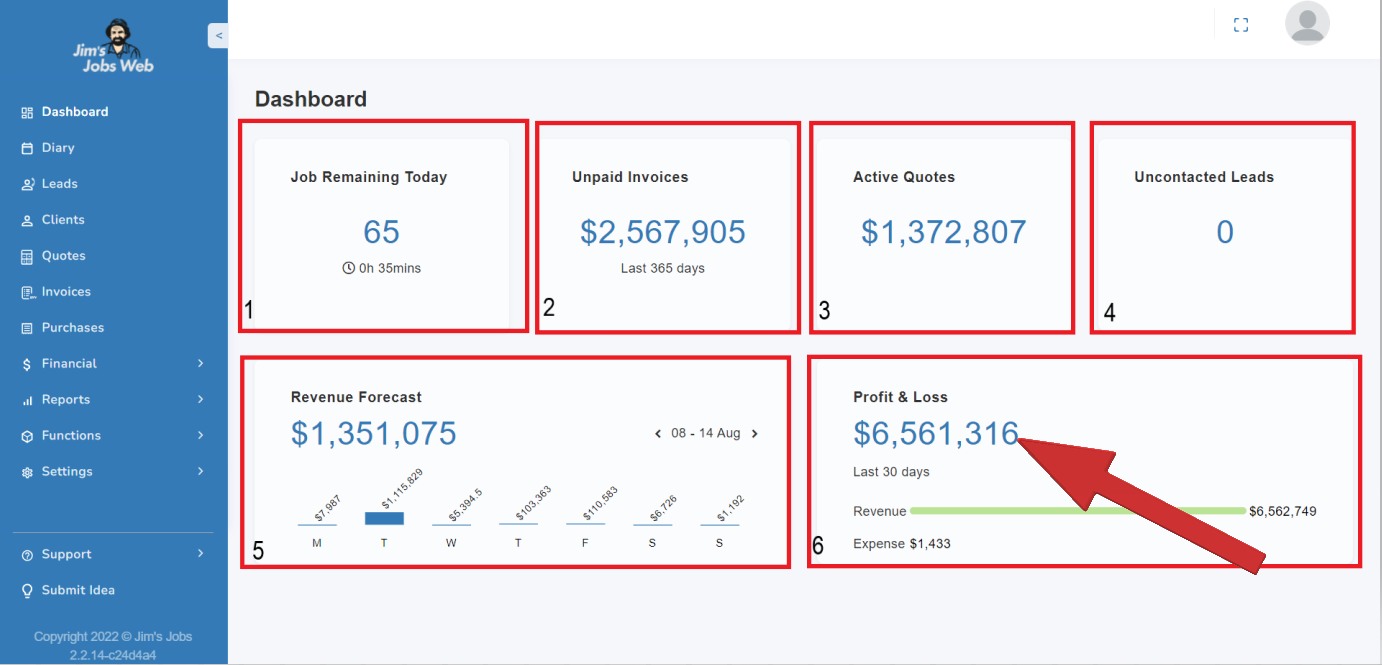
You can go through each of them by clicking on the numbers colored in blue .
3. Diary
The Diary module allows you to keep track of your daily job schedule and schedule future work for the next day, next week, or next month, as applicable. You can also record what jobs have been paid for and which ones are outstanding.
Viewing and Printing Your Daily Worksheet
The Diary screen allows you to view your worksheet on a daily basis, prepare your jobs ( quote, invoices and payments), and reschedule jobs where required. You can also print a run-sheet or daily Diary.
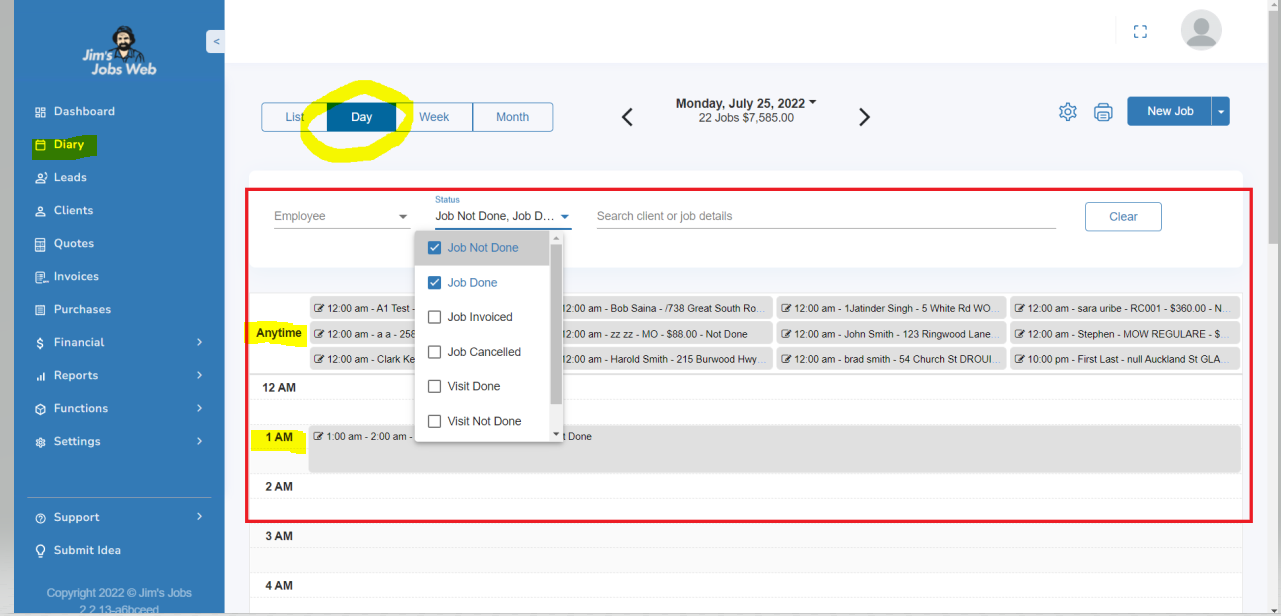
To open the Diary, click on the Diary option in the top left-hand corner of the main screen, below Dashboard. You can also select the display by the current Day, Week, or Month.
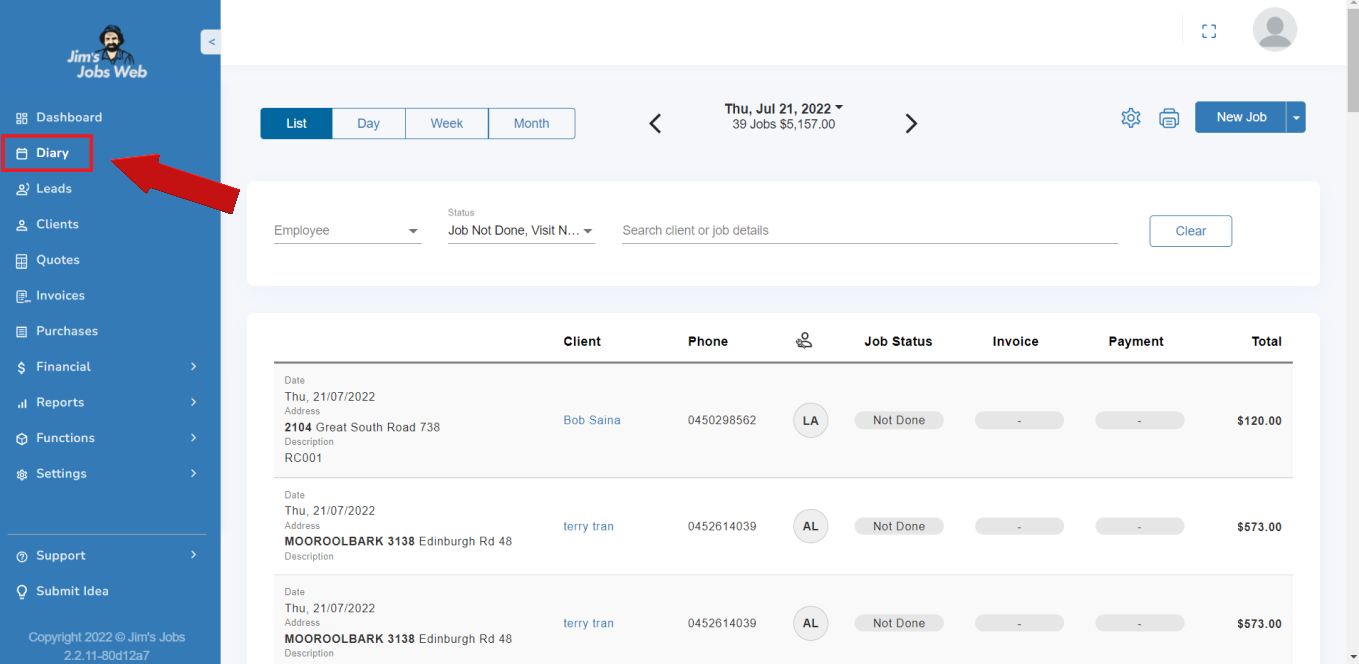
There are different ways to find jobs by:
- Employee
- job status
- Search. Type in the "Search client or job details" field.
See different boxes 1,2, and 3 below.

You can update the job status, and add invoices and payments from a client. You can also use the action buttons to invoice a job, include a payment, mark a job as done (no invoice or payment), cancel a job, or reschedule a job.
To view a specific day, other than the current date, go to the arrows from the current day, so the left arrow goes to days in the past (see red arrow) and the right arrow goes to the future (see blue arrow).
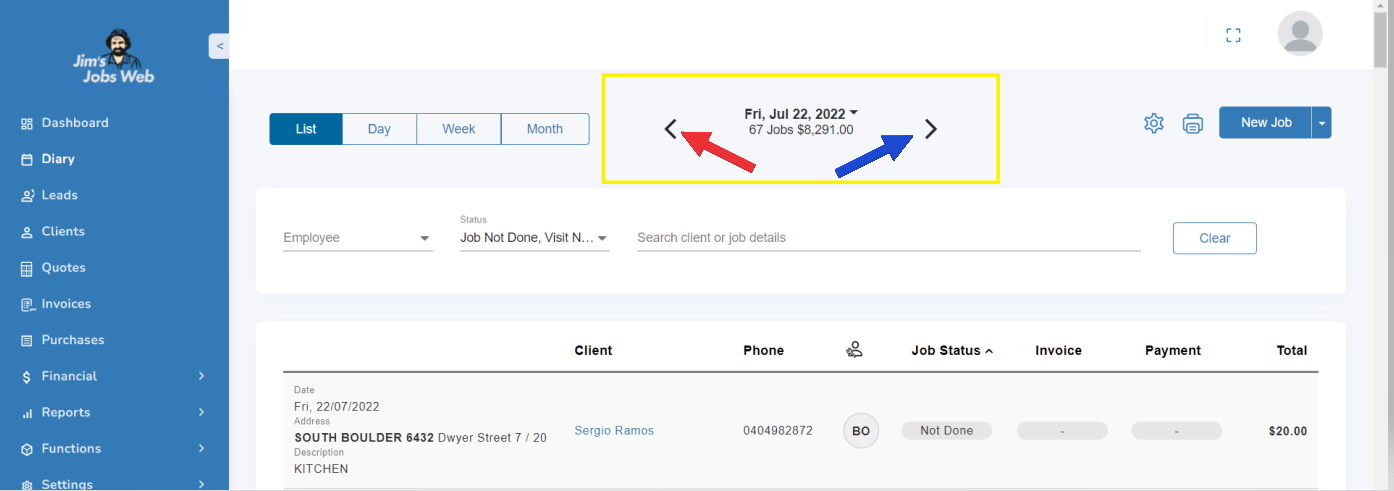
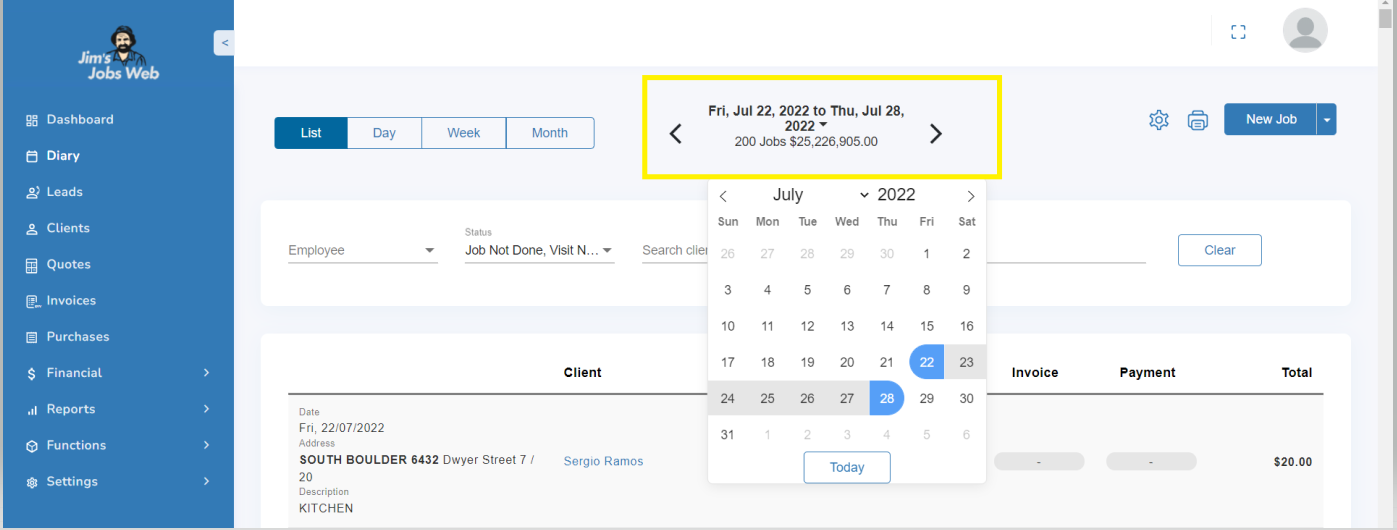
To view a date range, go to the current date that is in the middle on bold (1) and select your preferred From / To date (2). There is a popup calendar with the current month.
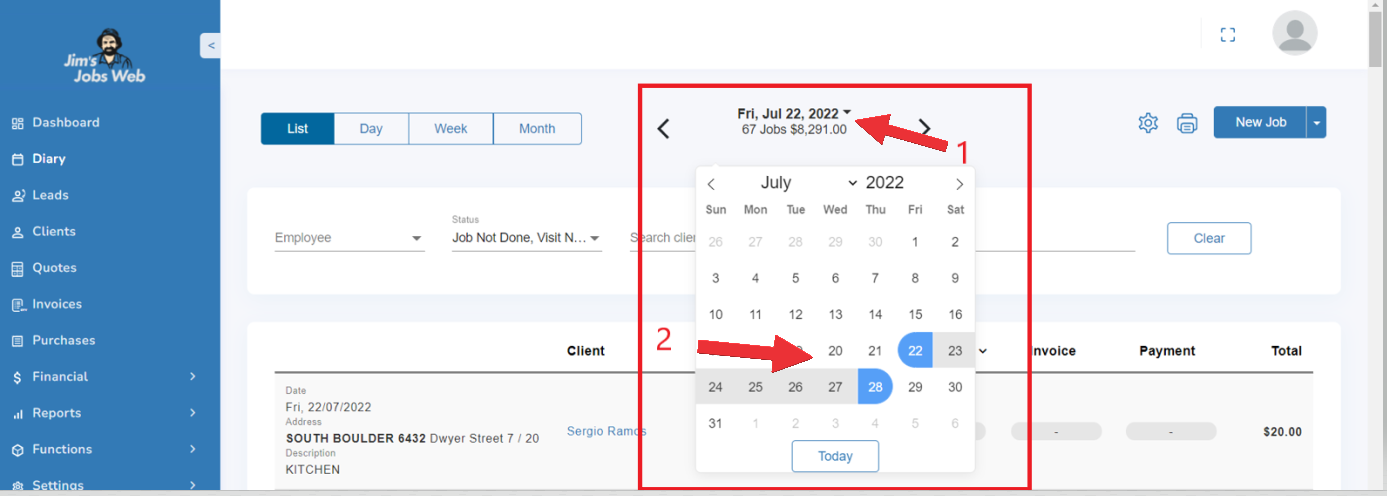
An update of the number of jobs and their value will come up on the top middle of the screen.
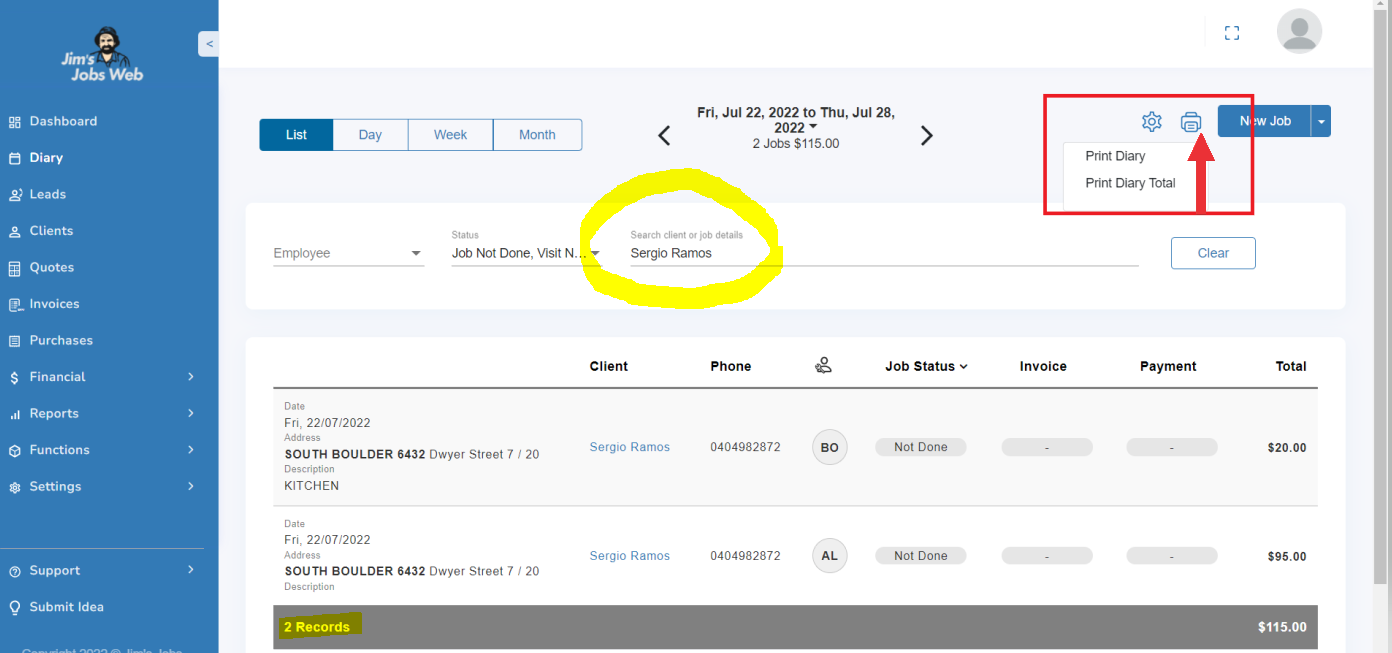
To print out your run sheet, on the top right go to the printer and you can click Print Diary or Diary total. The print-out is in a format suitable to take with you on the road and allows you to tick off jobs as they are done or to make notes for future work.
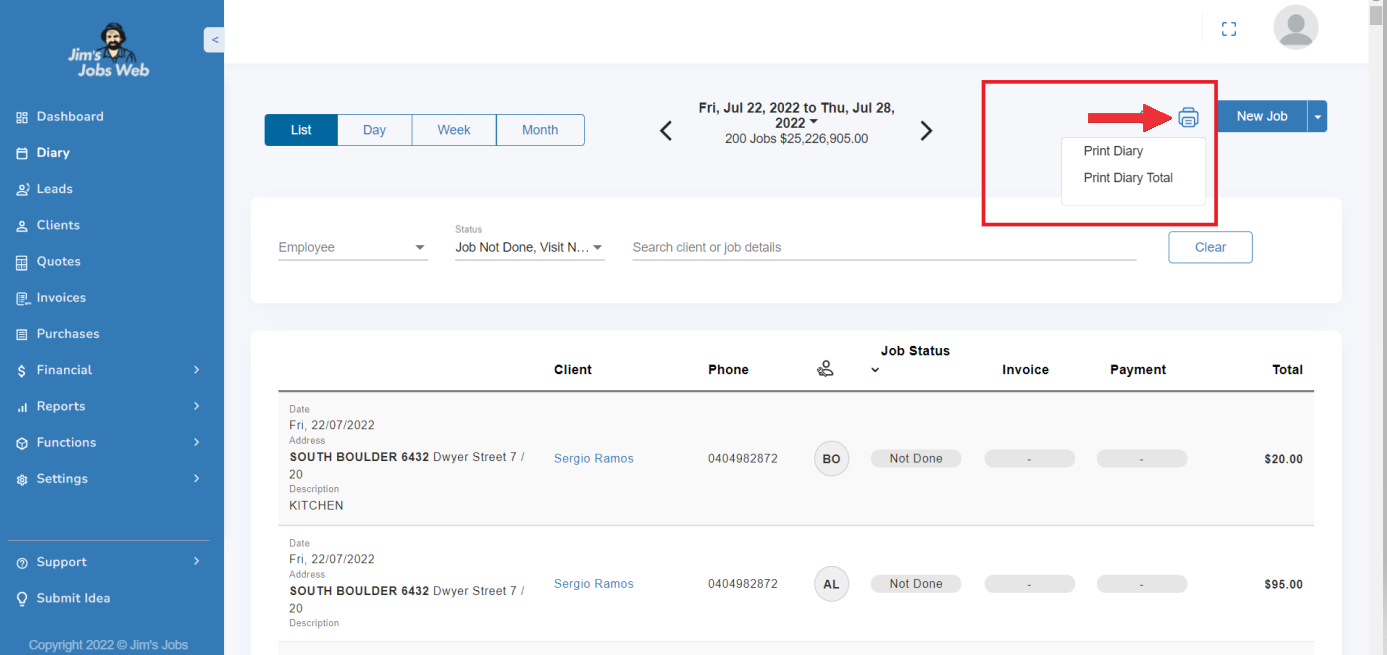
To print for a client just select the name of the employee from the selection or type their name in "search client or jobs details".
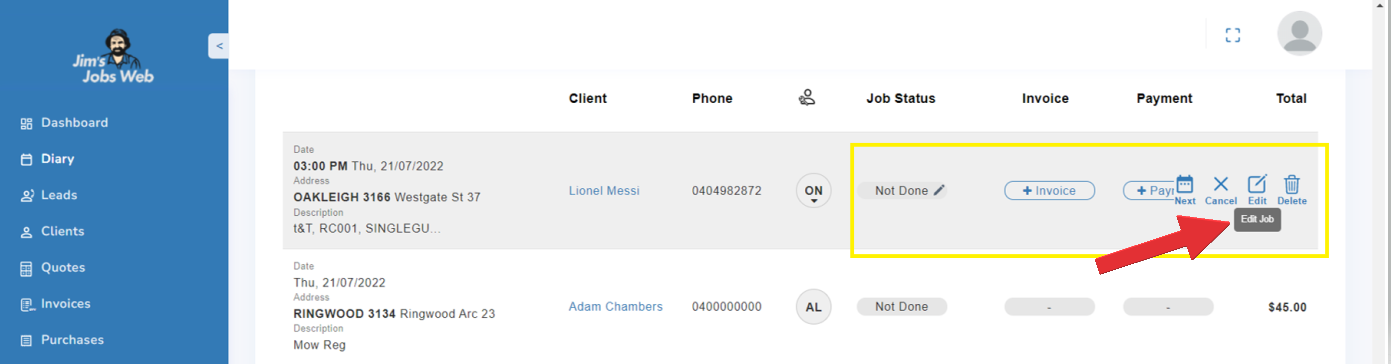
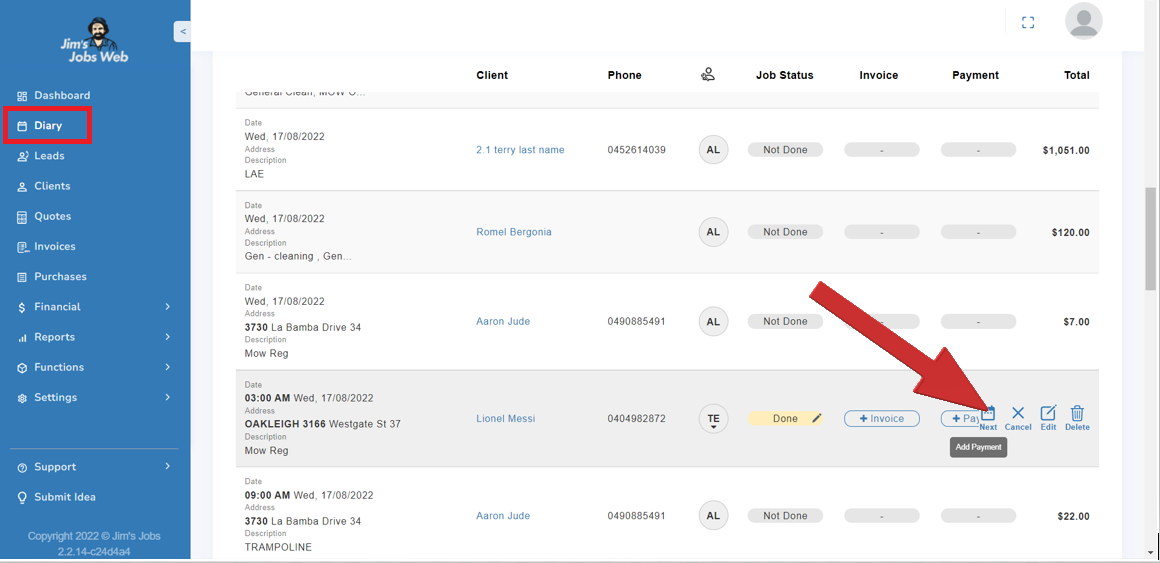
Jobs Organization At The End Of The Day
At the end of the day, you should always record what happened to each job – whether they paid you, if they didn’t pay you, or if the job was postponed/canceled or amended for whatever reason.
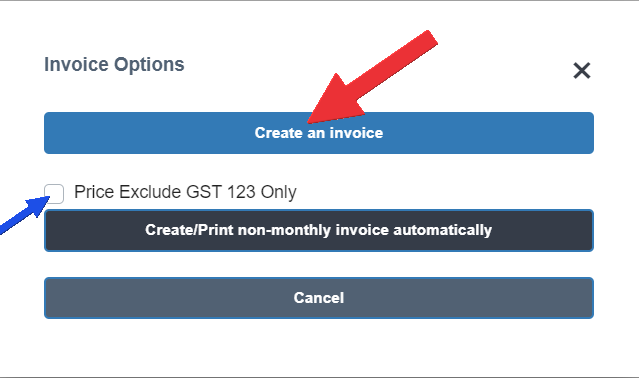
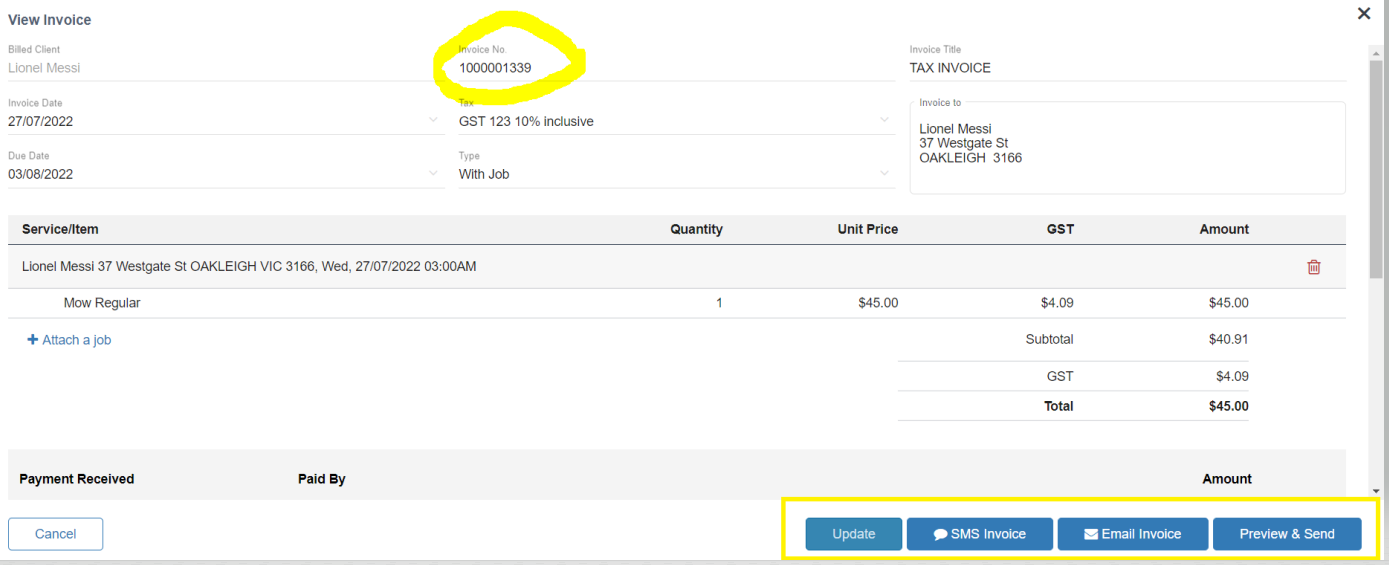
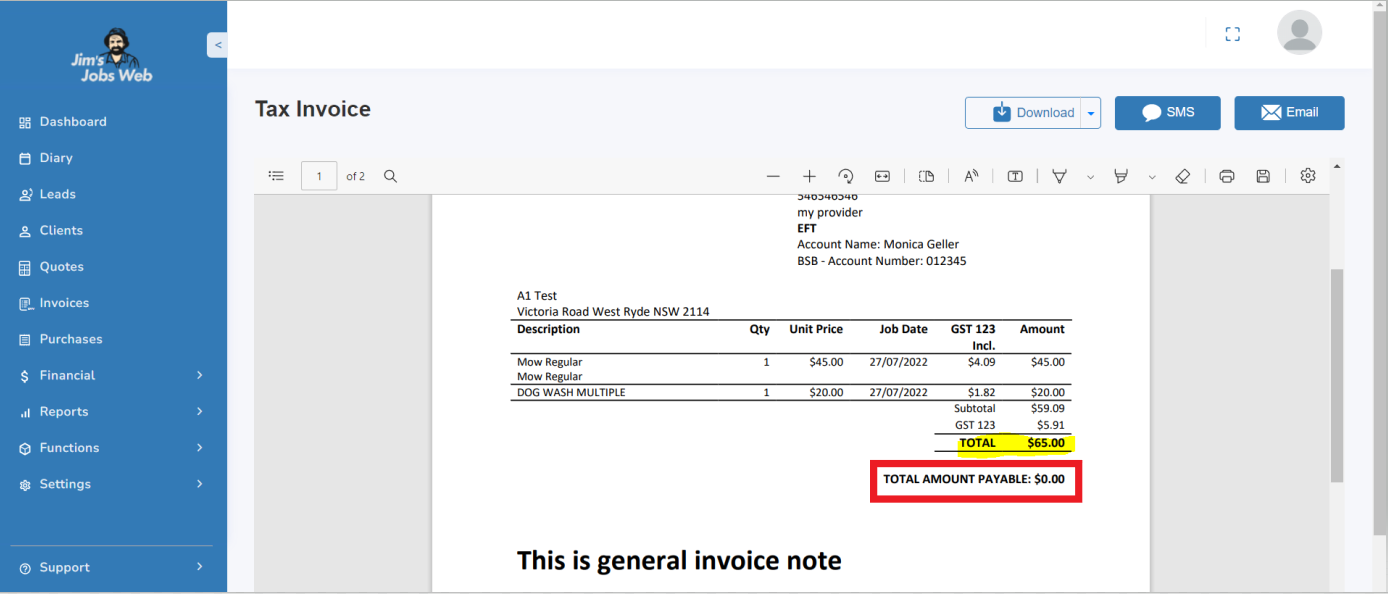
For example, invoice a Job using the + Invoice button as it is shown below.
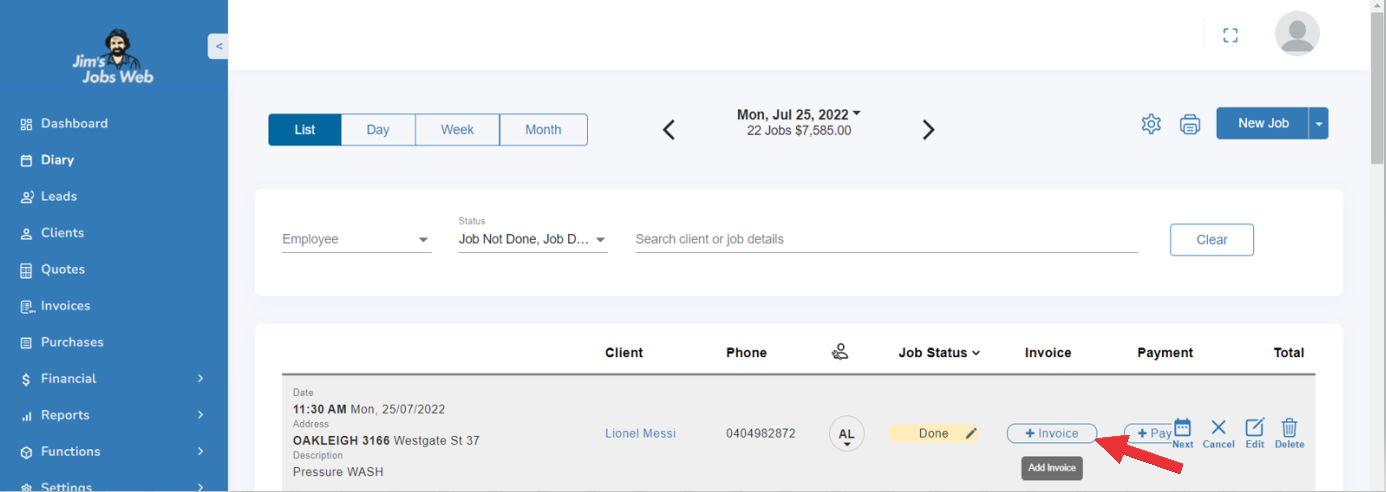
You can create the invoice and tick if it takes GST ( Tax).
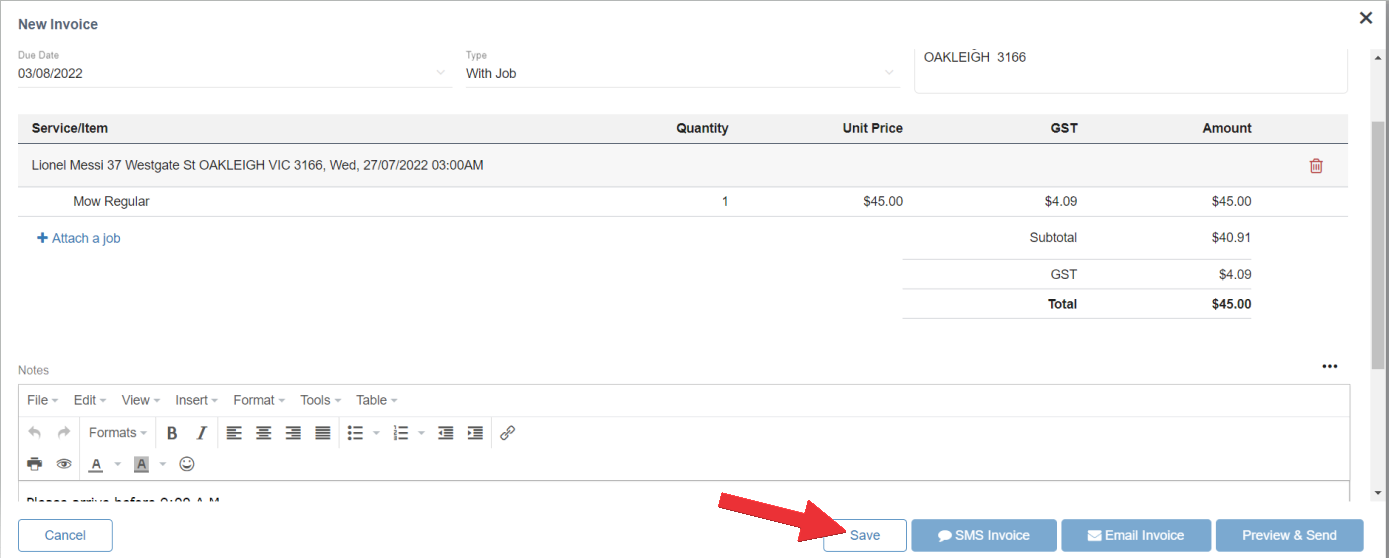
You only need to click on the save button and then the invoice is going to be generated with its number. In addition, you can update, SMS the invoice, email it or preview it and send it with their respective buttons.
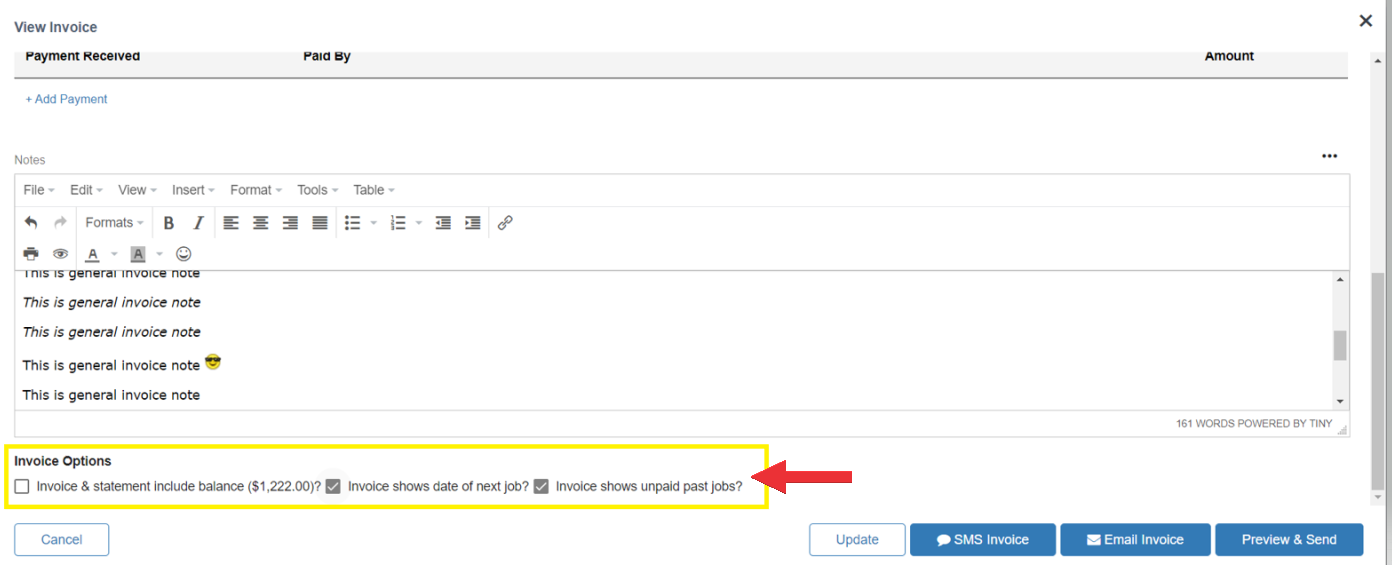
To get different invoice options you have to scroll down and find the following to tick:
- Invoice & Statement include balance
- Does the invoice show date of the next job?
- Invoice shows unpaid past jobs?
See the below screenshot inside the yellow box.
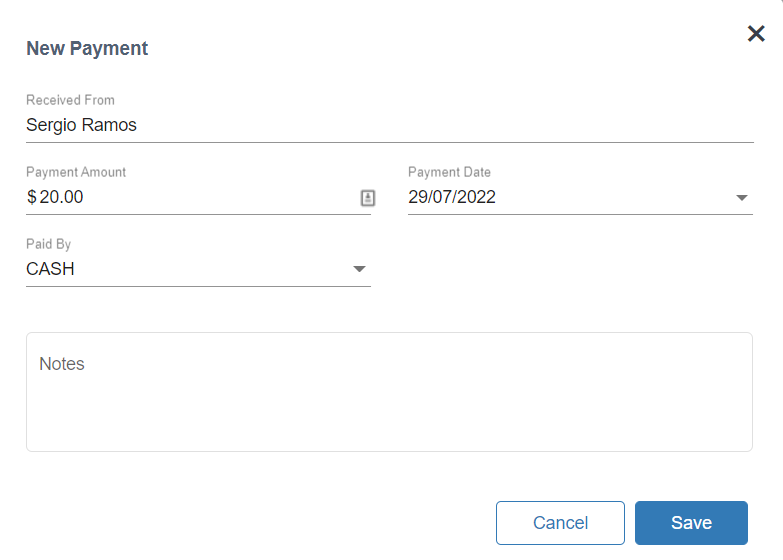
Once the invoice is created, you simply add a payment to a job.
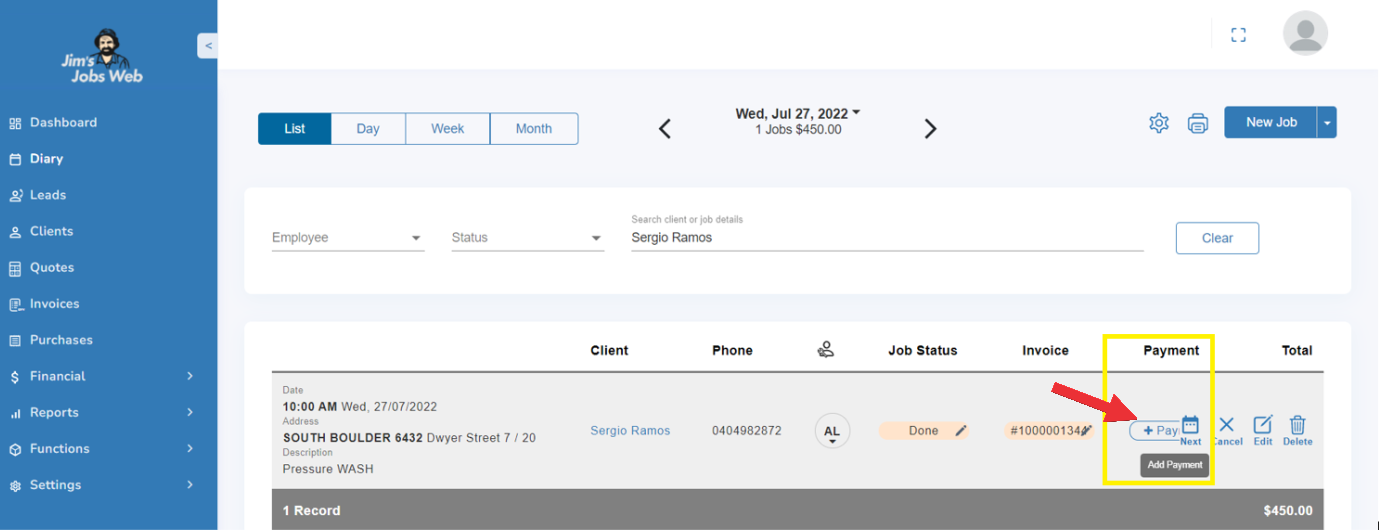
And just click on the save button.
Providing that the invoice was paid, the total amount payable is zero.
You should always record if any extra work was done or is planned to be done in the future.
To record any extra work done, or to change the job status, select the appropriate job in the diary for that client, then double-click that job in the diary or select the Edit Job  action icon.
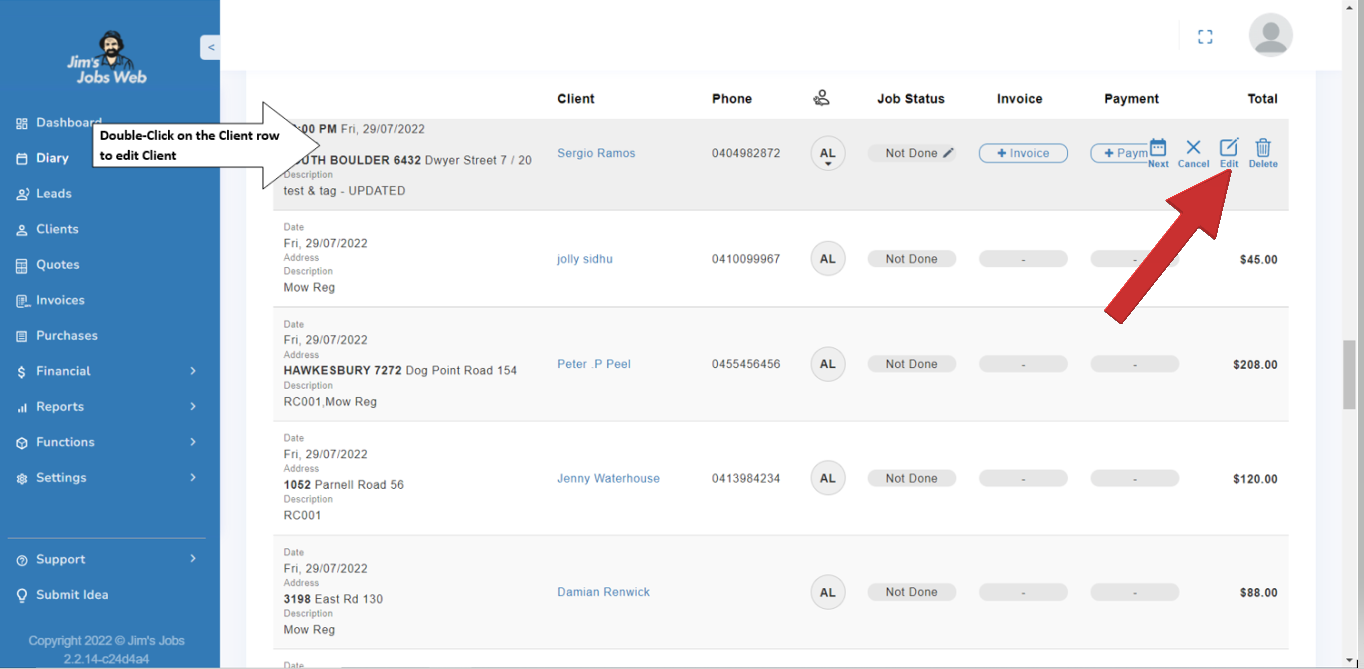
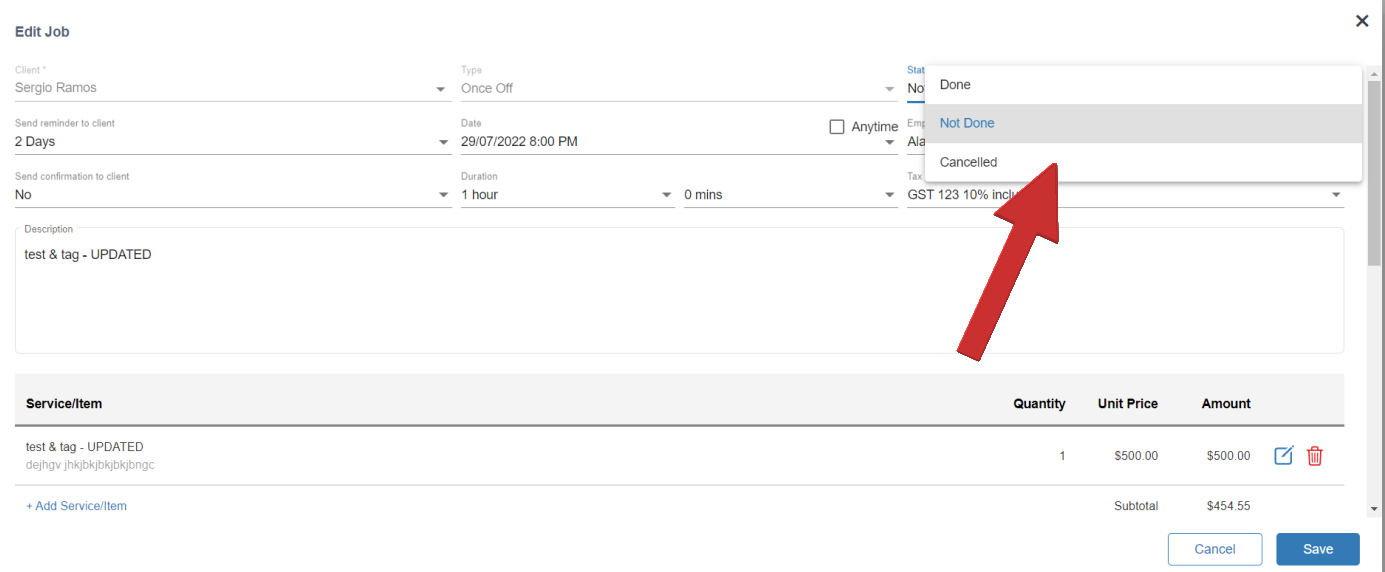
This loads the Edit Job page where you can amend the Job details.
Firstly, set the Status - was the Job Done, Not Done, or Cancelled?
Marking a job as Done, or Cancelled will move the job from the Future Jobs tab to the Past Jobs tab in the Clients view.
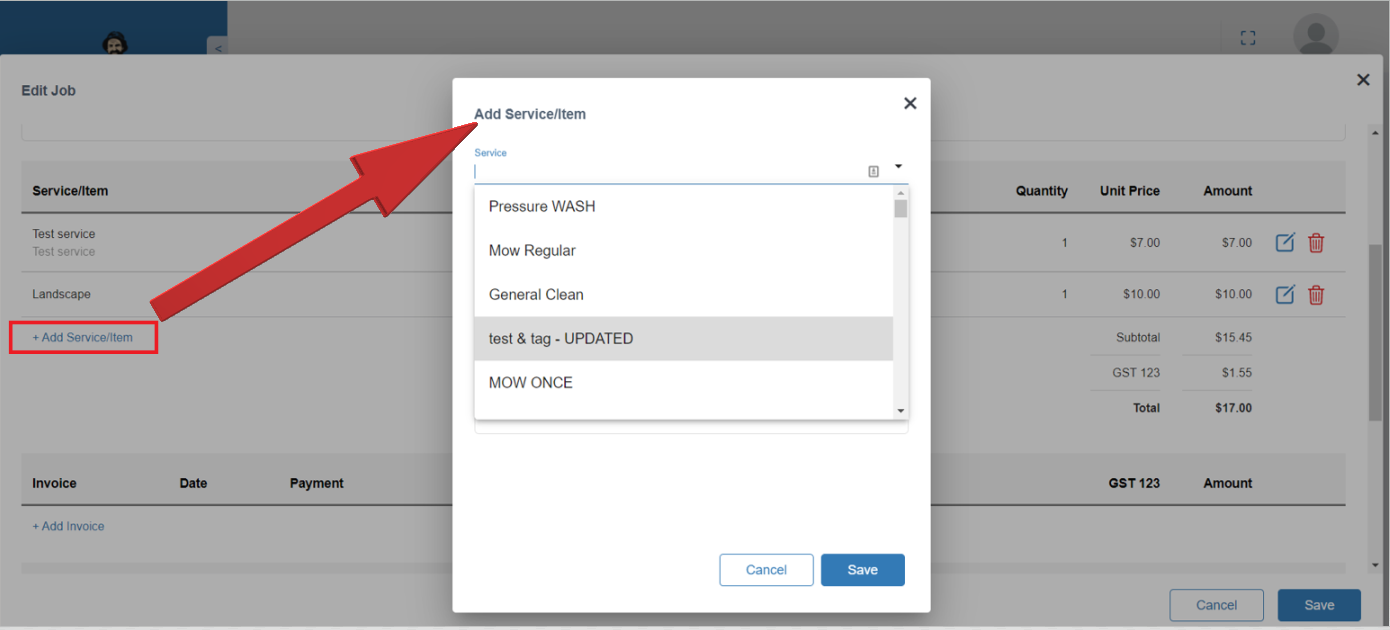
If the job was done, review the services on the job and record if any extra work was done. You can Add Service to add in additional services that were provided, and specify the price. You can do this several times if you provided multiple additional services. A pop-up message with a scroll-down bar with the different services supports this task.
You can also change any other details of the job such as price, date, or notes. You then need to specify whether the job was Paid or Uunpaid.
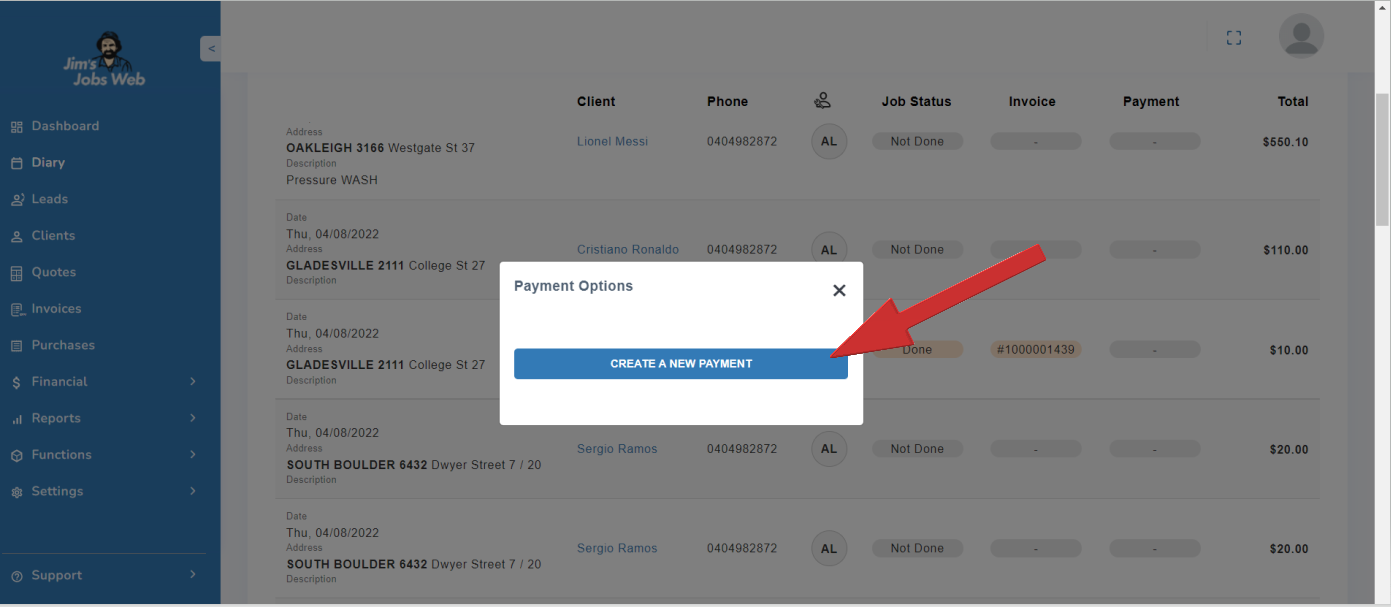
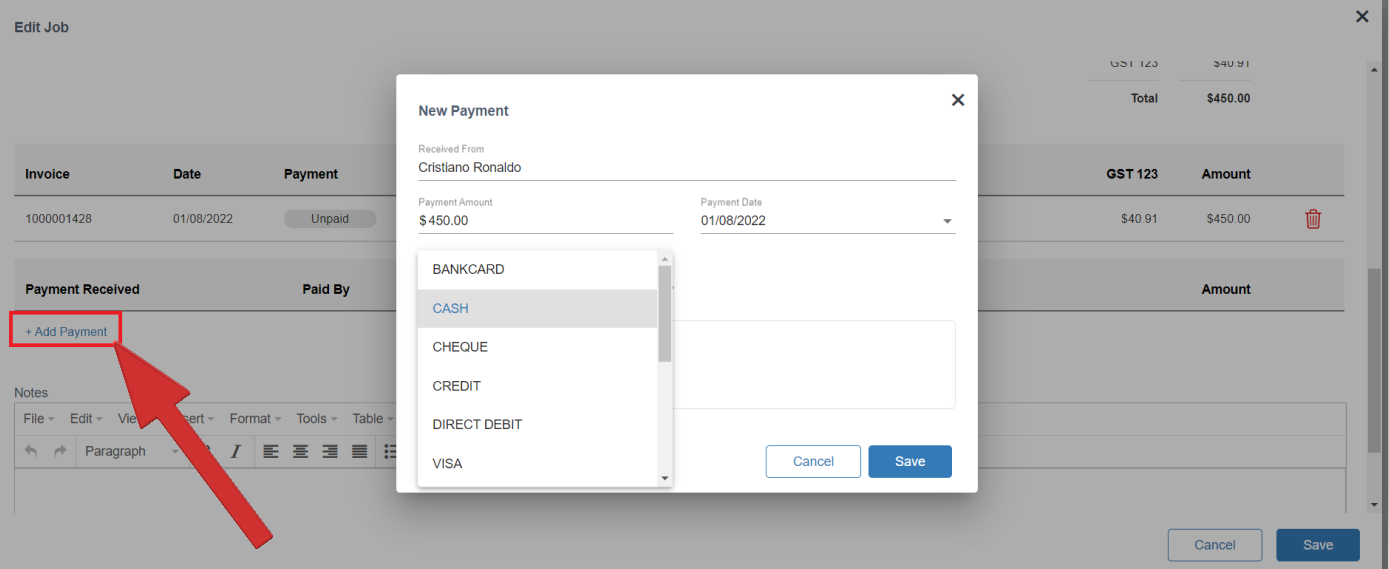
If you did a job, and the client paid you on the spot for it, click on Add Payment. This allows you to specify the details of the payment.
Select the Update button to save any changes you make.
You will still have to enter the new cheque details for cheque payments.
If the client however was not home or did not pay you on the day, when you change the job status to Job Done go straight to Update, and do not click add payment. Jim's Jobs will automatically record the amount as outstanding against the client when you date.
It’s best to record any extra work that you did before you enter payment options. This will keep the accounting clearer.
4. Leads
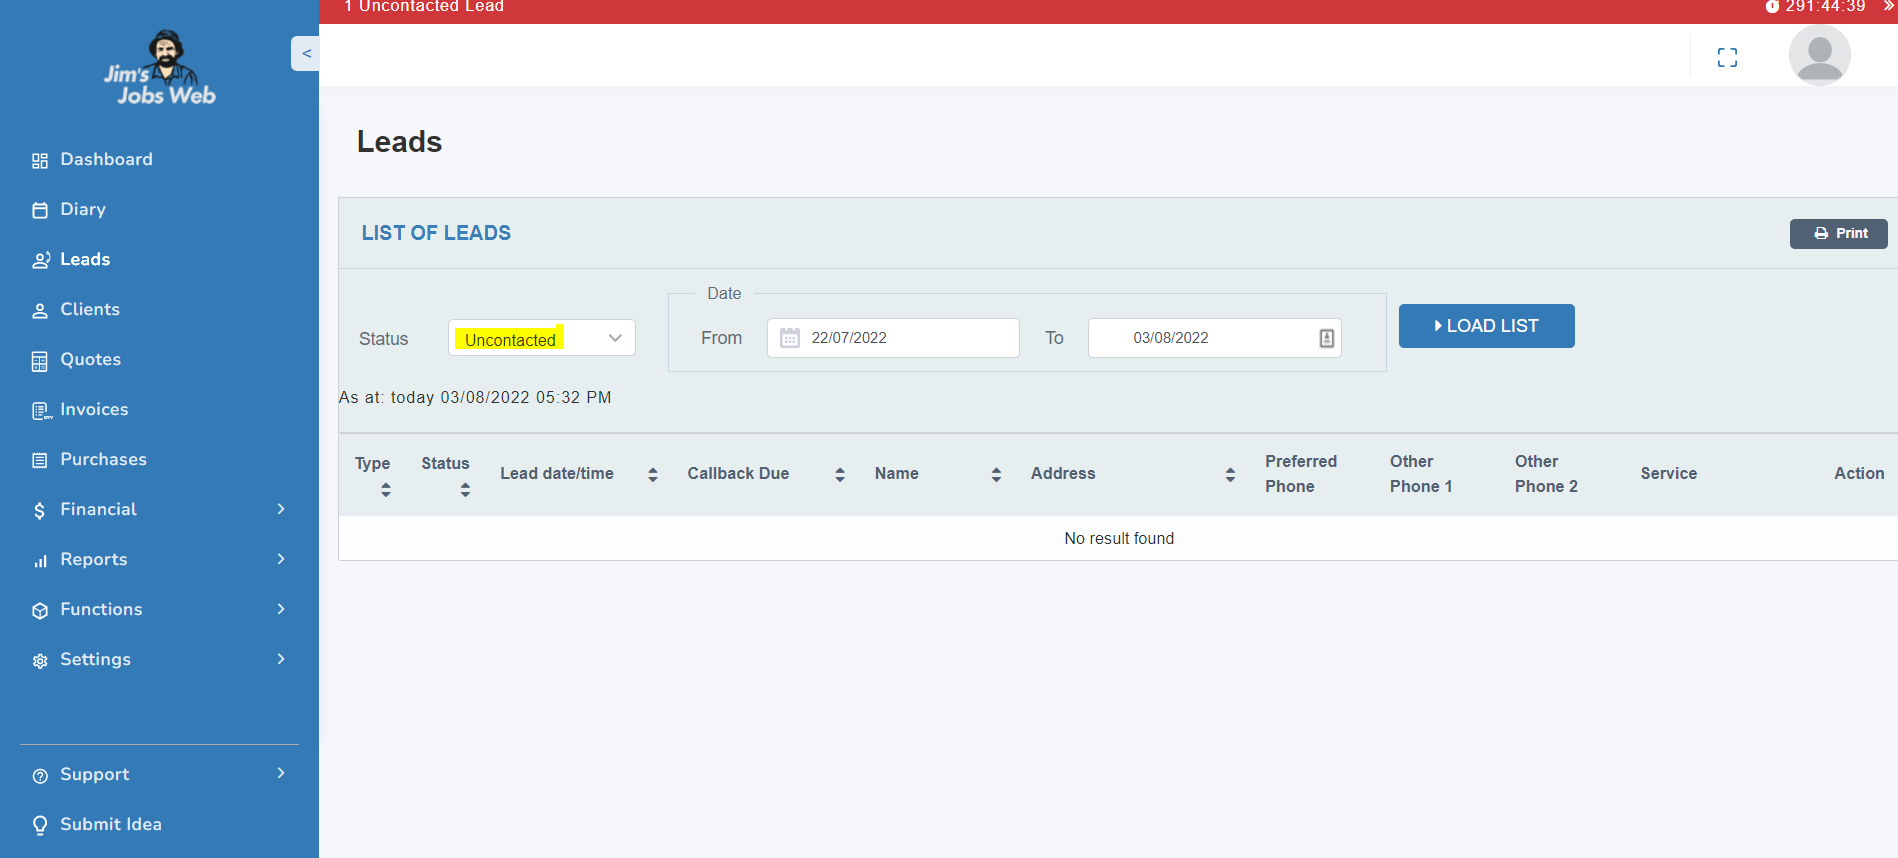
Active Leads
In the Leads module, you can see the leads you have received from Jim. You will still receive an SMS for the lead as you currently do. The only change is that it will also appear in your Jim's Jobs Web and Jim's Jobs Mobile if you are using them both.
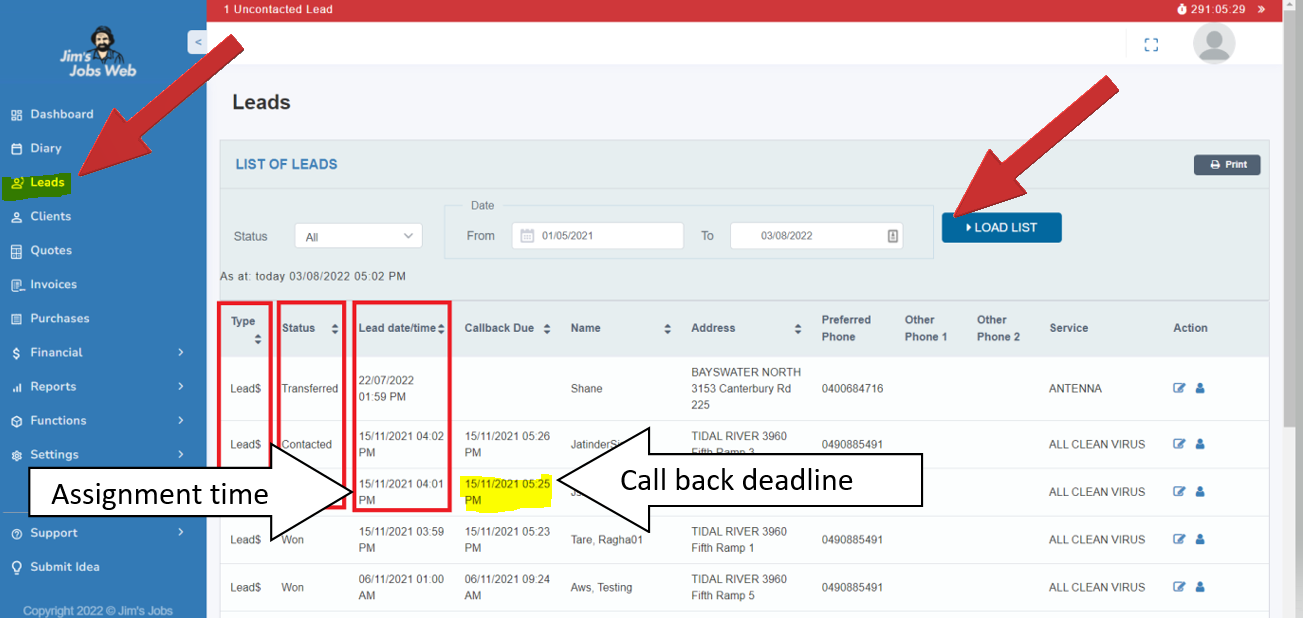
Double-click a lead to see full details of the lead.
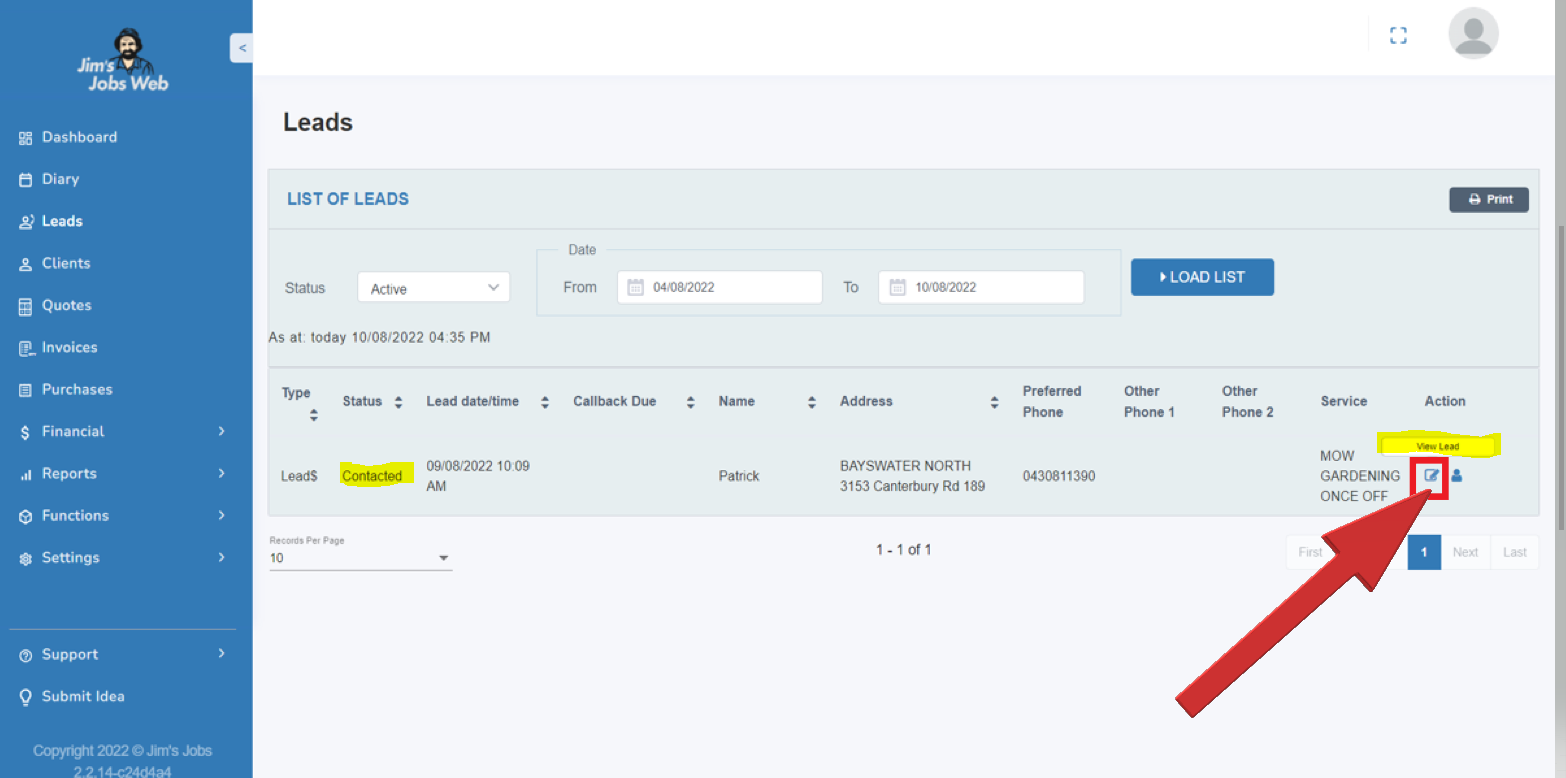
Status
When a lead first appears, it will display as status Uncontacted - which means you need to contact the lead. The callback due date/time tells you by when you should contact the lead, based on the callback time within your division.
A lead displays as an orange the color at first, but if you do not record that you have contacted the customer within the callback due date/time, the lead will display in red (to alert you about the contact being overdue).
Contacting a lead
Typically, you would call the lead from your Jim's Jobs Mobile, but if you are not using the mobile app, you can record the contact history manually.
Contact History
By clicking the Contact History button, you will be able to Add a New Contact History. Once you are satisfied you have made contact with the Client, mark the status as Contacted.
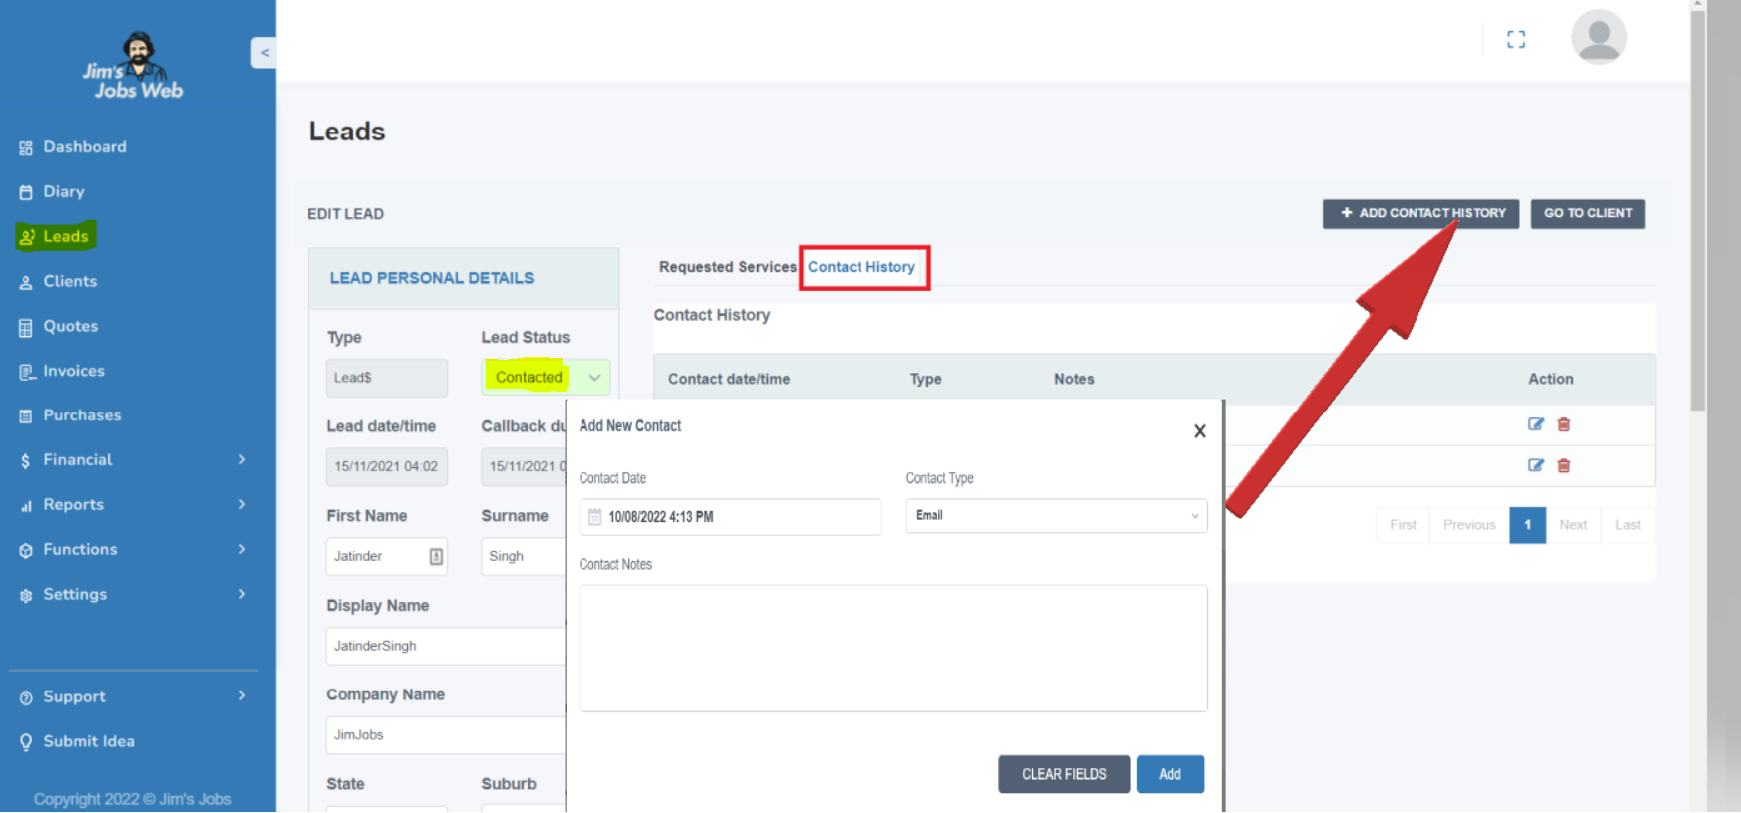
When discussing the services with the client, you may ascertain that the client is after something else or in addition to what was communicated in the lead.
You can edit the Requested Services for your lead by adding in/ editing/ deleting as required. This allows you to record these Services more accurately before you Quote or add in a Job.
Adding the lead to your Client list
Once you have contacted the lead and recorded any changes to the services they require, you can add this lead to your Client list.
This allows you to then add a Quote or a Job for this client.
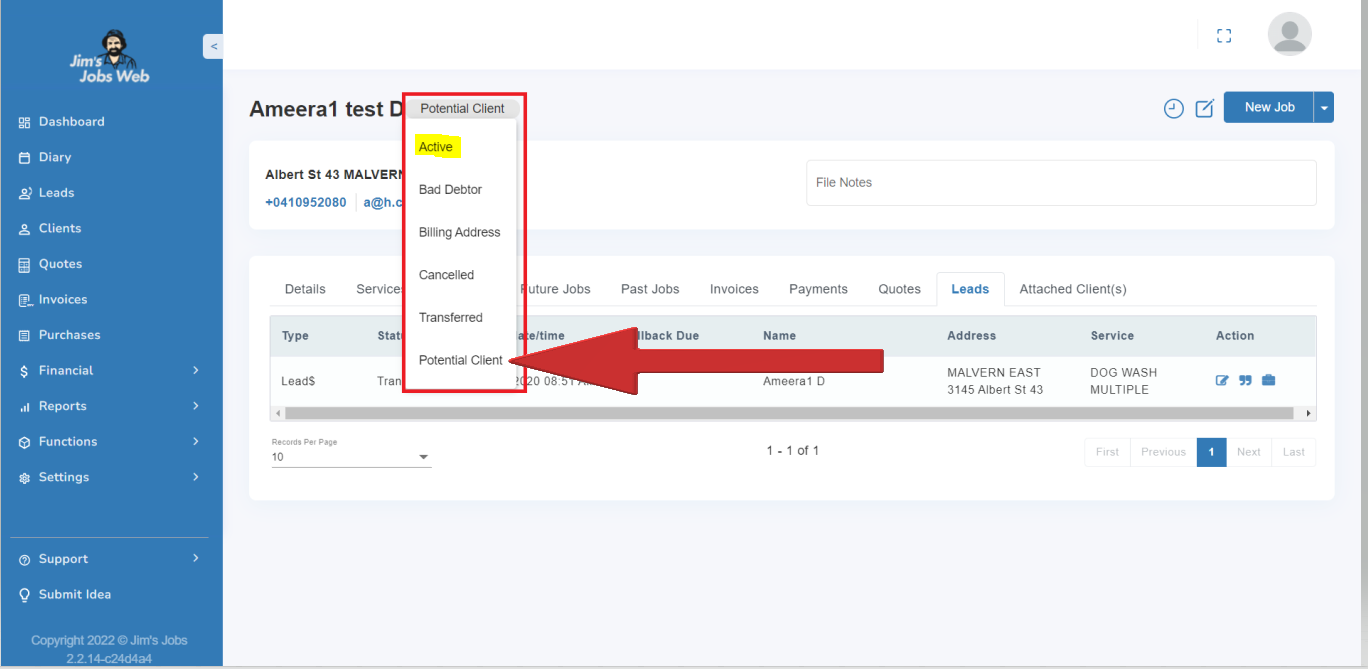
Note, the Client will be added as a "Potential Client" initially, and you can change the client status to "Active" when you are satisfied that they are an active client for you.
Lead Customer Details
Once you added a new lead to your Client List, you can edit and reach your Client’s personal and other details. You can change Client Status and under the ‘Leads’ section, it has been seen how it is assigned via Leads.
5. Clients
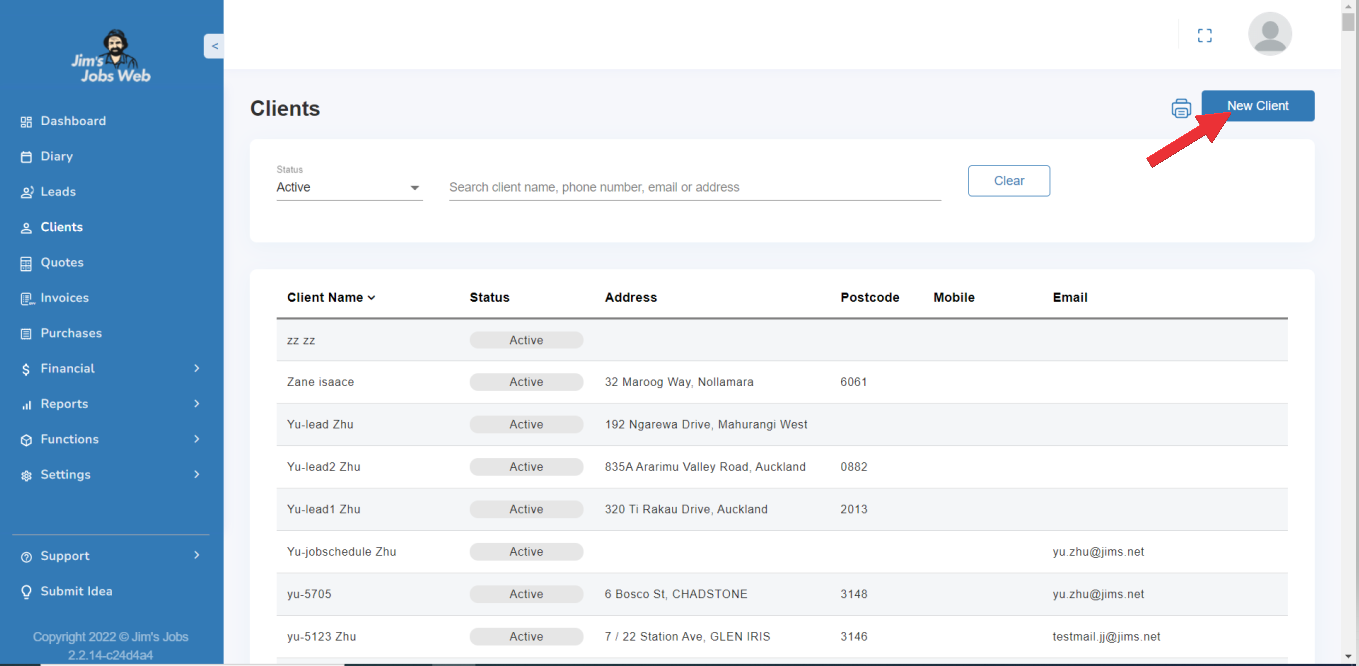
Adding New Clients (including Pickups)
To add a new client, go below under Dashboard on the left there is the Client module. Click on the client and top right you will find the New Client button
This will display a blank client screen, where you can type in the relevant personal and contact details, when you serve them, and how you want to bill them.
This functionality is described detailed further in this document.
When you add a pickup in Jim's Jobs, it will push through to Jim's Online and Xero (if applicable). There is no longer a need to enter them into Jim's Online.
Adding addresses to your clients/pickups using Google
In Jim's Jobs, you can add your client's address using Google's API if the address already exists. This means that you only enter the address on One field and Google pops up with a list of addresses while you type and if the address is on the list, you just select the specific one. Please go through the video attached using Jim's Jobs Web
Jim's Jobs and 1 more page - Work - Microsoft Edge 2023-04-19 12-12-05.mp4
If you prefer using Jim's Jobs Mobile, on your phone, the same feature is available. Please go through the video below attached.
Adding addresses to your clients/pickups manually
If your client's address does not exist in Google, then you can add manually his/her address field by field. You need to make sure you filled out the following fields:
- State/Country
- Suburb
- Postcode
- Street
- Street No
- Unit No ( If applies)
When you use Jim's Jobs Web, there is a dropdown menu when you click on " Enter Manually", please see the video below.
If you prefer using Jim's Jobs Mobil on your phone, please go through the below video.
Finding Existing Clients
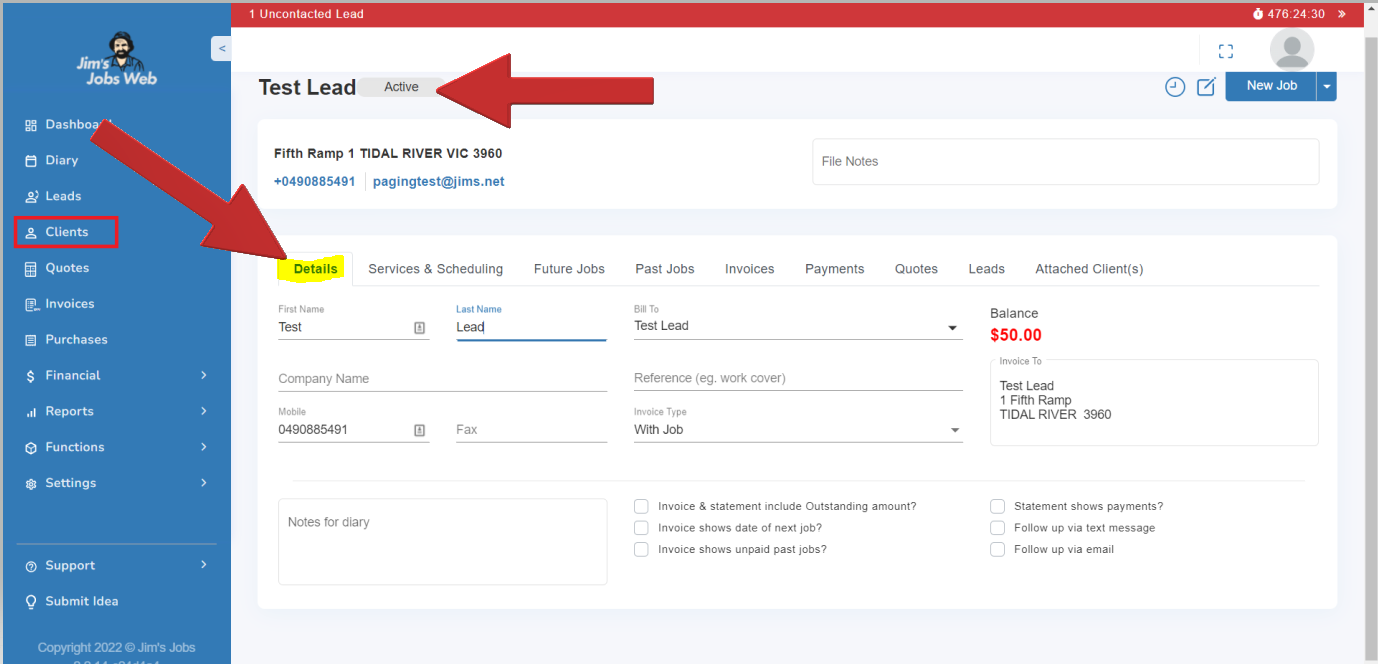
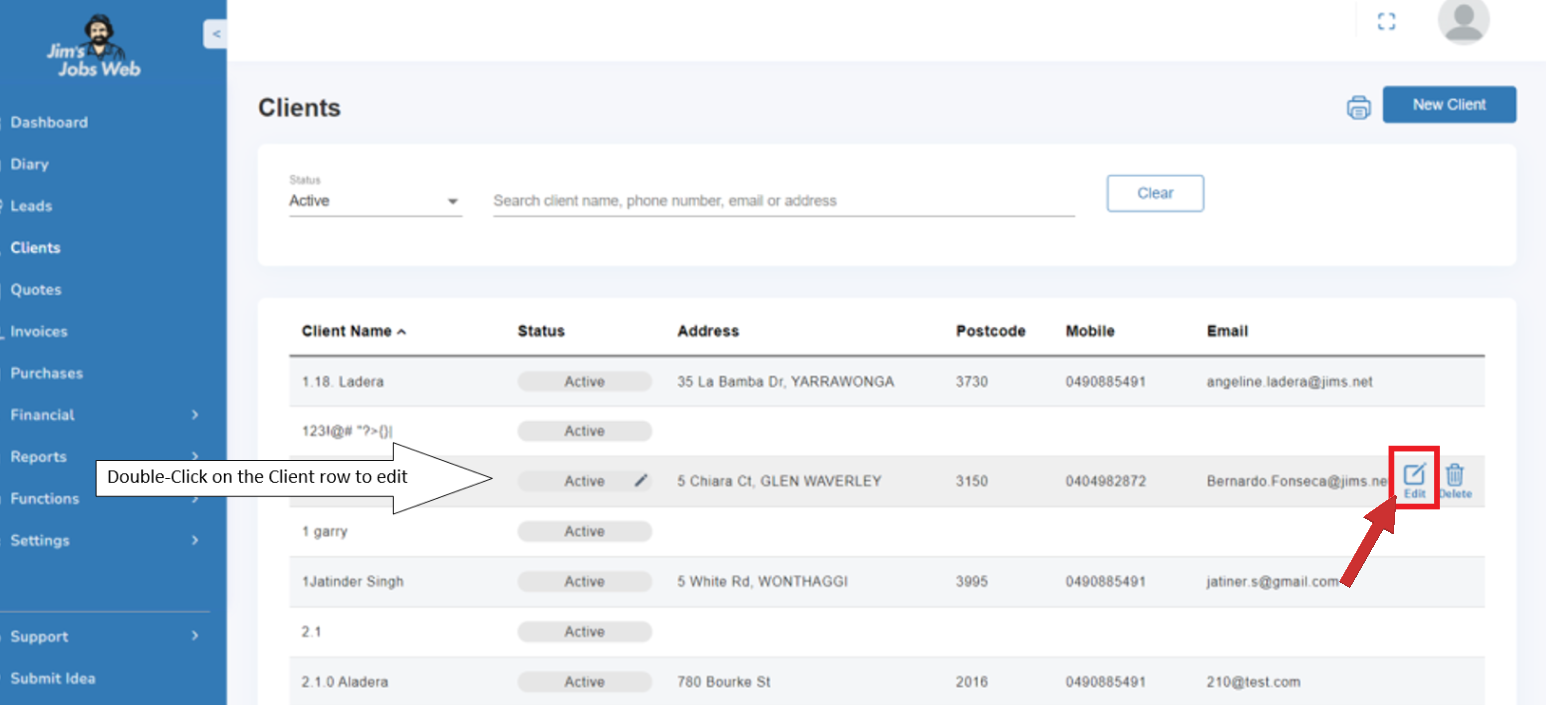
If you wish to view or edit an existing client, first click on the Clients module. This will bring up the main screen which will display all the clients you have previously entered and saved.
By default, Active clients are displayed. You can change the filter to display other client filters
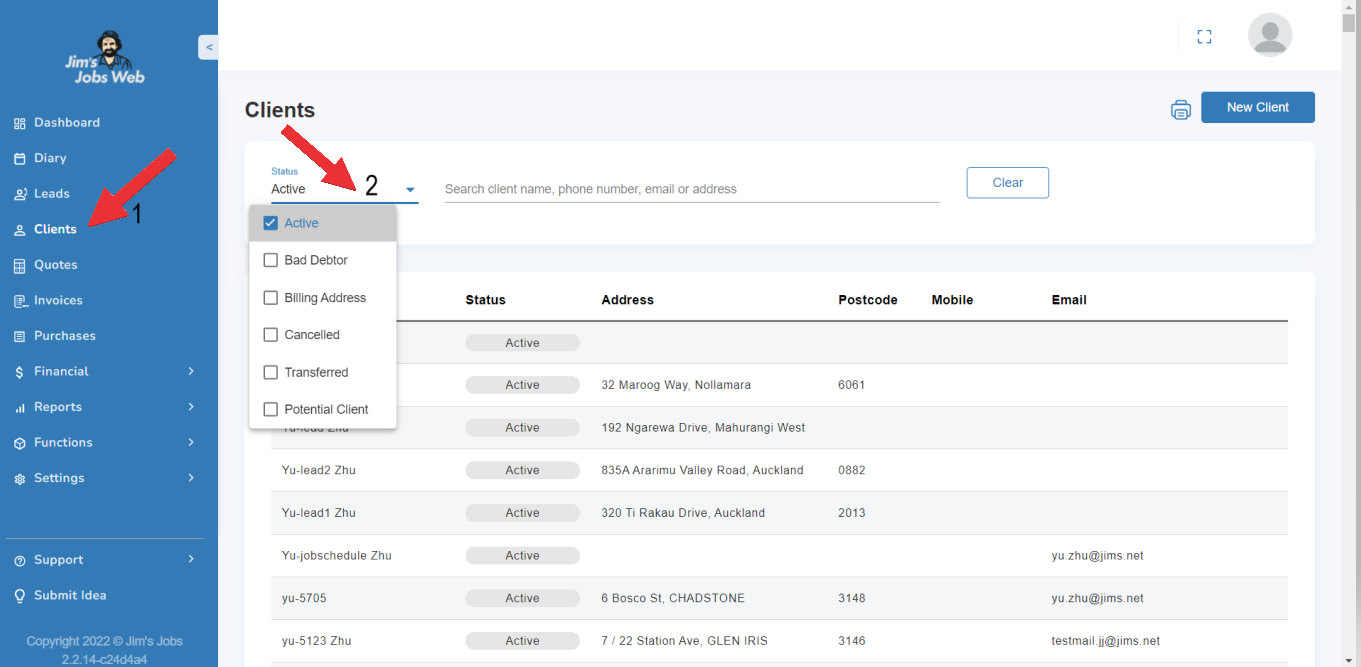
To search for a client, select the type of client you are looking for with the Select Clients Status to list filter. You can select by Active client, Bad debtor, Billing address, Cancelled client, Transferred client, and Potential Clients (clients you are not servicing yet) or All clients (if you are not sure what the client status is).
Search using your browser
You can sort your client list by clicking the arrow 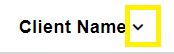 next to the Client Name field to sort ascending or descending alphanumeric order.
If you want to locate a client within the list you have filtered, make sure you have set the Records Per Page to ALL. You can then use your browser to search Control-F function to find the client in your list by any data visible (e.g. Client name, address, telephone number)
For example, if I was looking for my client called Lionel Messi, I would use Control-F in my browser to search for those keywords and the browser will highlight where they are found in my client list (in any field):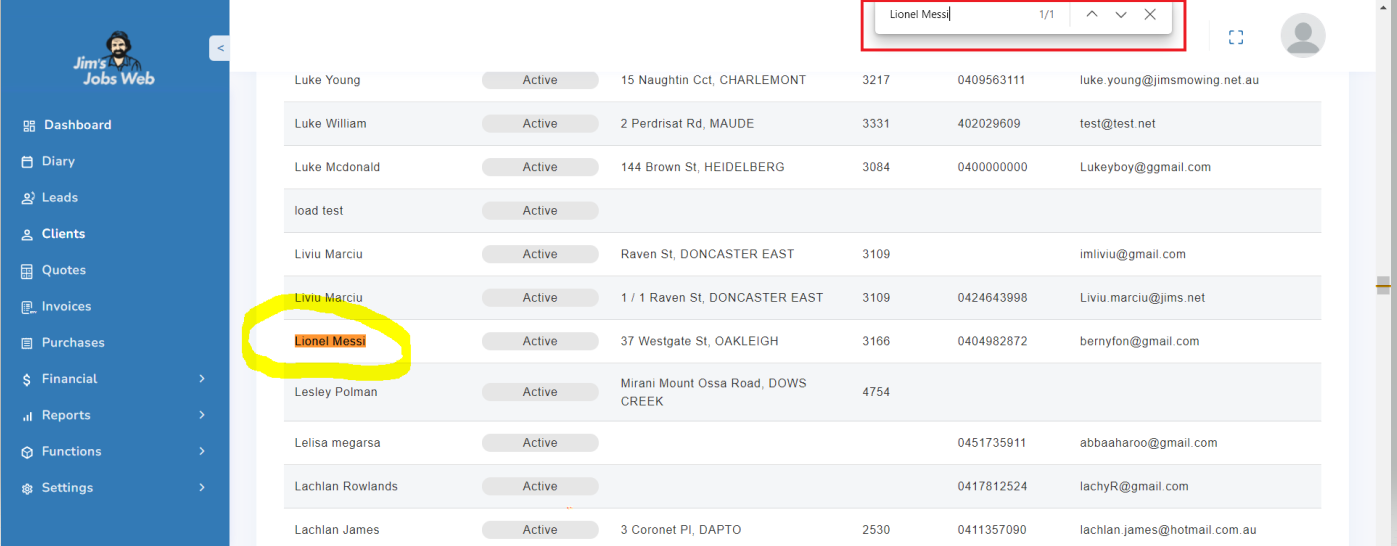
Search using the on-screen search function.
You can search for a client using one of the available search fields:
- Client name
- Phone number
- Email,
- Address

Client Details
Note: By default, when emailing a quote or invoice, the “To” field shows what is entered as the client's Display Name under the client's details page. By default, it’s the client’s name but you can change it to whatever you like.
To view a client's details, double-click on the client (anywhere on the row), or click the Edit Client action button.
The Client details area contains the client’s status and current contact information, and an area for general notes about the client. Once you enter First Name and Surname, Display Name auto-populates.
Use your scrollbar or mouse scroll to see the Diary notes(will be displayed on the Diary printout) and File notes(will be displayed in Client details) below the Email/Fax field.
You can edit any of the client details, including the Client Status:
| Status | Meaning |
|---|---|
| Active | This means you’re doing work for them. Most of your clients will be active. (Whether they are regular or casual is specified under Services and Scheduling - section 2.4) |
| Bad debtor | This client isn’t paying their bills, and you likely don’t want to schedule any more jobs for them. |
| Canceled | You have serviced the client in the past, but they’ve since canceled the service. These clients don’t normally appear on your client's list – if you want to access them go to the Clients screen and select client status Cancelled. Once the client is canceled, all the clients' NOT DONE jobs will be deleted. |
Billing address | This client may be a corporate client or a private rental property owner, where you service several addresses but just bill the one address. Or, it may be in the system because you send an account to a different address to your service address (ie. PO boxes, etc). |
| Transferred | The client is now being serviced by another operator. Once the client is transferred, all the clients' NOT DONE jobs will be deleted. |
| Potential client | The potential client is a lead contacted |
By typing the address, note that this information is validated to ensure that the Address conforms to a valid address in FMS.
Otherwise, for adding a pickup to FMS (Jim’s Online), please use Enter Manually to add a valid address. For this reason, you will need to enter the details in sequence:
- State - select from the dropdown.
- Suburb - you can start typing in the first three letters of the Suburb you are looking for, and then select from the dropdown list that will be populated with options matching your data entry.
Suburbs are validated against the State that has been selected, to ensure that the address will have a valid State/Suburb combination. - Postcode - this is displayed on the screen based on the Suburb you have selected and is not editable. This is to ensure that valid Postcodes are kept in Jim's Jobs, based on State/Suburb entry.
- Street name - as per the Suburb, you can start typing in the first three letters of the street name you are looking for, and then select it from the dropdown list. Only valid Street names for the State/Suburb combination will be available for data entry.
- Street no - enter the street number (this is a required field).
- Unit no - enter the unit number or leave it blank if not required.
To Save any changes you have made to Client details, use the Save button on the blue button.
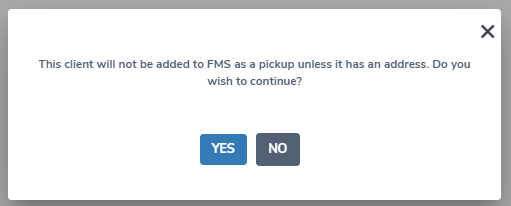
By adding in a client in Jim's Jobs, you will automatically save this client back to FMS, so that any new leads for this client should not trigger a lead fee.
Very important: a client will only be saved back in FMS if it has a valid address.
If you choose to not add in an address for a client, you will be warned that this client will not be saved to FMS.
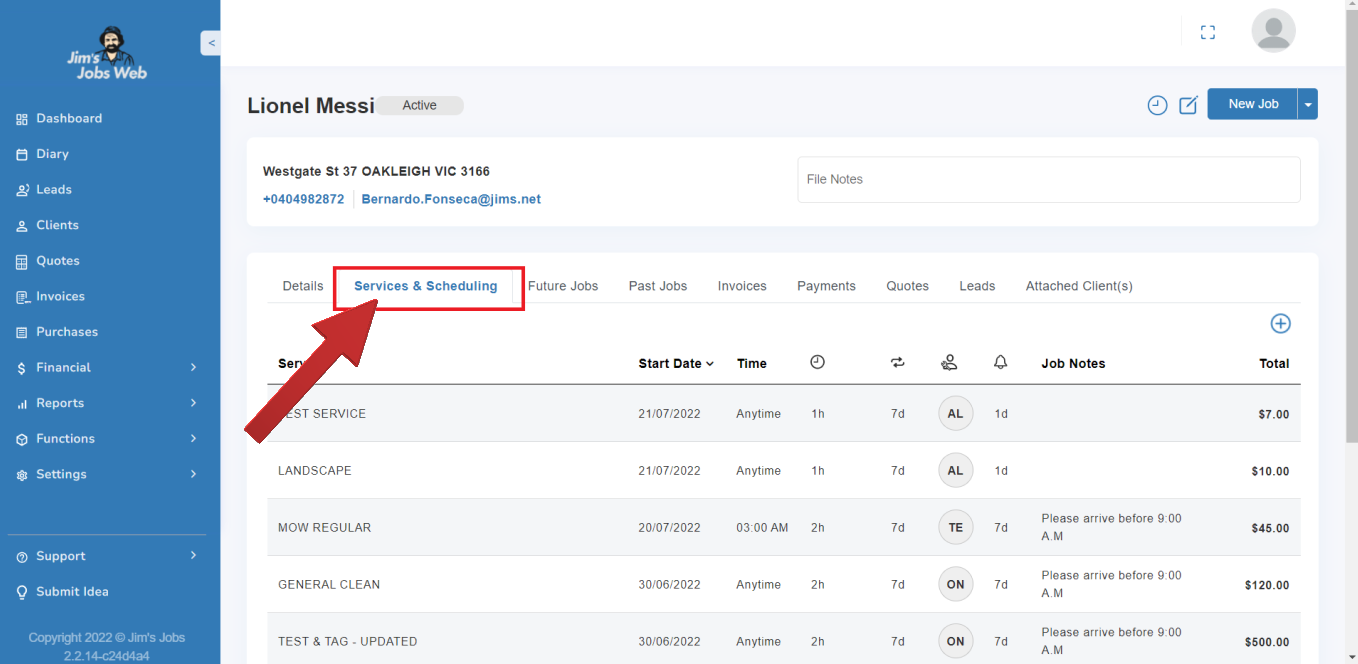
Services and Scheduling
Information about a client’s schedule, servicing, regularity, and pricing is accessed through the Clients screen under the Services and Scheduling tab.

You can specify which service(s) you are providing to a specific client, how much you normally charge them, and how frequently you will be doing those services for them.
Services
When selecting the service you wish to schedule, the list of services is displayed in two sections:
- Custom Services
These services are ones that you have entered in yourself, in addition to the Standard Services provided by Jim's Group. - Standard Services
These services are provided to you from Jim's Group as the standard services in your Division.
Some of these services are ones for which you will receive Leads, as these services are assigned to you in FMS.
Add Regular Service, casual, or quote only
If the client has requested service should be done regularly (e.g. once a week), select Regular as the job type on the service. You can then specify the date of the first job (Start date), and also how frequently they want the job done.
A new feature is the ability to specify an End date. This is defaulted to the number of days to auto schedule ahead (in your Setup | Miscellaneous settings page).
For example, if you have set 60 days to auto schedule ahead in your diary, the End date will be set to 60 days after the Start date by default. You can change this to be any date on or after the Start date.
This allows you to set, for example, the date to the end of a season, if your service is seasonally set.

Add Casual Service
If you’re not going to service the client regularly, you can specify the job type as Casual instead. To add in a once-off job, specify the date of the job only (i.e. there is no need for a frequency setting).
Main Service
By default, the first service you add in for a Client is the main service.
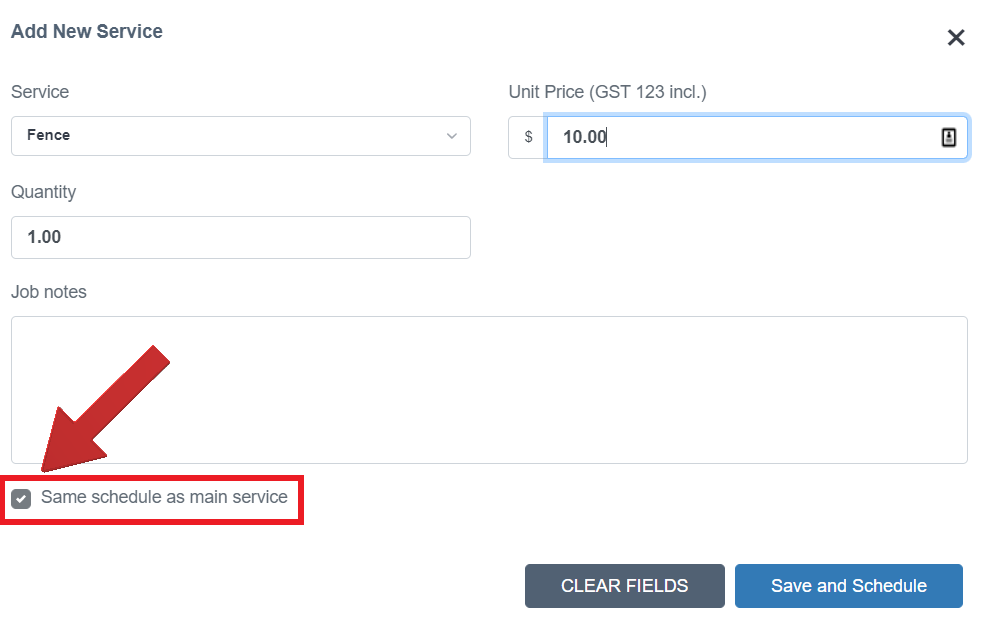
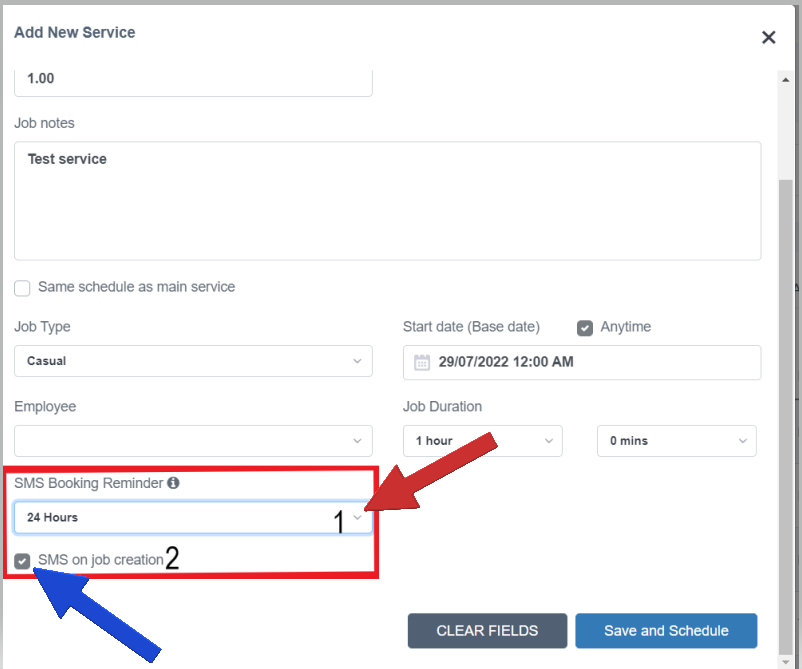
Adding a Service that is to be done at the same frequency as the main service
Occasionally, the client may have requested several services to be done. If so, click the button "+ Add New Service". You can then enter the details of the extra service. Usually, this other service will be done at the same time as the first one and will have the same schedule as the first service selected.
Tick box the same schedule as the main service to schedule these two services on the same days in your diary.
Booking Confirmation and Reminder SMS
Scheduling the Services
To schedule the services for a Client, click the Create Schedule Based Services button. Jim's Jobs will provide a confirmation message when the jobs have been scheduled.
You can check that Jobs are scheduled correctly by looking at the Future Jobs tab.
Details
You can specify how you want to bill the client, by going to the Details tab of a Client. This area contains information about who you want to address the billing invoice to, how much money the client owes you, as well as information for work-cover clients.
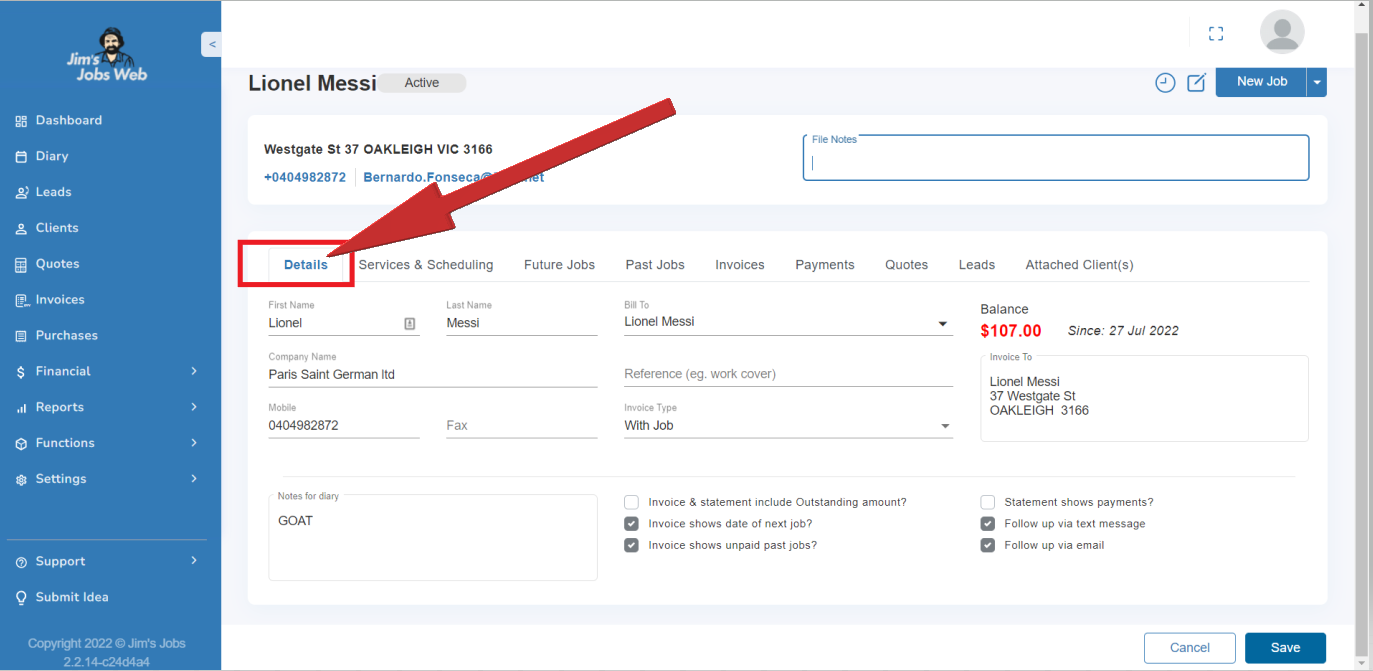
Most of the time, you will give the billing invoice to the same person you are servicing, and thus you will want to specify Bill's same address. Invoices generated will be addressed to that address.
You can choose to bill on a "with job" basis (that is one invoice for each job you do), or, you can bill on a monthly basis (one invoice per month, with all the services on the same invoice.)
Sometimes, however, you will be servicing one address, but billing a different address. If this is the case, you can select Bill's existing address or Bill a new address.
(If you already have the billing address recorded in the system somewhere, you can select Bill as an existing address. Then you can select the address you want to bill by selecting the appropriate client in the drop-down box. If you have never entered it previously, select Bill a new address instead and you will be able to enter the details of the new billing address).
Note:
- For work cover clients, specify the work cover company’s address as the address to the bill, and then you can enter the claim number of the client underneath. This number will be printed on the invoices.
- If there were invoices imported that have been created for payment records without any invoice. They will get -1 as the invoice number so you can distinguish them.
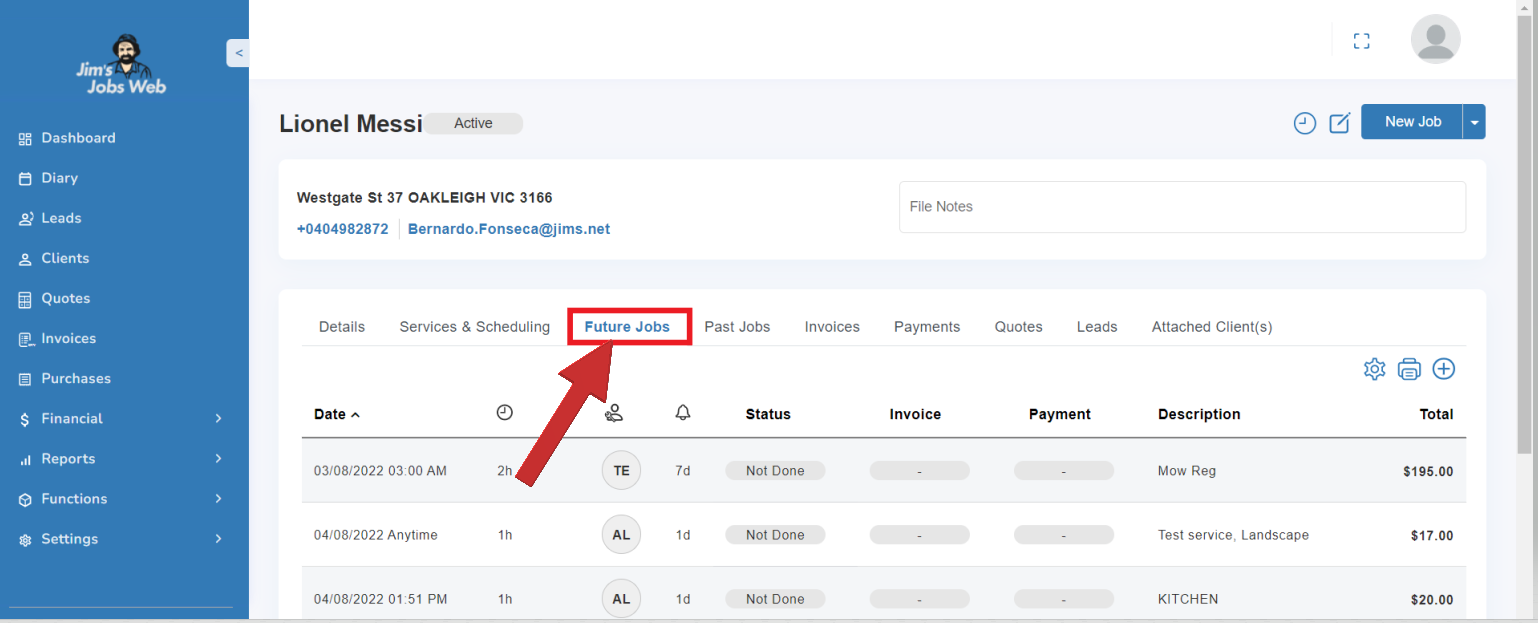
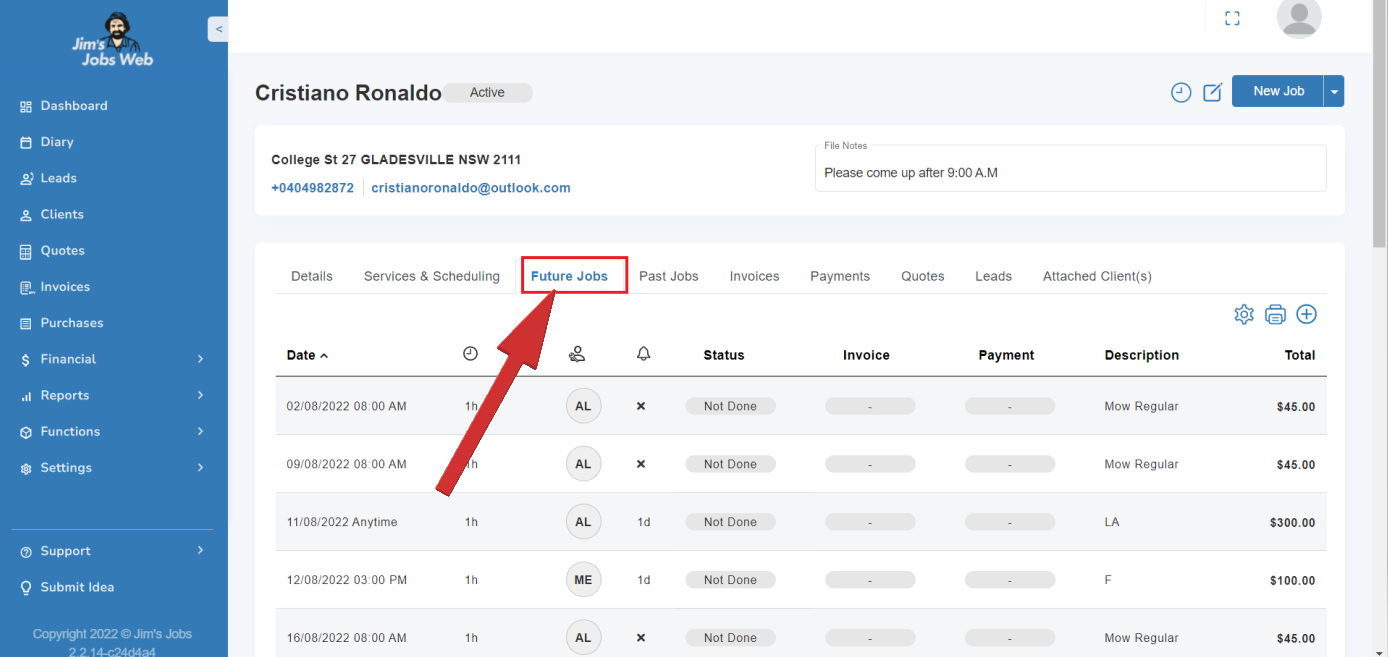
Future Jobs
All information about a client’s regular and casual work future schedule is accessed through the Clients screen under Future jobs.
Work is scheduled typically for the next couple of months - e.g. 60 days, or as specified in the Miscellaneous Settings (No. of days to auto-schedule ahead).
Future Jobs include any Job that is Job Not Done and is for today or a future date.
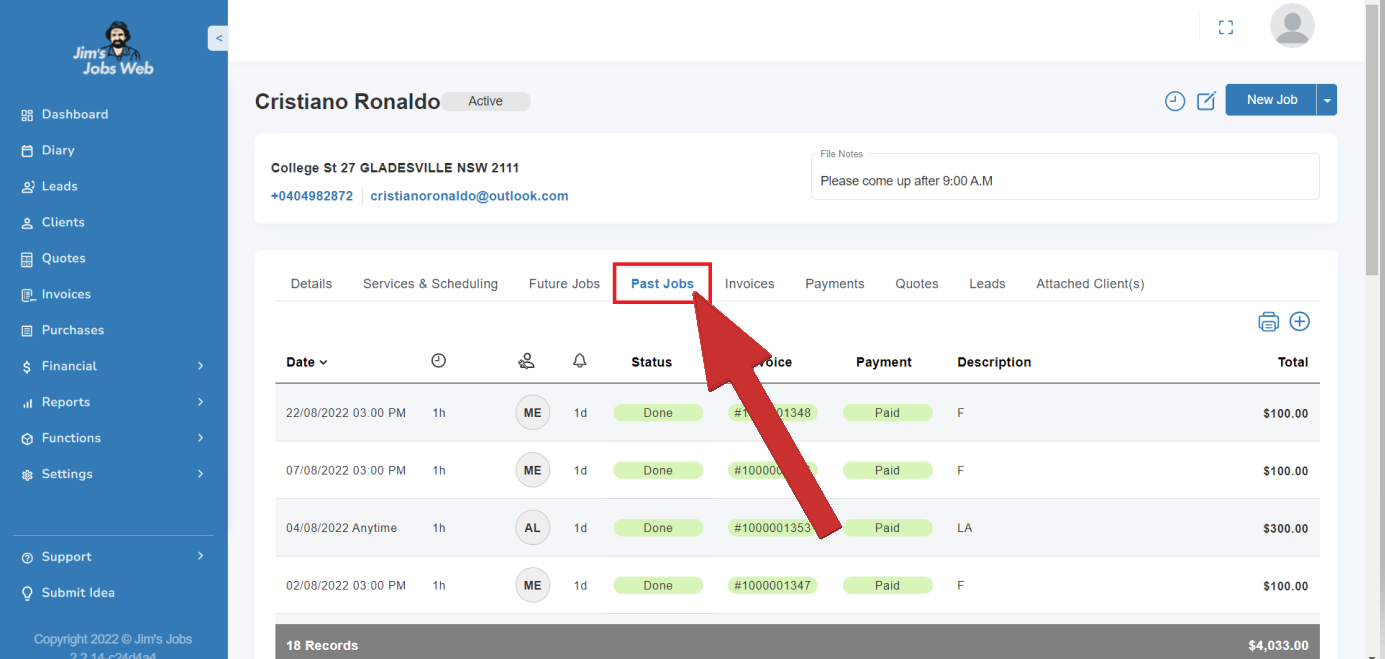
Past Jobs
Information about a client’s previously serviced work schedule is accessed through the Clients screen under Past jobs.
Past Jobs include any Job that has been Cancelled, Done - as well as Job Not Done where the date is today or in the past.
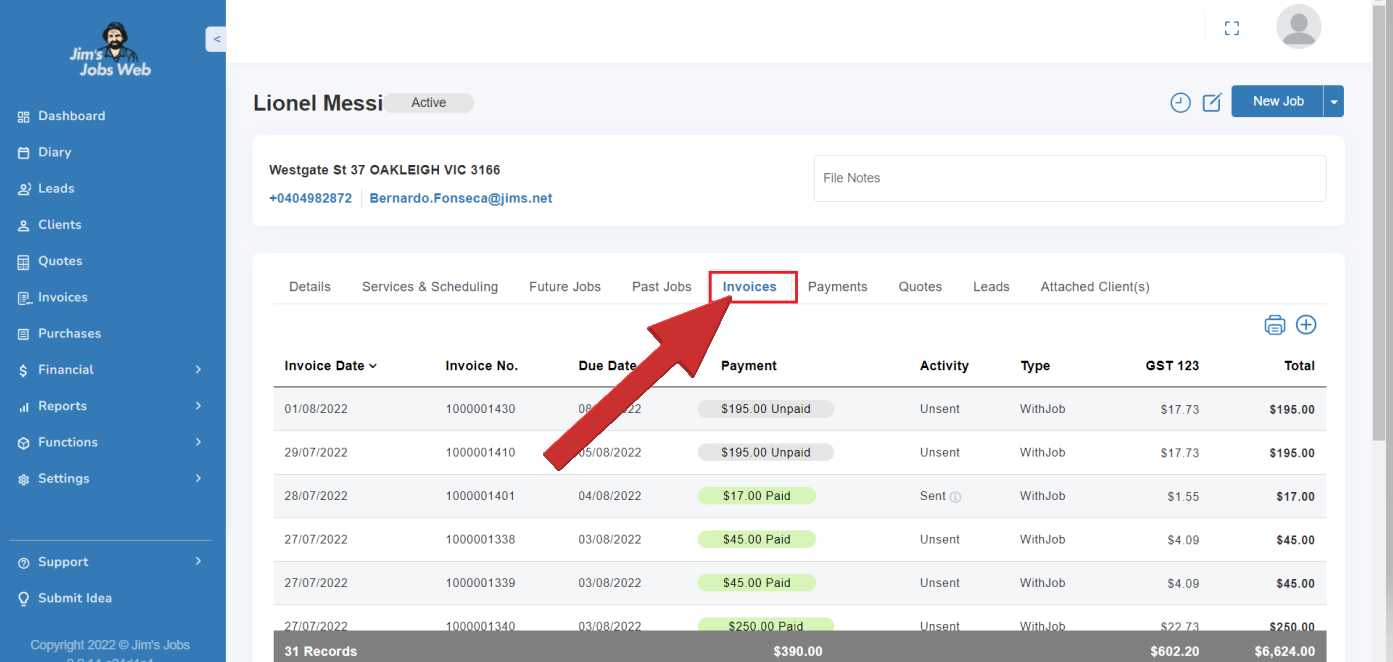
Invoices
Information about a client’s recent invoicing history is accessed through the Clients screen under Invoices.
You can also add in an Invoice here unless the client has a different billing address.
If a client has a different billing address (see Billing details), then the client's invoices will be attached to the Billing Address client.
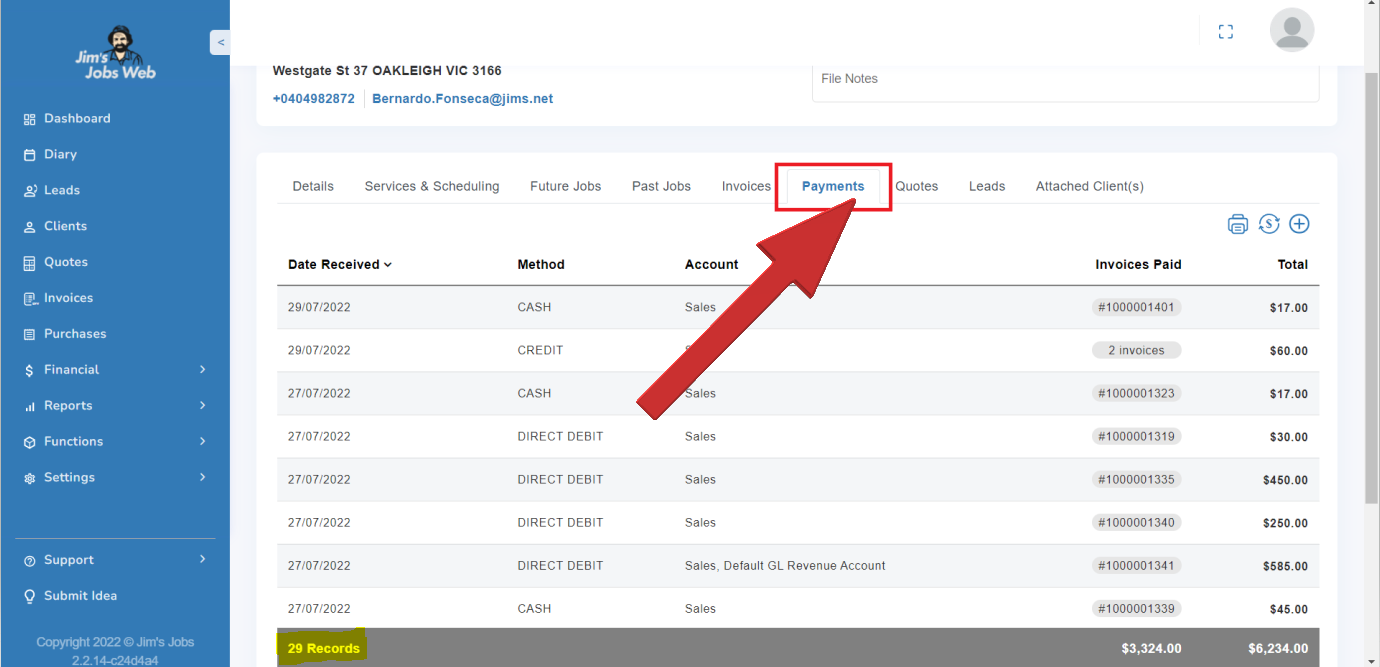
Payments
Information about a client’s recent payment history is accessed through the Clients Screen under Payments. There is a record of all payments made.
You can add in a Payment here, and attach Jobs to the payment record unless the client has a different billing address.
If a client has a different billing address (see details), then the client's payments will need to be made via the Billing Address client.
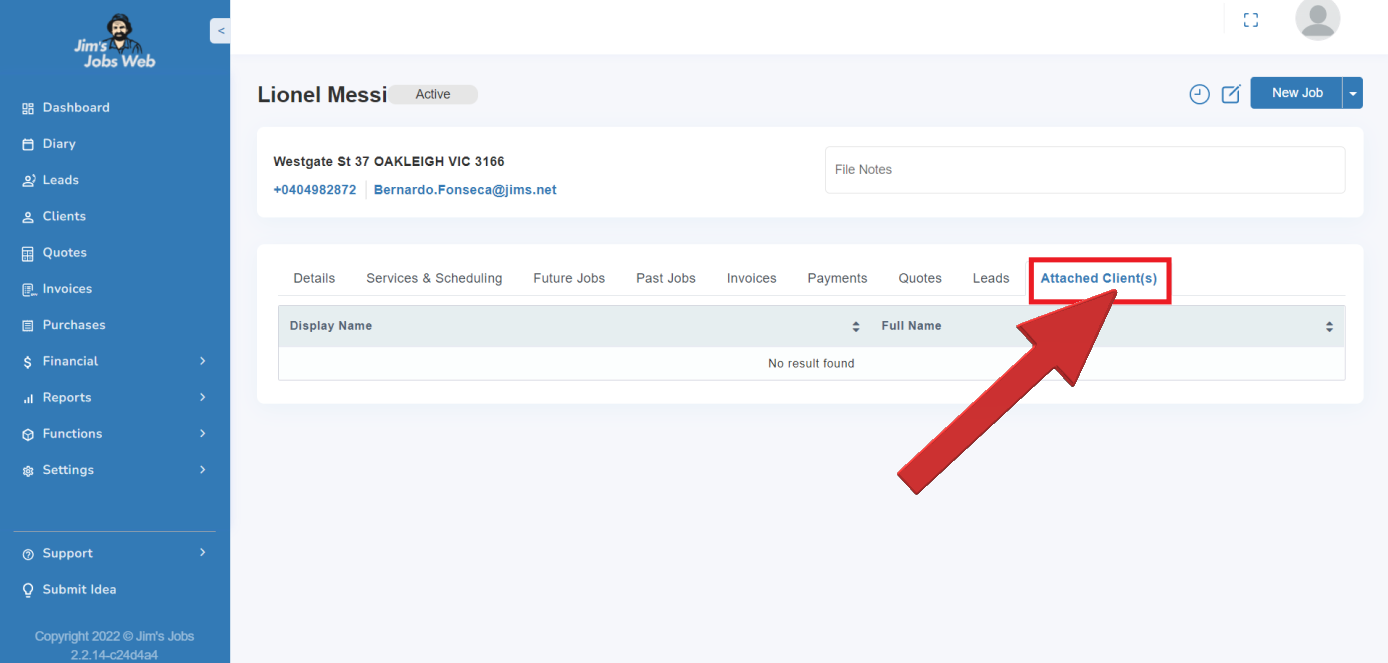
Attached Clients
Information about the linked clients (i.e. Corporate, Real Estate, or multiple property owners) can be accessed through the Clients screen under Attached clients.
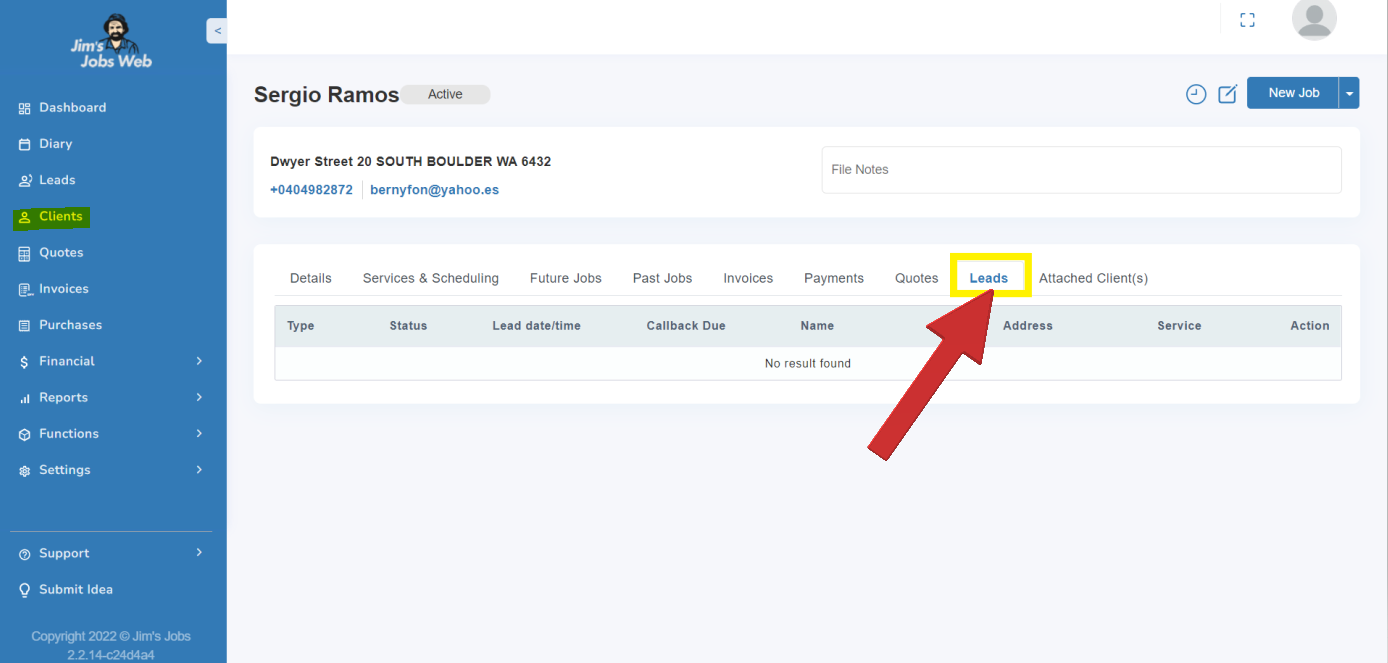
Leads
Leads from your client that were previously received from Jim's Group can be accessed via the Leads tab on a Client.
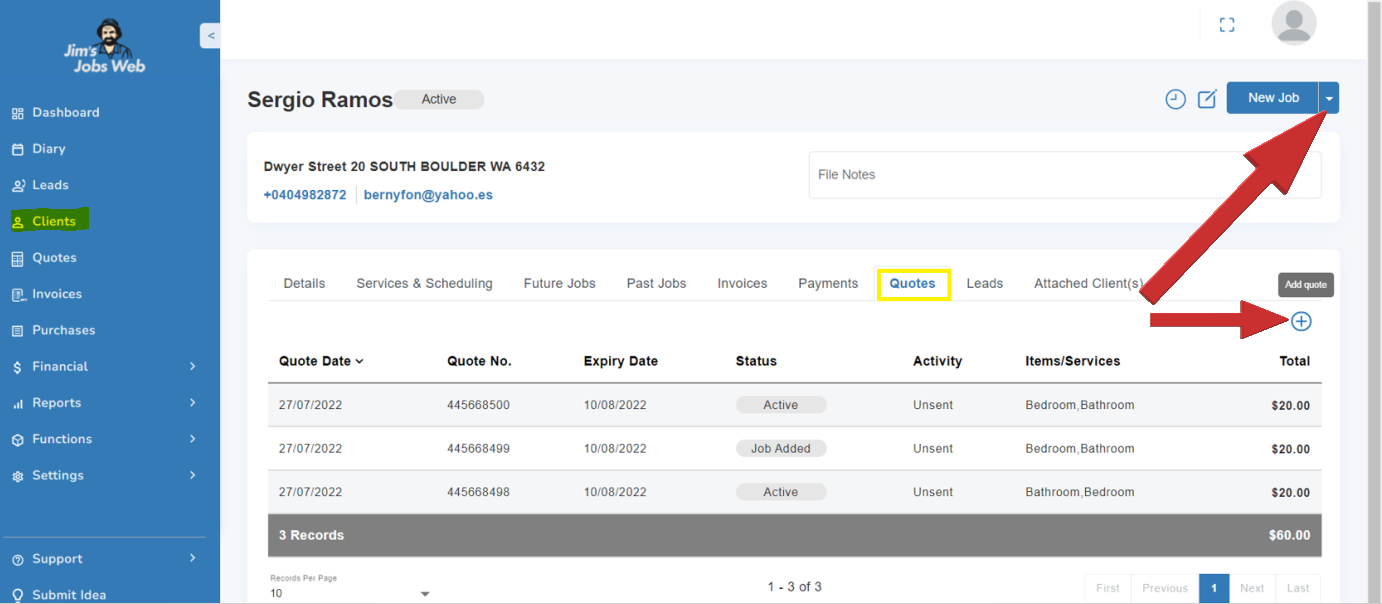
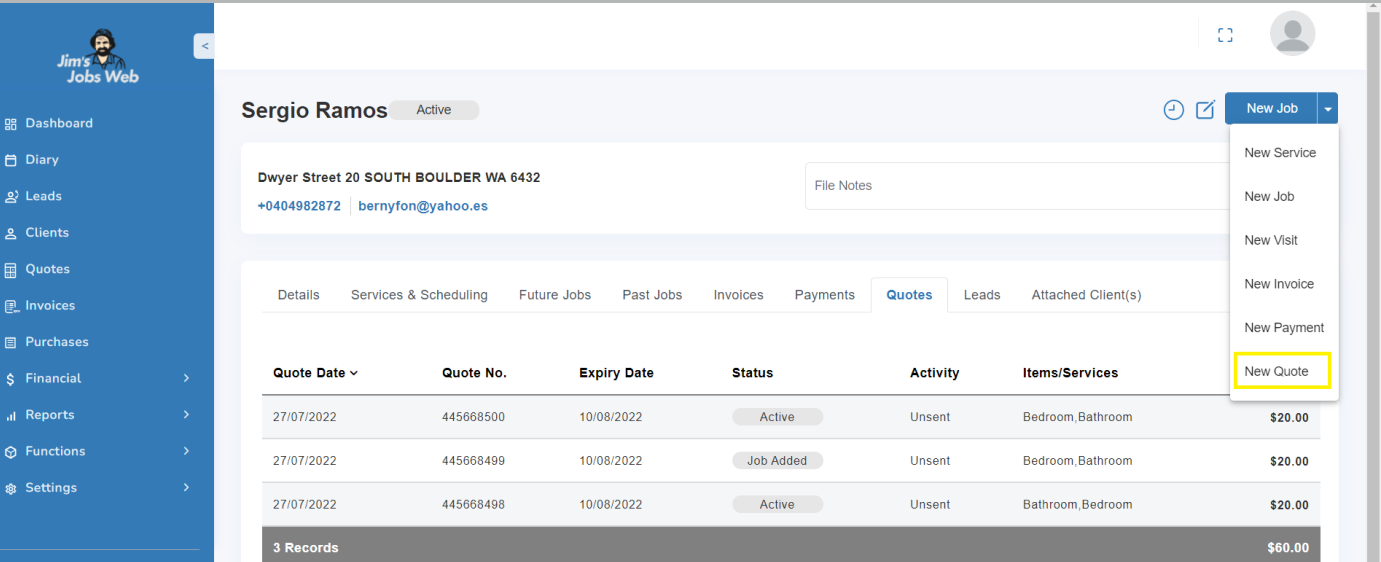
Quotes
Quotes for the client can be accessed through the Clients screen under the Quotes button. New Quotes can be added via ‘+’ or from the New Job button click on the arrow
6. Quotes
Creating a Quote
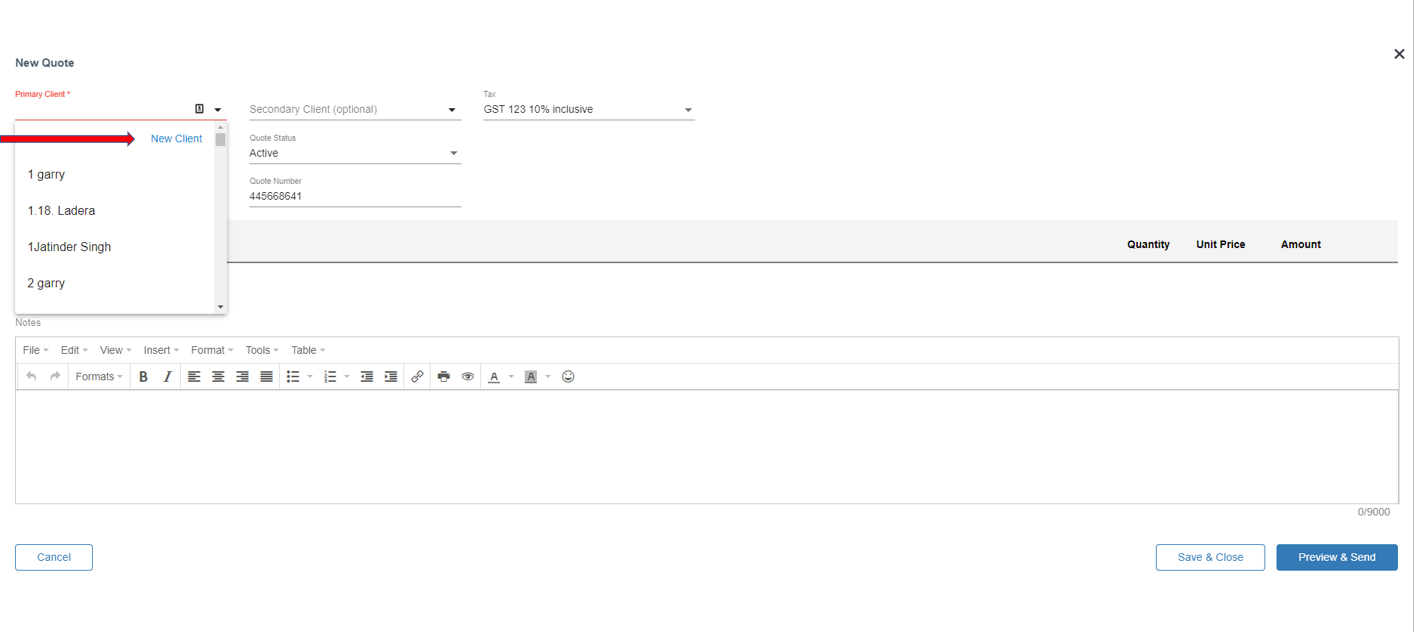
The Quotes module allows you to add a new quote for an existing client, go to the Quotes option in the main menu and then select the client from the dropdown list. All your clients will be displayed with the address details in case you have two clients with the same name.
To add a new quote click on New Quote.
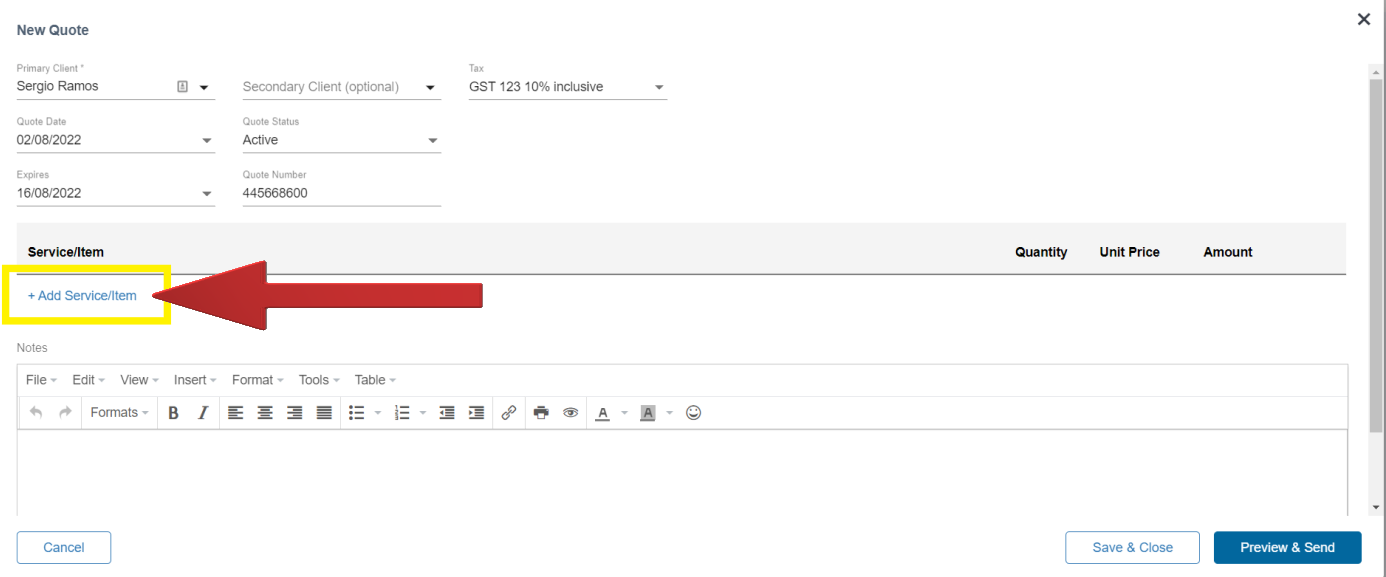
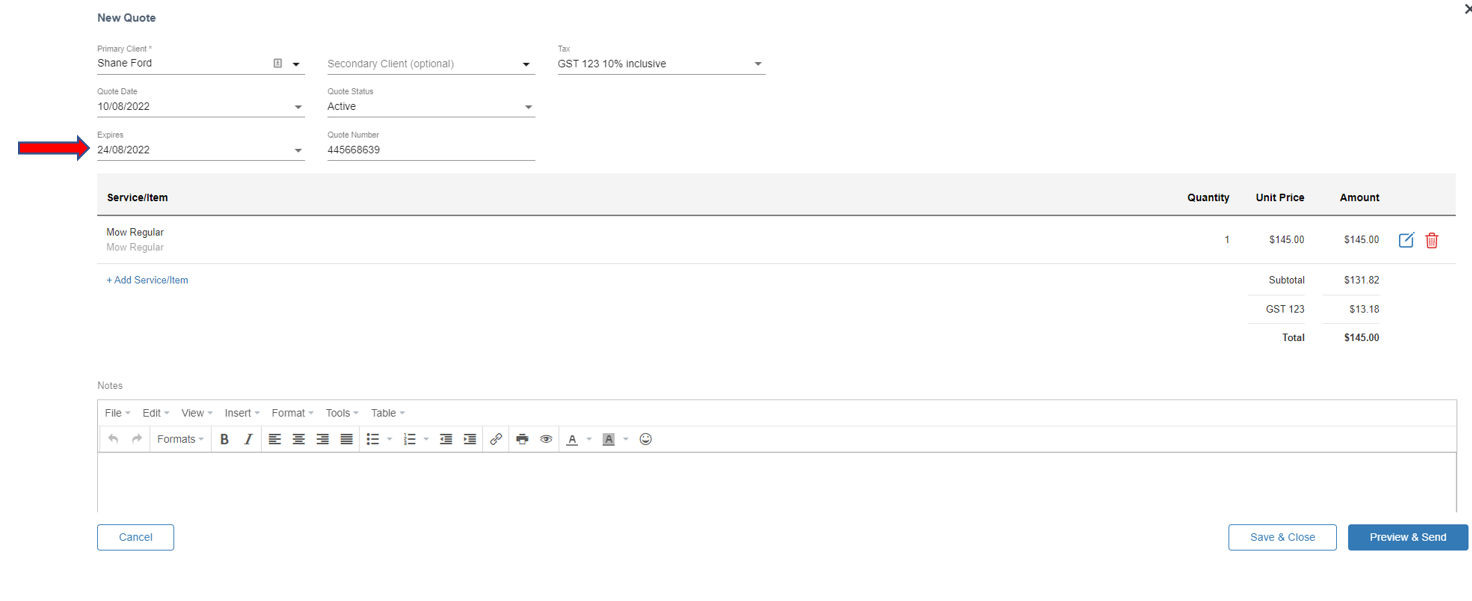
The Quote Details page will open and you can fill in the client details as well as add in services for the new quote.
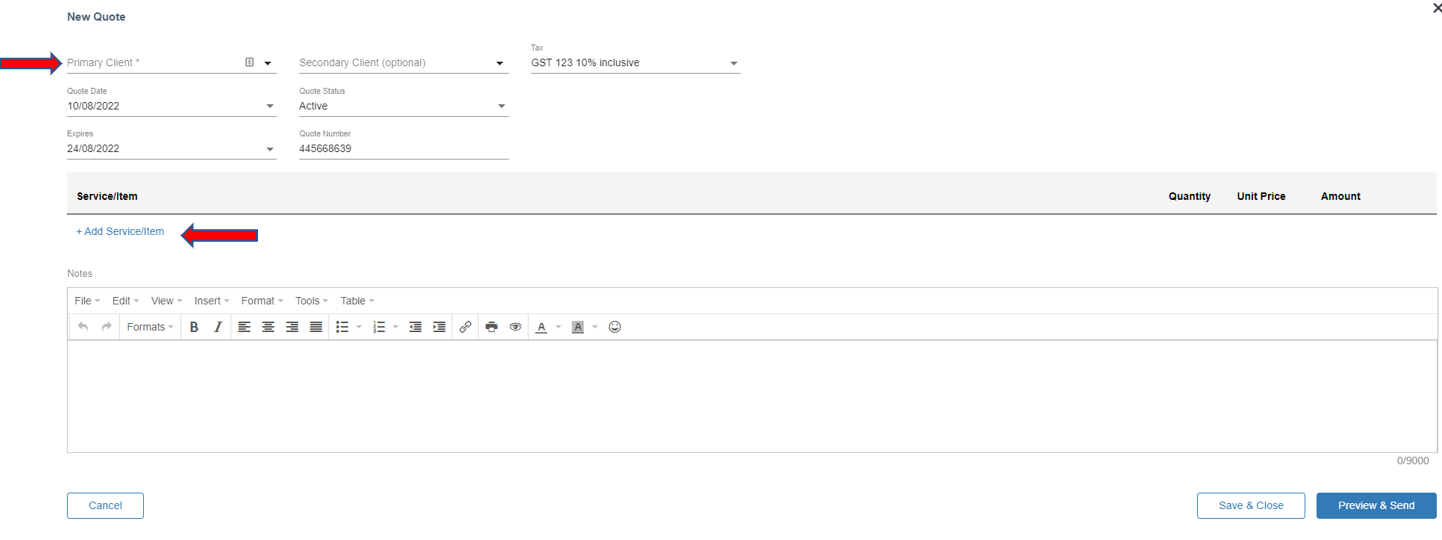
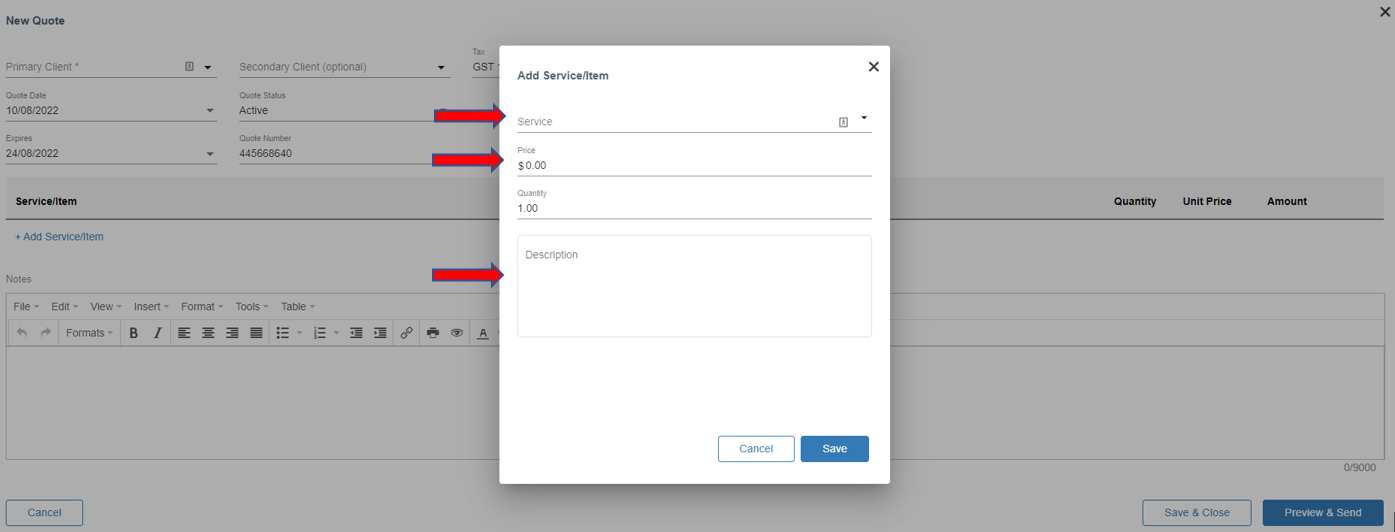
The Add Service/Item popup box will open and you can add the services details as well as the price for the new quote.
The Quote Expire Date can be set.
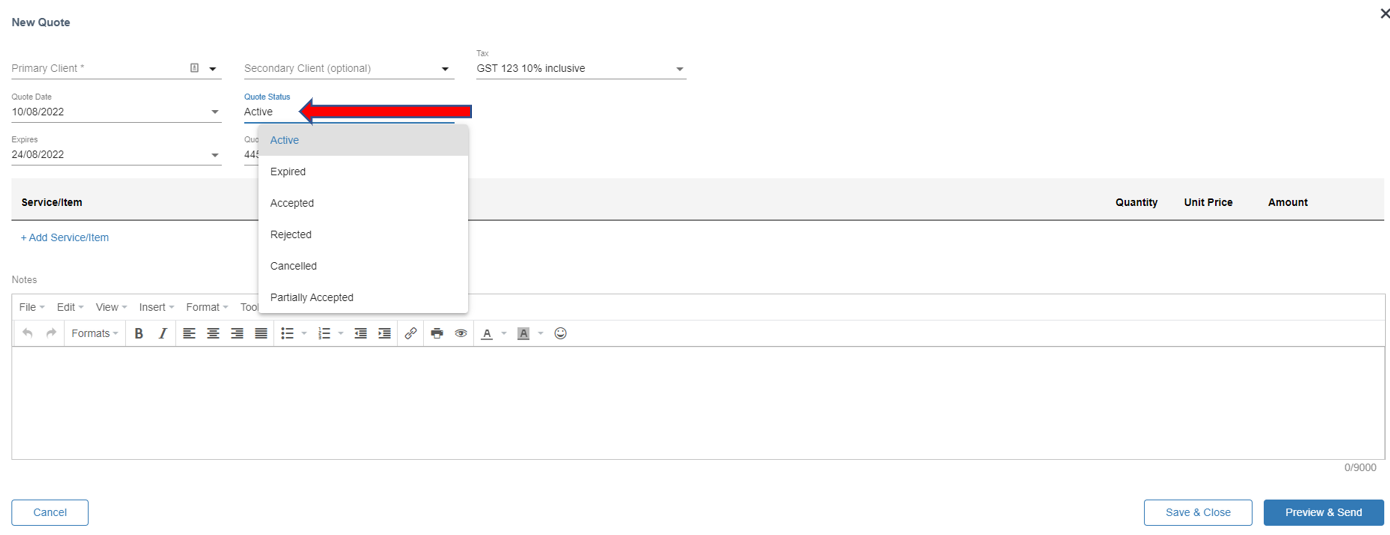
Quote Status can be filtered as Active/Expired/Accepted/Rejected/Cancelled.
Once you have completed the service details and price, you can Save the quote.
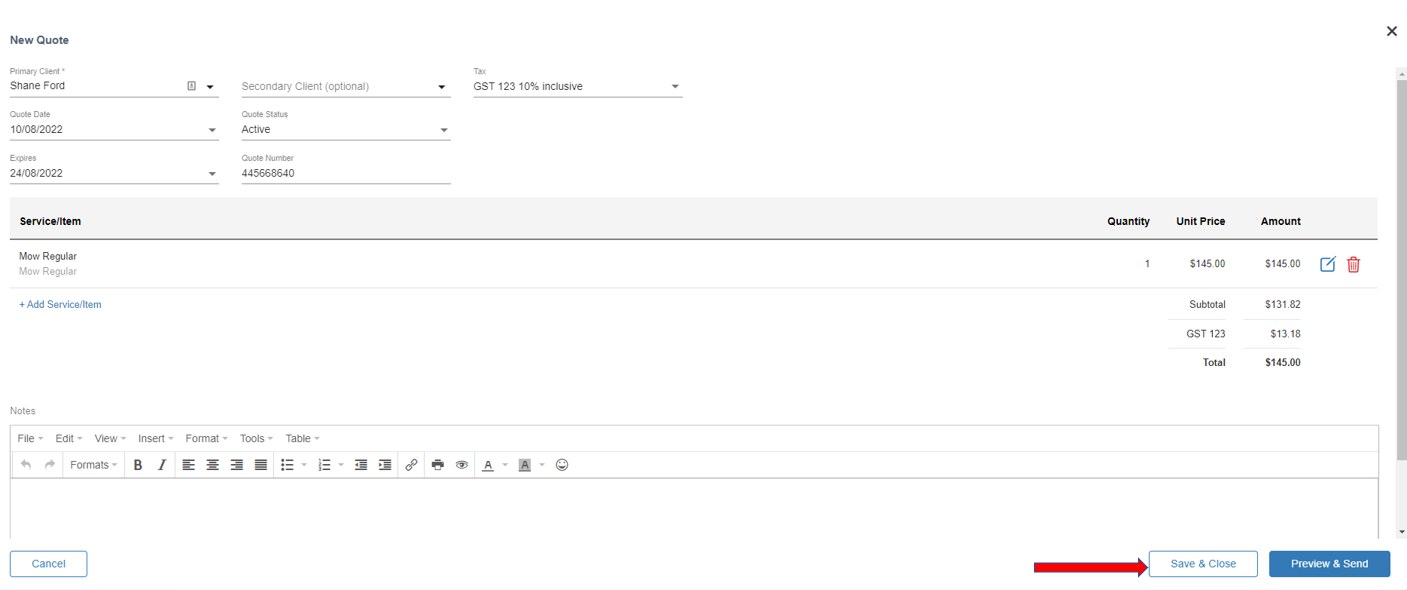
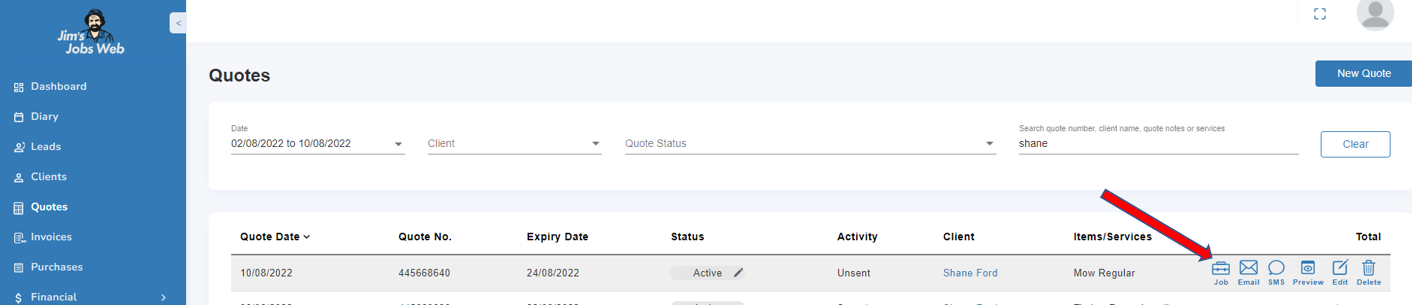
You can create a Job, Email, Text, or Edit the quote to your client directly from the Quotes module.
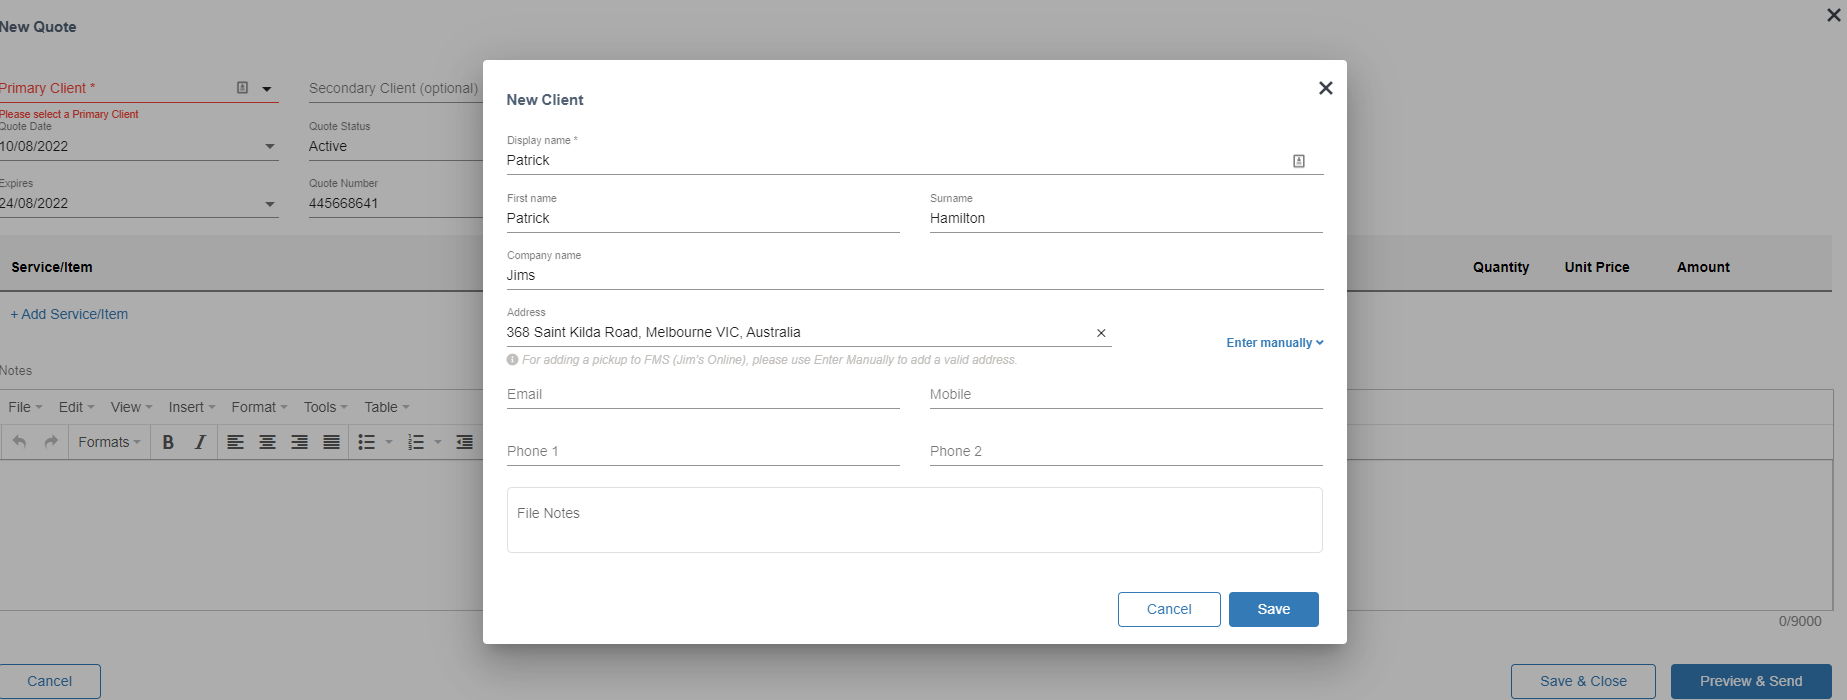
To add a new quote for a new client, select the Add New client. This will allow you to capture quotes, as well as Client details.
For more detailed information on creating and managing quotes
How to Create and Manage Quotes
7. Invoices
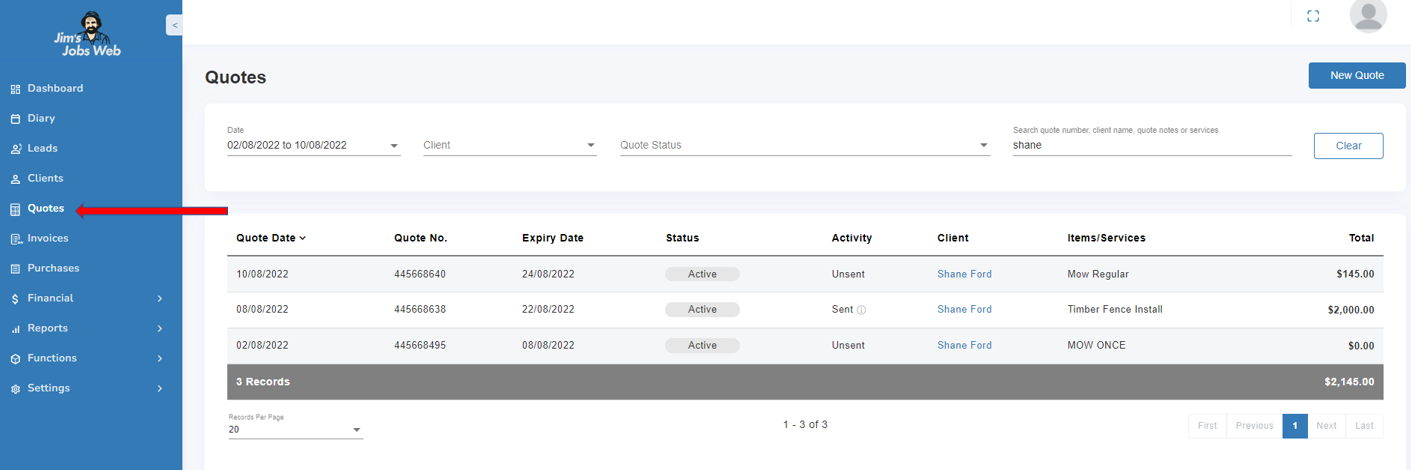
Search an invoice
You can search invoices by
- Date Range
- Status ( Paid, unpaid)
- Client name
- Type ( With job or monthly)
- Tax (None, GST)
- By typing in the field ( Client name, invoice number, notes, or services)
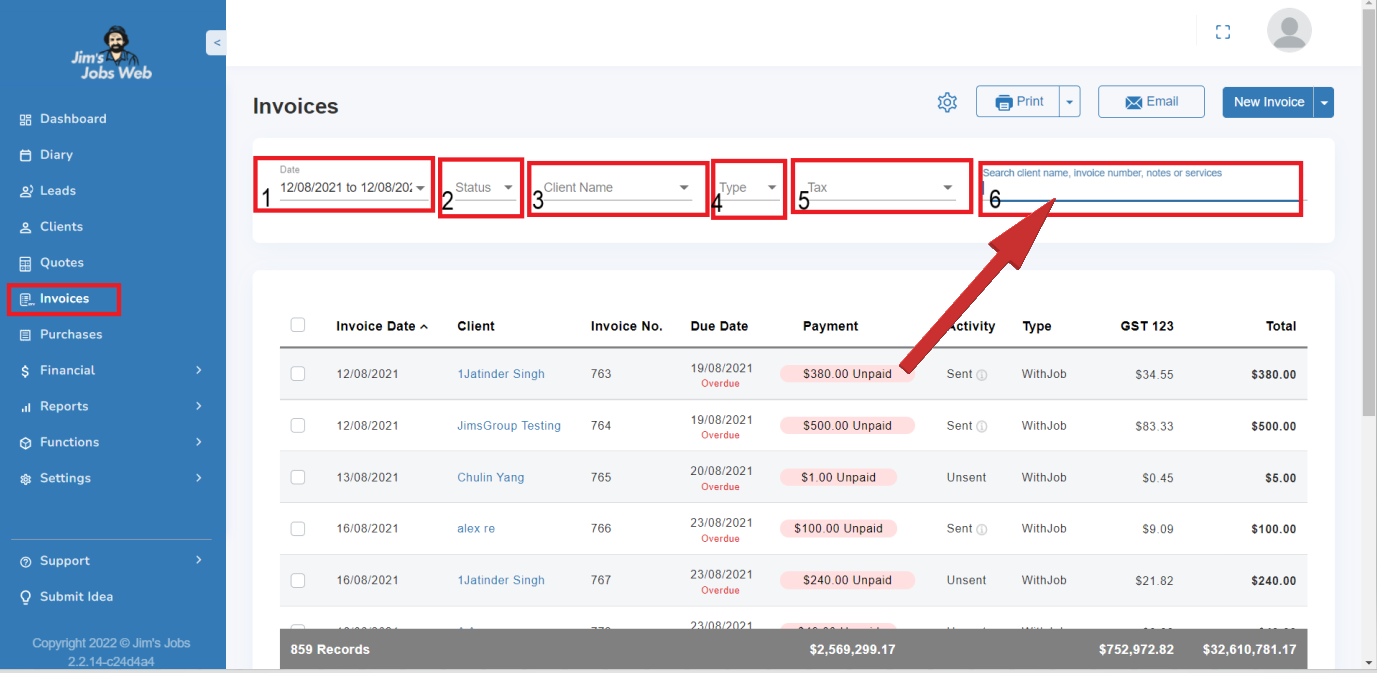
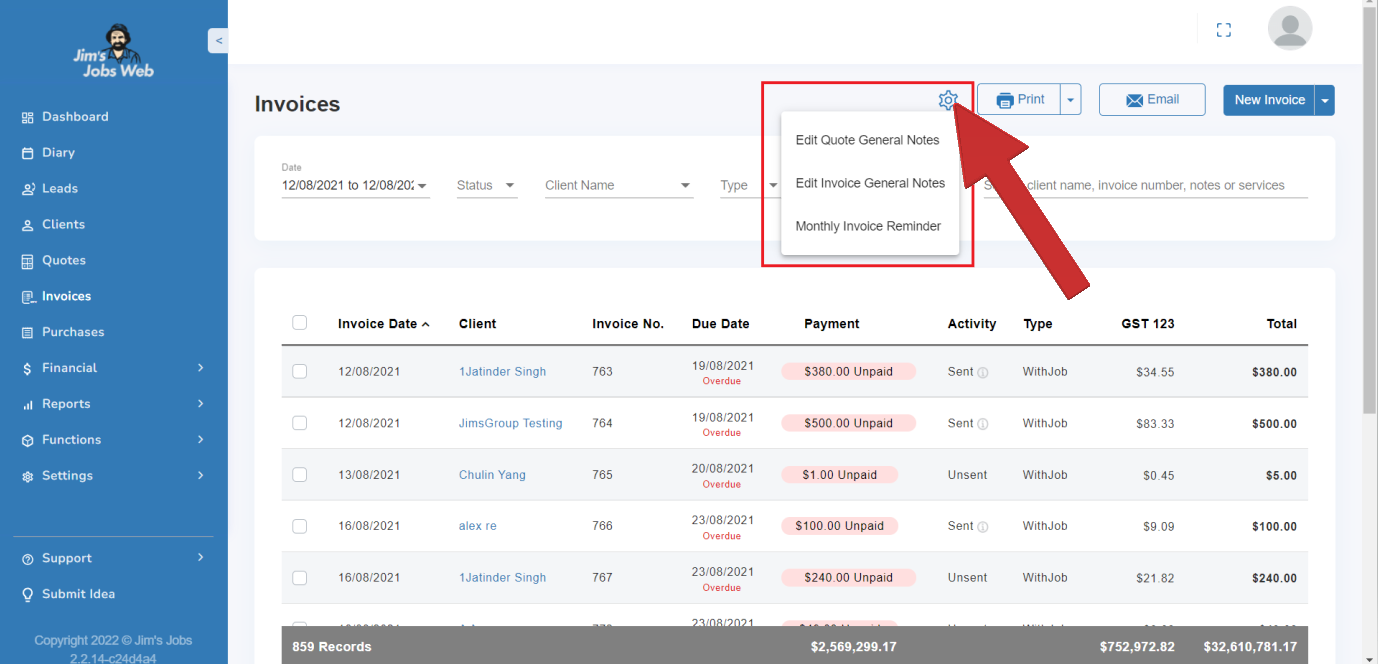
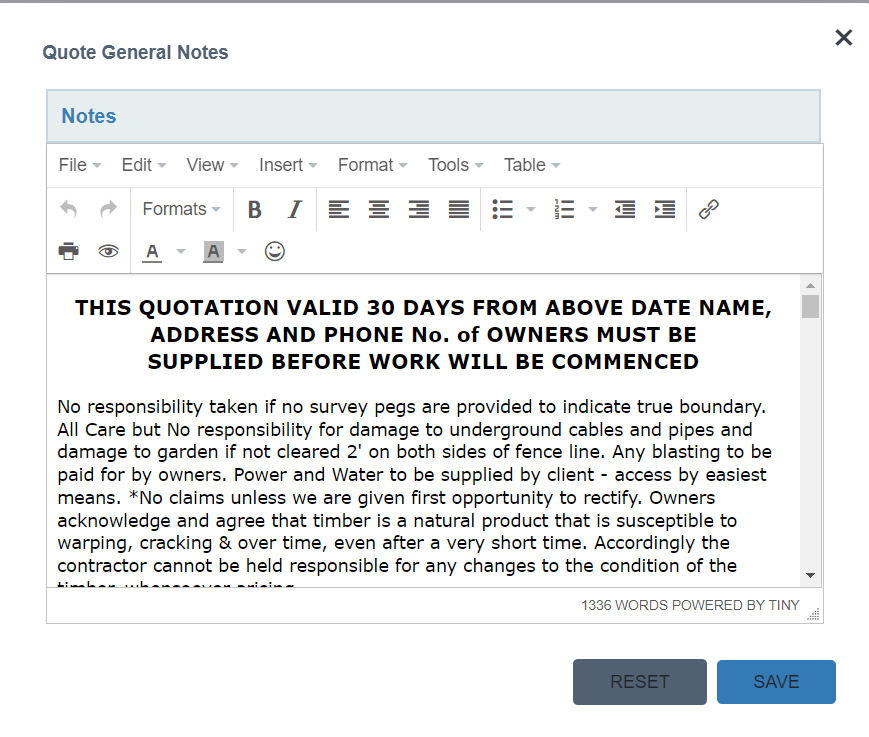
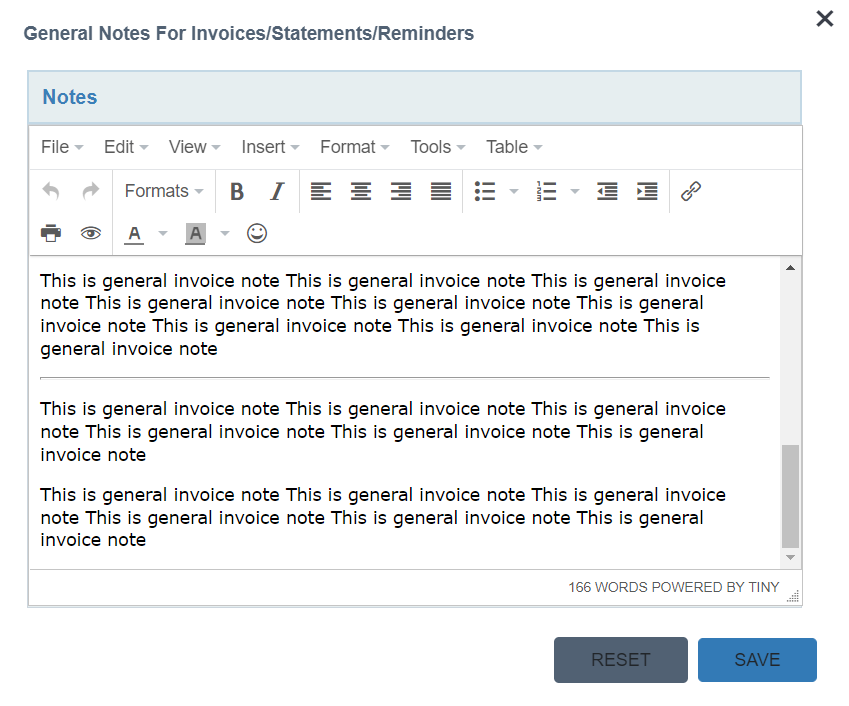
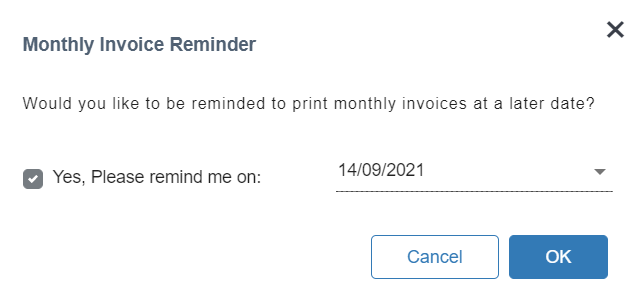
Edit Quote, Invoices General Notes, and Monthly Invoice Reminder
You can generate these notes and set up a monthly invoice reminder by clicking on the ![]() icon. You can reset or save them.
icon. You can reset or save them.
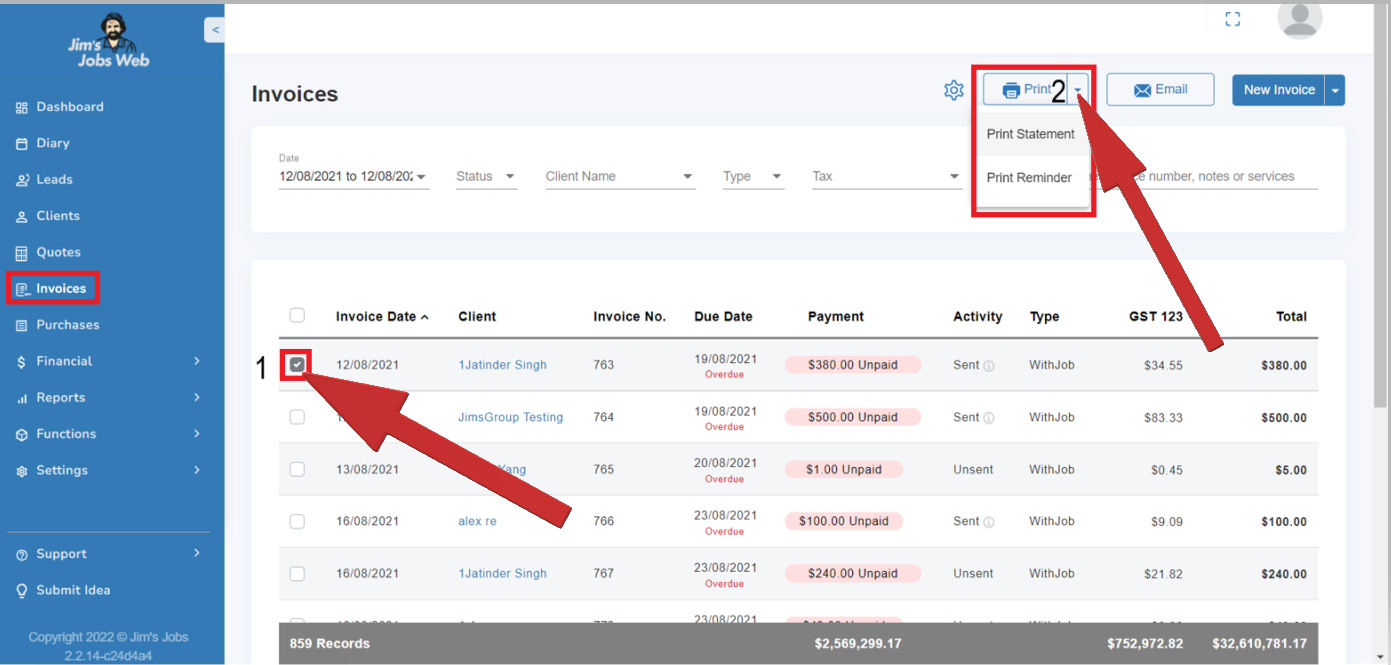
Printing statements and reminders
You can print statements and reminders:
- Select the invoice(s)
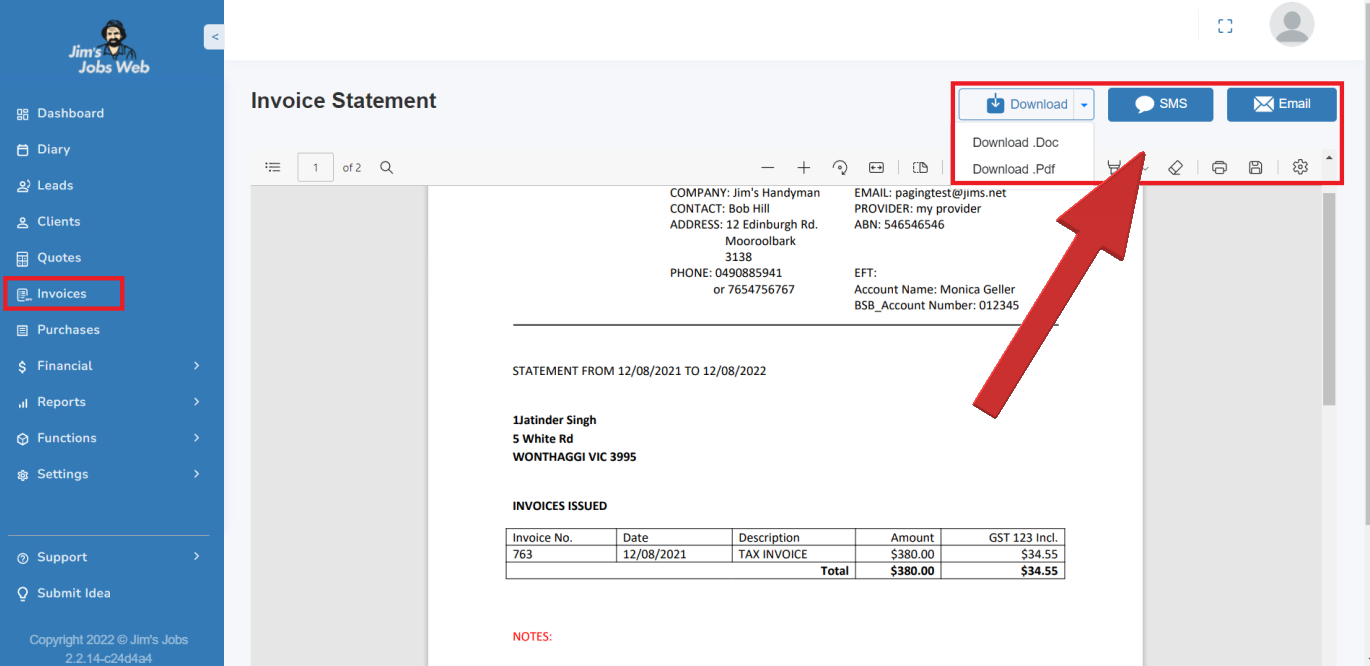
- Click on the printer icon
You can download the statement as a word or PDF document, send it as an SMS or Email.
8. Purchases
The Purchases module stores records of all the purchases, the GST taxes associated, and the total amount.
You can also go through any purchase by:
- Date Range
- Supplier
- Paid by
- Expense account
- Search
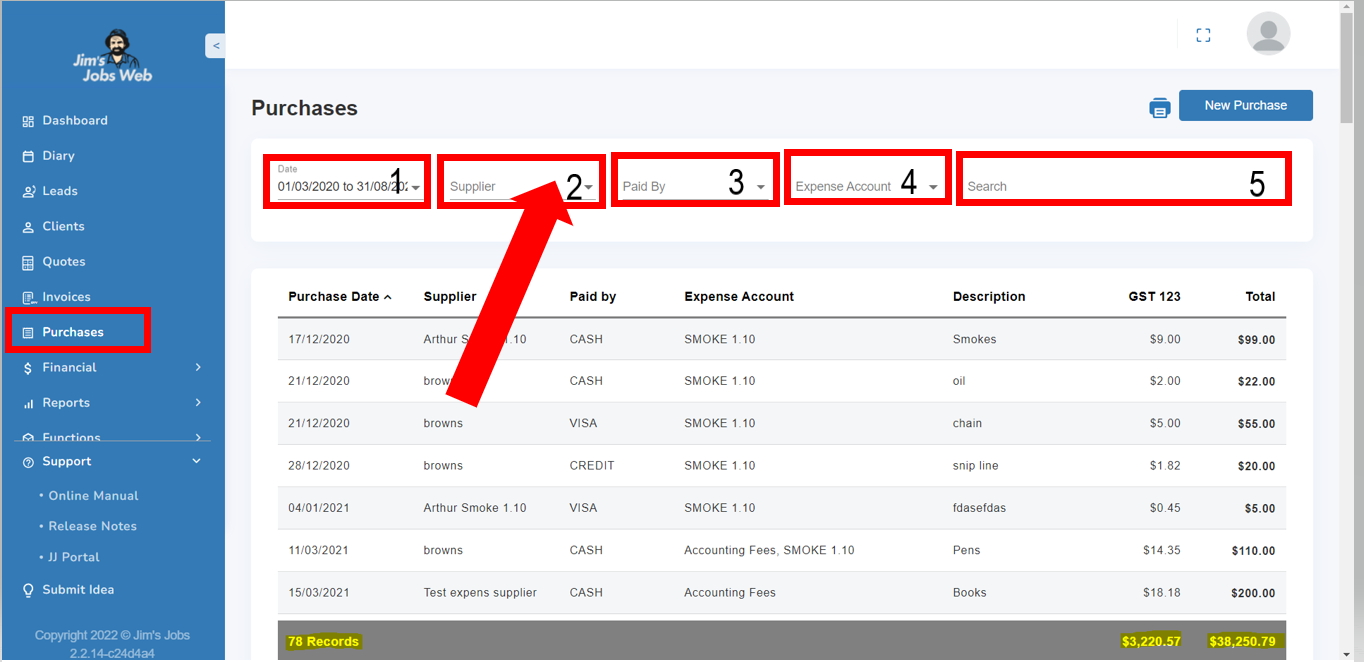
You can edit the current purchase and change its details.
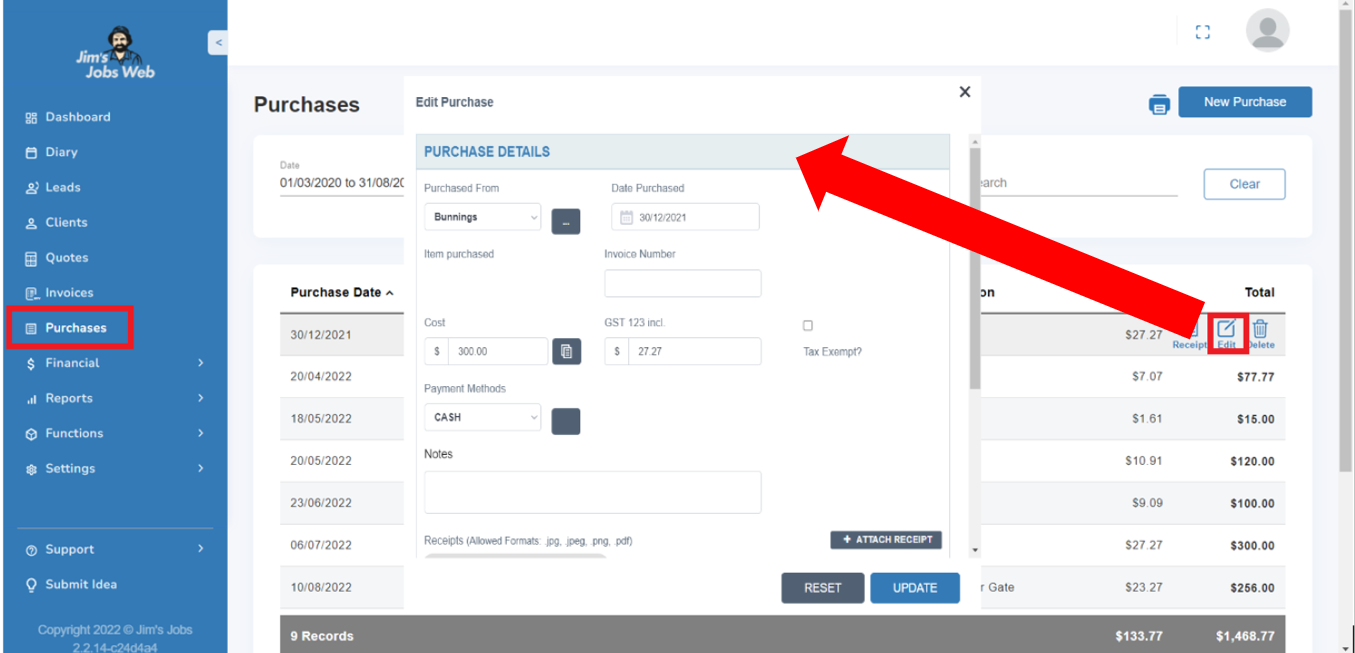
Creation of a New Purchase
You click on " New Purchase" with information from the Supplier, Payment Method, tax and attach its receipt and save it.

9. Financial
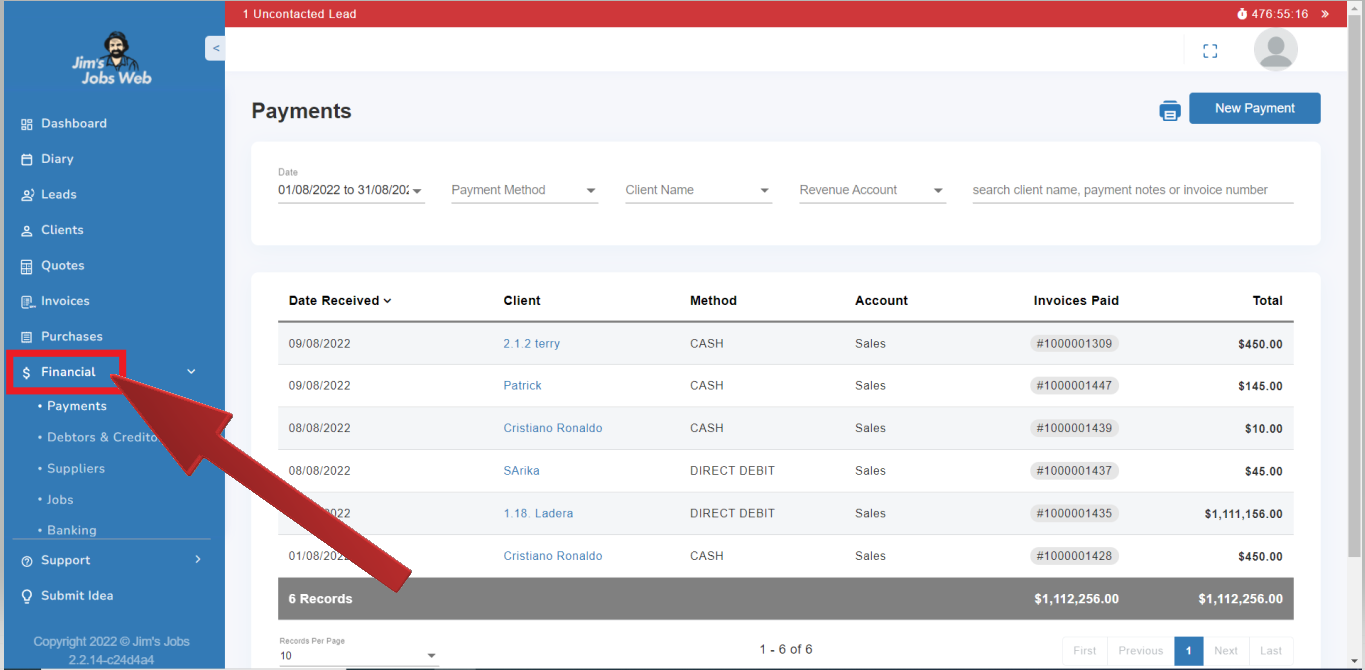
Payments Received
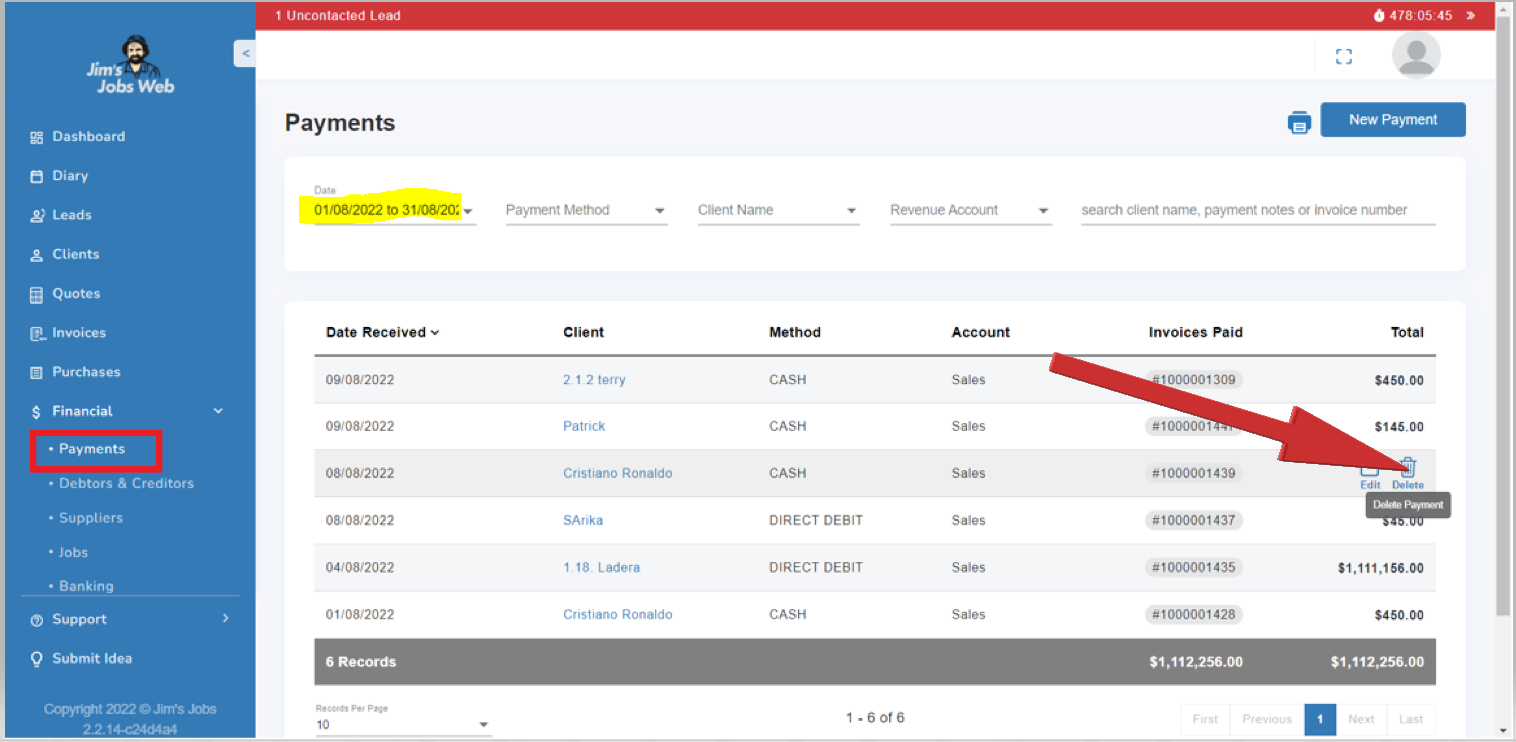
In the Financial module. the Payments feature allows you to find payments, record payments, edit payments and delete payments you get from your customers.
You access this by clicking on the Financial module to visualize Payments Received.
For the convenience of the user, there are several other ways you can also record a payment. From the Diary screen, edit the Job (double-click the job or select the edit job icon) and then “Add payment” on the job screen.
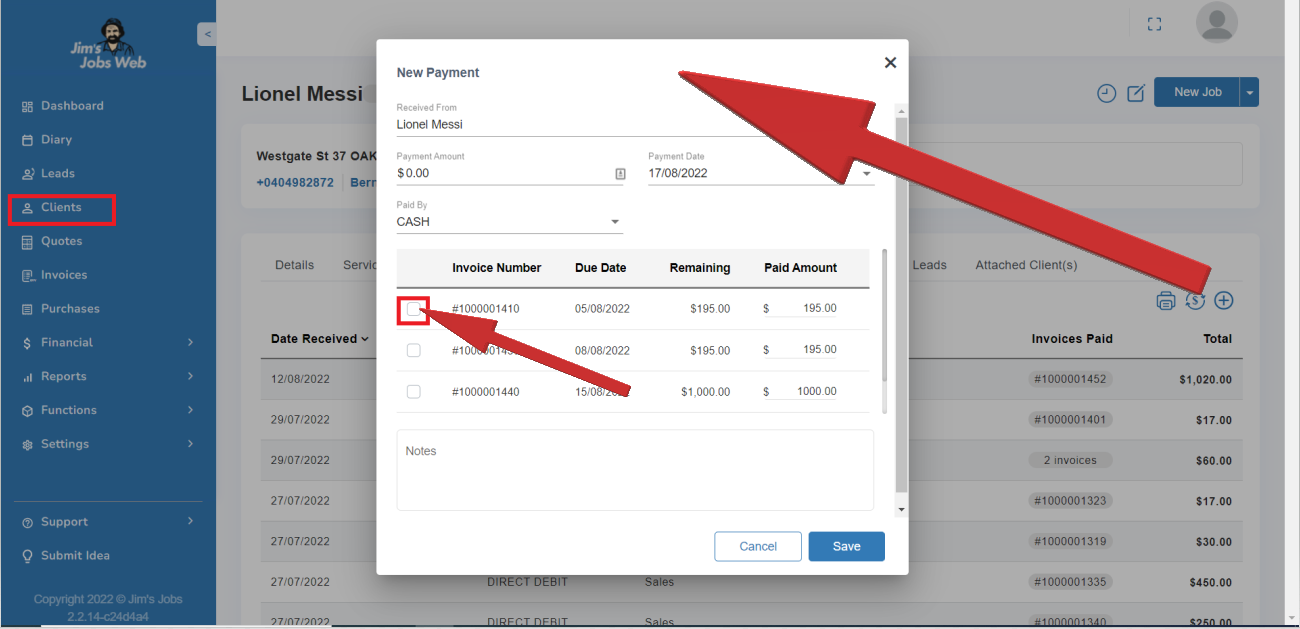
Alternatively, you can record a new payment that you have received from the Client screen by selecting Client, clicking on the Payment Adjustment tab, and Add (payment). For doing this, click on the "+" icon, thick the box from the corresponding invoice.
If you wish to view the details of an old payment, you can locate it by clicking on Payments Received and selecting the relevant date range. This will list all the payments received for the specified date range. Double-click on the payment you’re wanting to view and it will be displayed.
Finally, you can delete the record of a previous payment in case of an error. Locate the payment as described above, and then click on Delete payment.
Debtors/Creditors
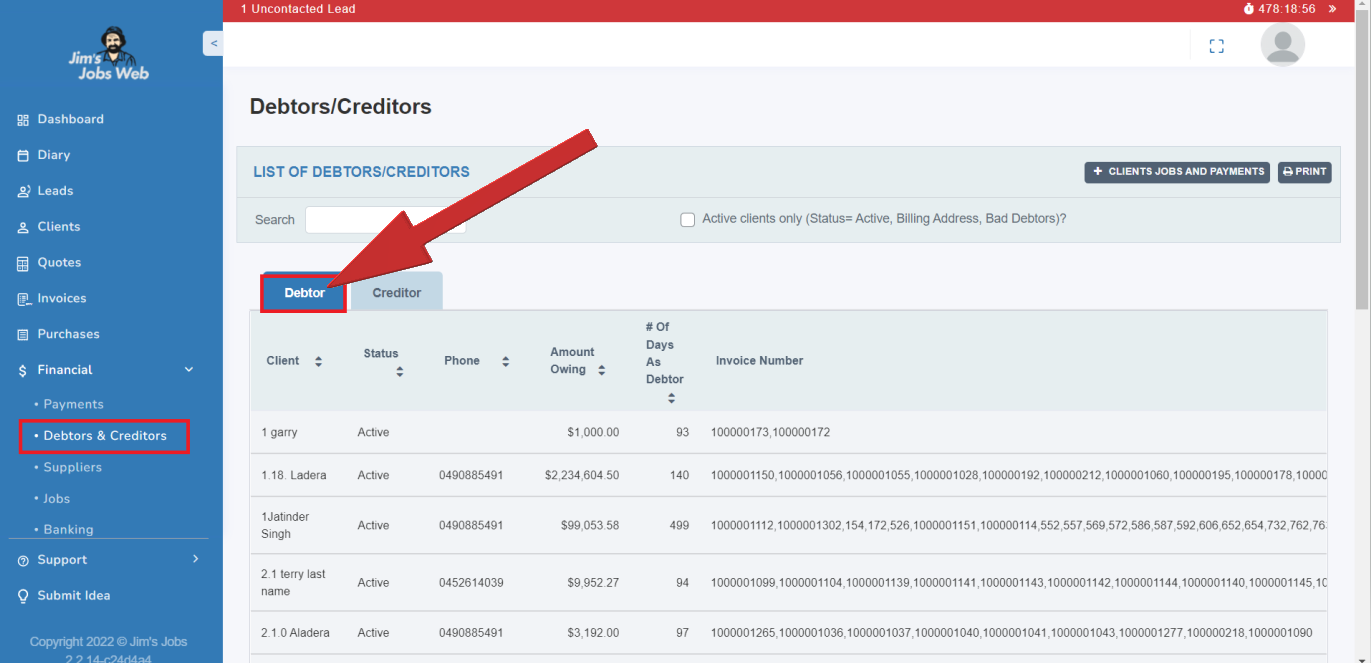
A client becomes a debtor when the amount owing is greater than $0.00. Amount owing is computed using the formula: Total amount of jobs done minus Total amount of payments received. The negative amount owing puts the client on the list of clients who owe you.
To view a list of people currently owing you money, click on Financial and then Debtors/Creditors.
Select the relevant tab - Debtors or Creditors - to view the list of clients that fall into each category.
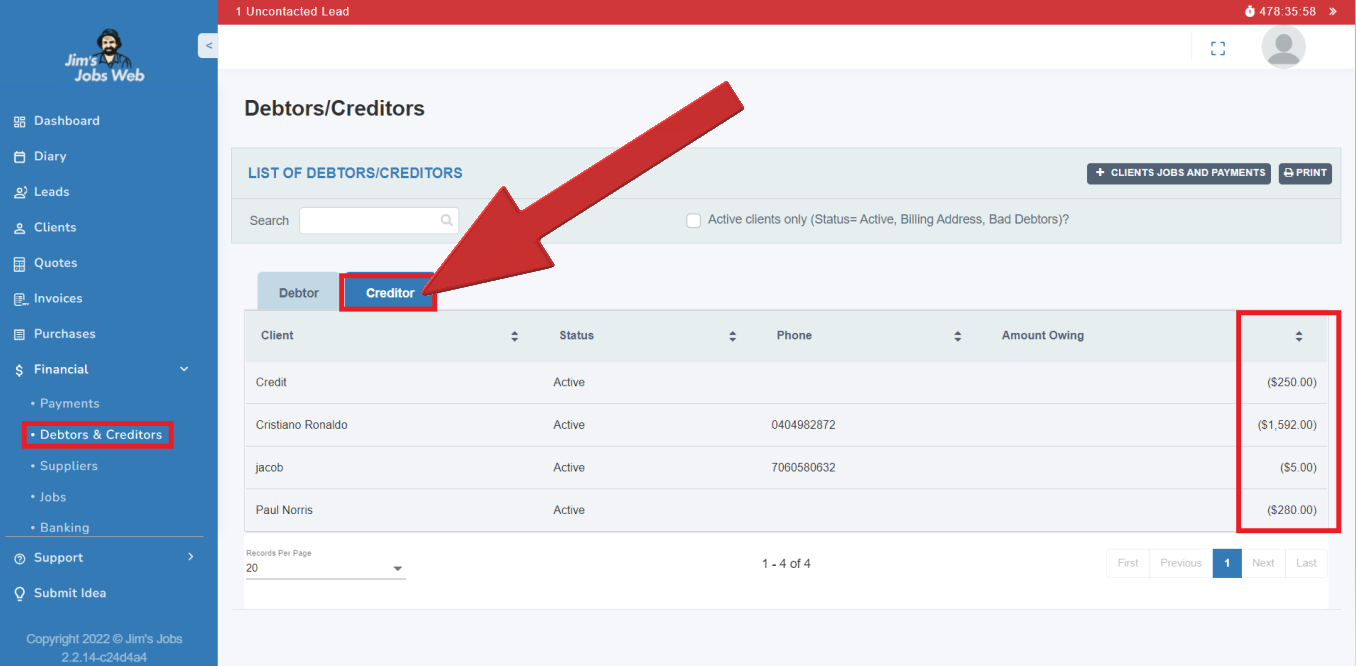
A printable version of this is available by clicking the Print button, or to obtain a more detailed report you can access Reports → Debtors/Creditors and sort by Name, Amount Owing, or Number of Days as a Debtor.
To identify those clients who have a payment credit, click on Financial and then Debtors/Creditors, this time select the Creditors tab. Clients in credit will be identified by ($ xx. xx) amounts. These clients may have paid in advance or received credit for whatever reason.
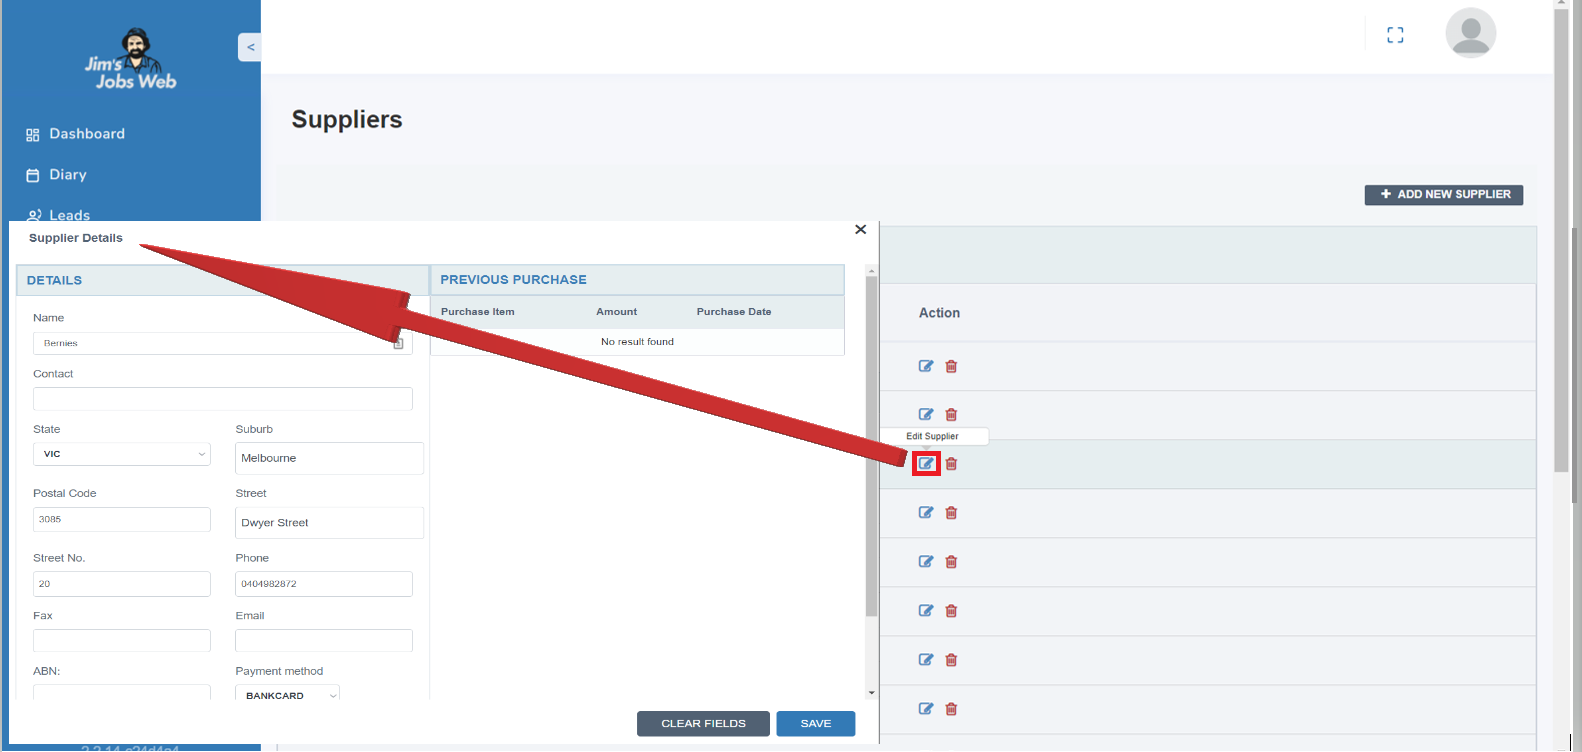
Suppliers
You have to identify and enter your preferred suppliers so that this information is available before recording your purchases.
To create a new supplier click on the " + ADD NEW SUPPLIER" button.
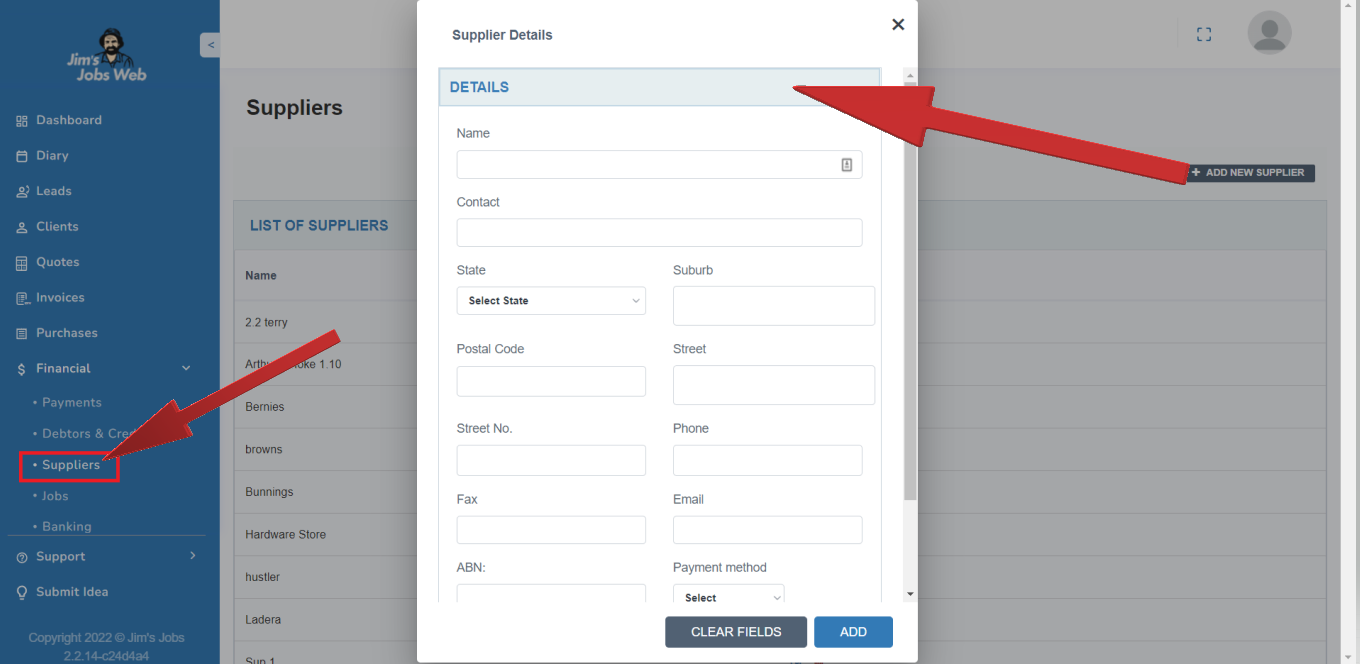
You can also change an existing supplier. Click on the "Edit Supplier" box.
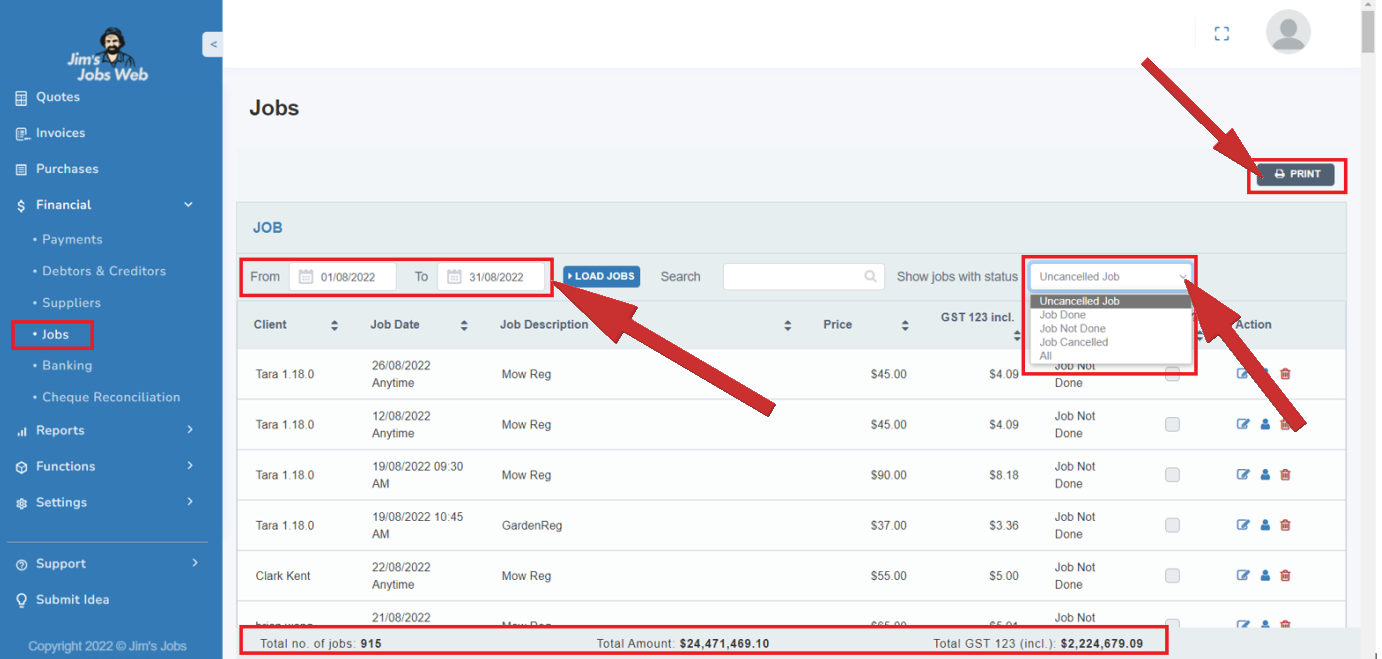
Jobs
Select Financial, Select Jobs to check:
- Job's status ( Done, not done, uncancelled, canceled)
- Select a forward date to view upcoming work.
- Print jobs
You can visualize the total number of jobs, amount, and GST. You also can print out them all.
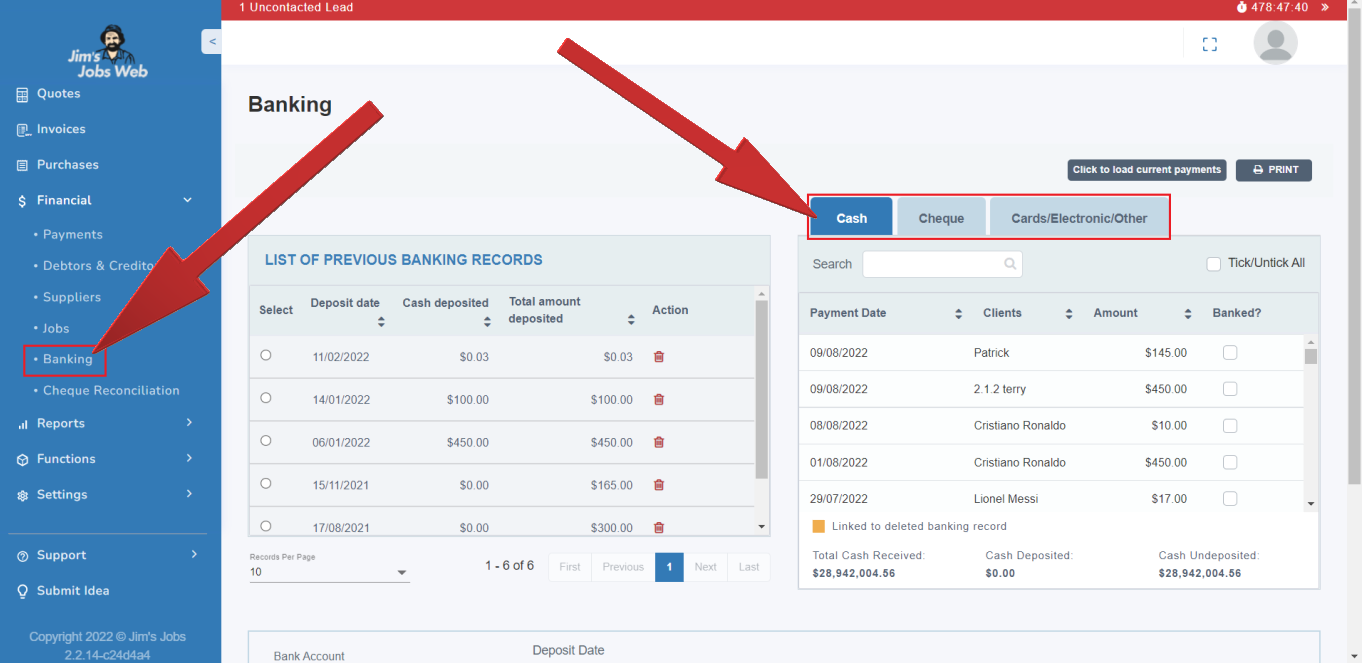
Banking
The Banking screen allows you to control your trail of cash, cheque, and other (e.g. Visa, Card) payments in your nominated bank accounts.
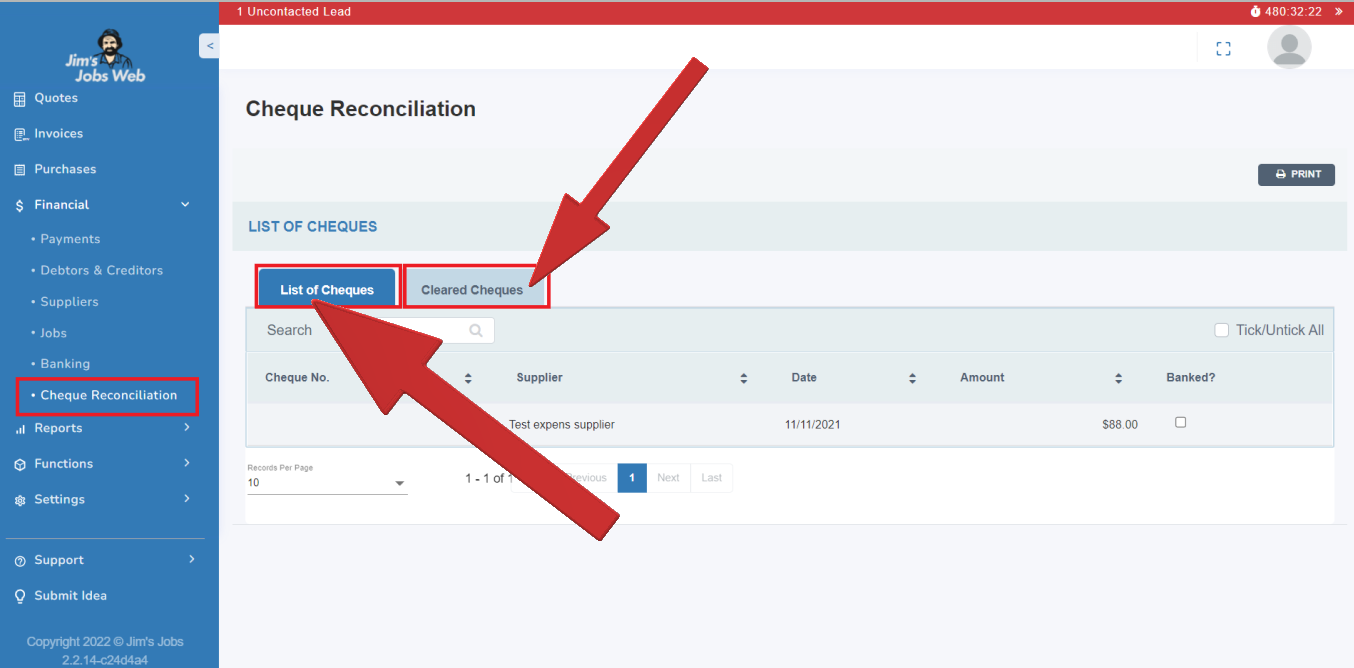
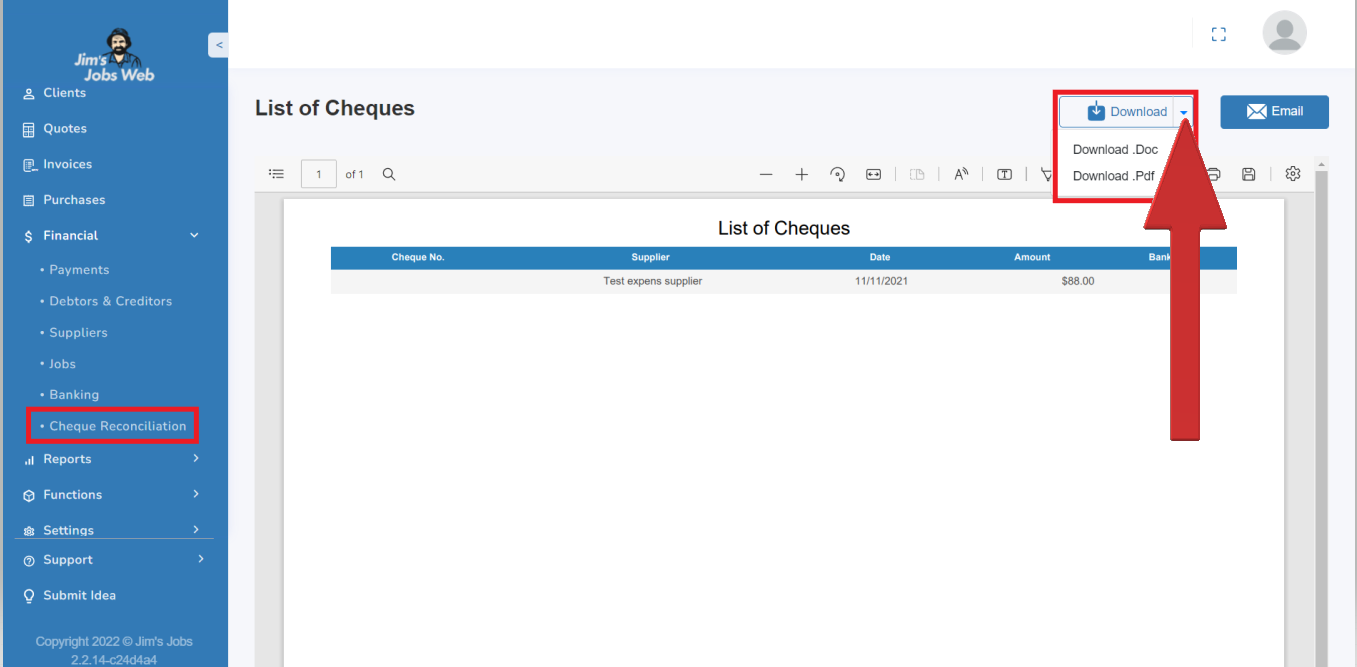
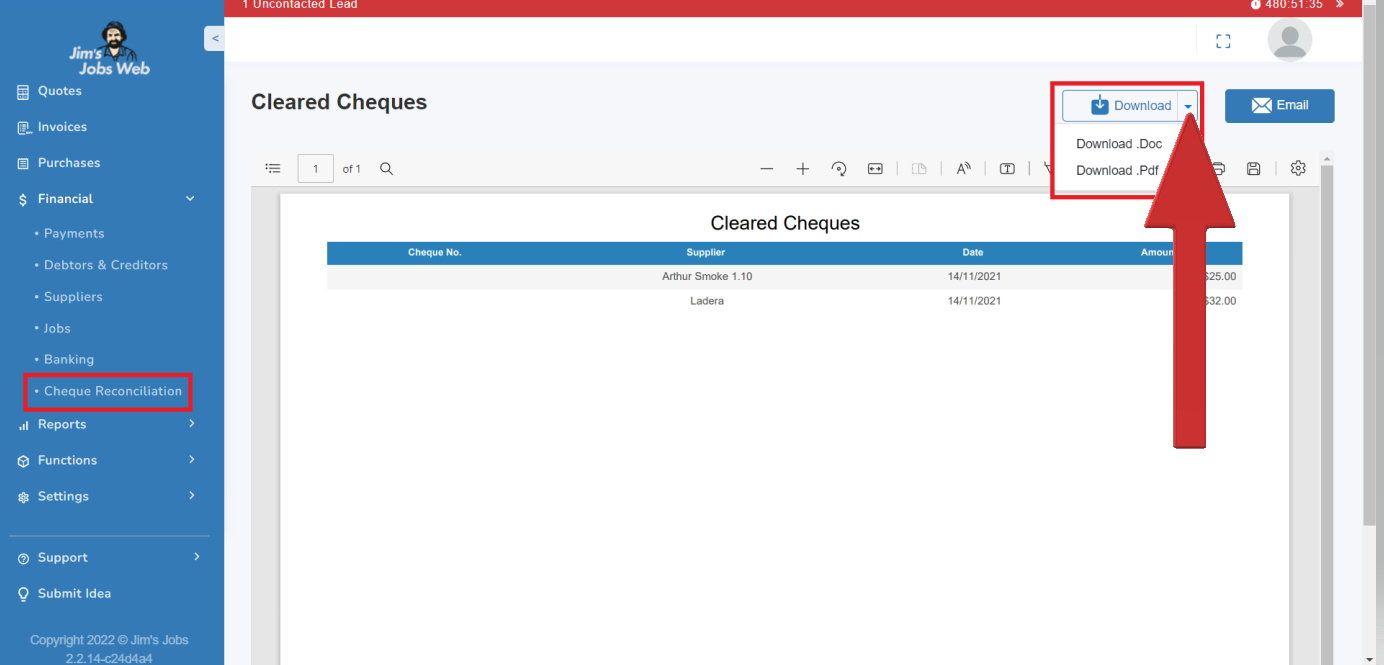
Cheque Reconciliation
This allows you to record those cheques you have written to your suppliers have been presented and cleared as confirmed against your bank statement.
Xero integration
NOTE: As of August 2023, Xero integration WILL NOT be available to users who have not already connected to Xero, until the next version of Jims Jobs is released.
Jim's Job can be integrated into the Xero system for your accounting. Click HERE to find out how to do it.
10 . Reports
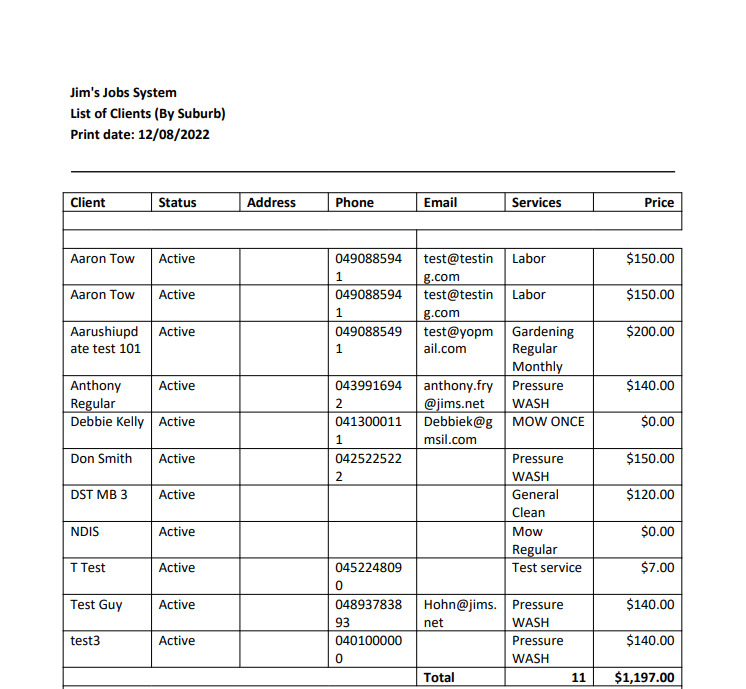
Clients
From the Reports module, Clients Report sorts lists of your client base as per the example below:

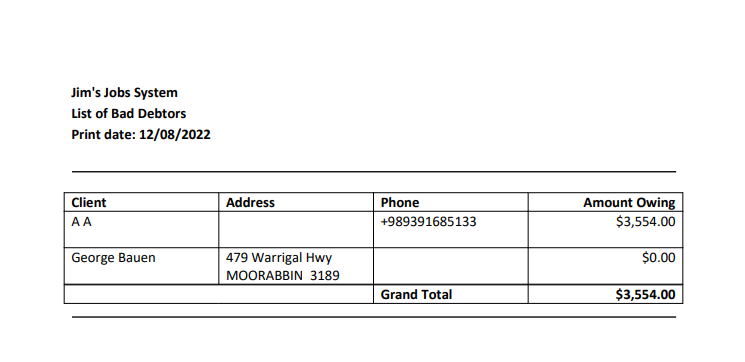
Bad Debtors
To view all your bad debtors, select Reports, then select Bad debtors. If you are doing everything right, this should be a very small listing.
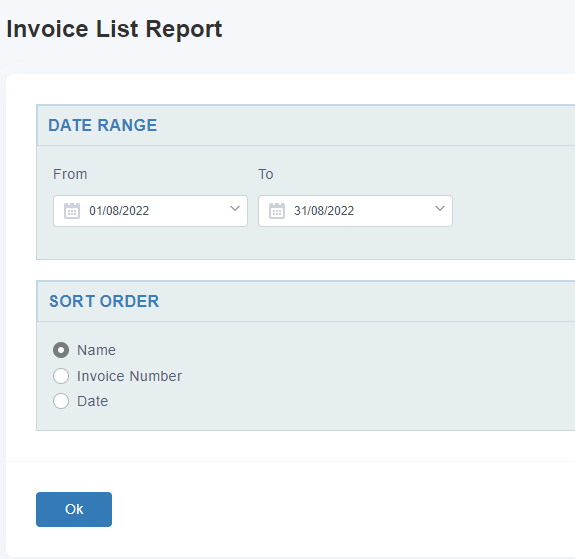
Invoice List
Produce sorted lists of your invoiced client base for any date range, sorted by Name. Invoice number or Date, as per the example below:
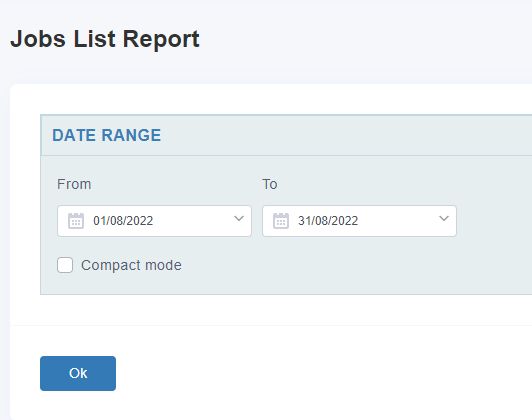
Jobs List
Review lists of jobs done for any date range of your client base as per the example below:
Overdue Jobs
List all overdue jobs from any selected date as per the examples below:

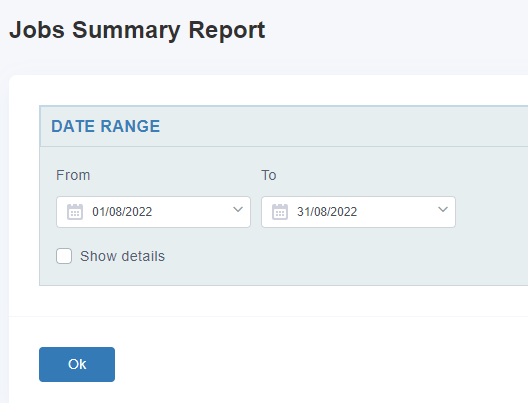
Job Summary
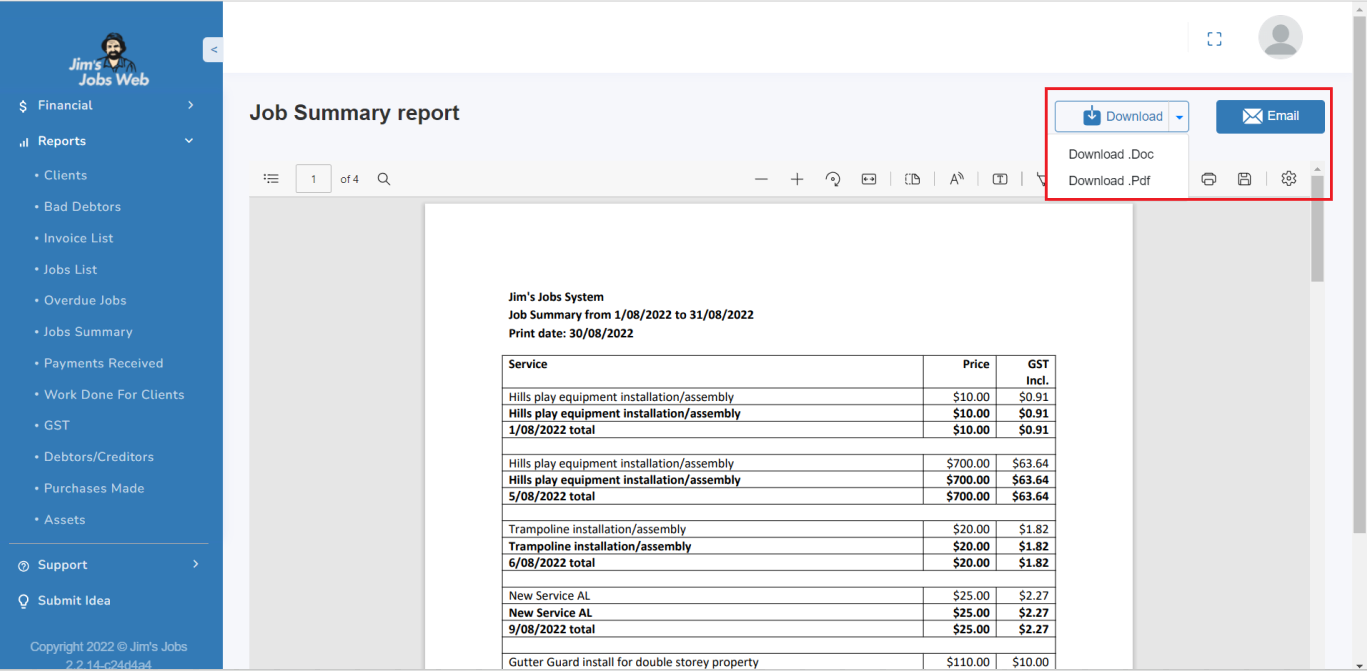
List your jobs summary between a selected date range.
This lists are downloadable in .doc and .pdf formats. You can email it to your customers, as well.
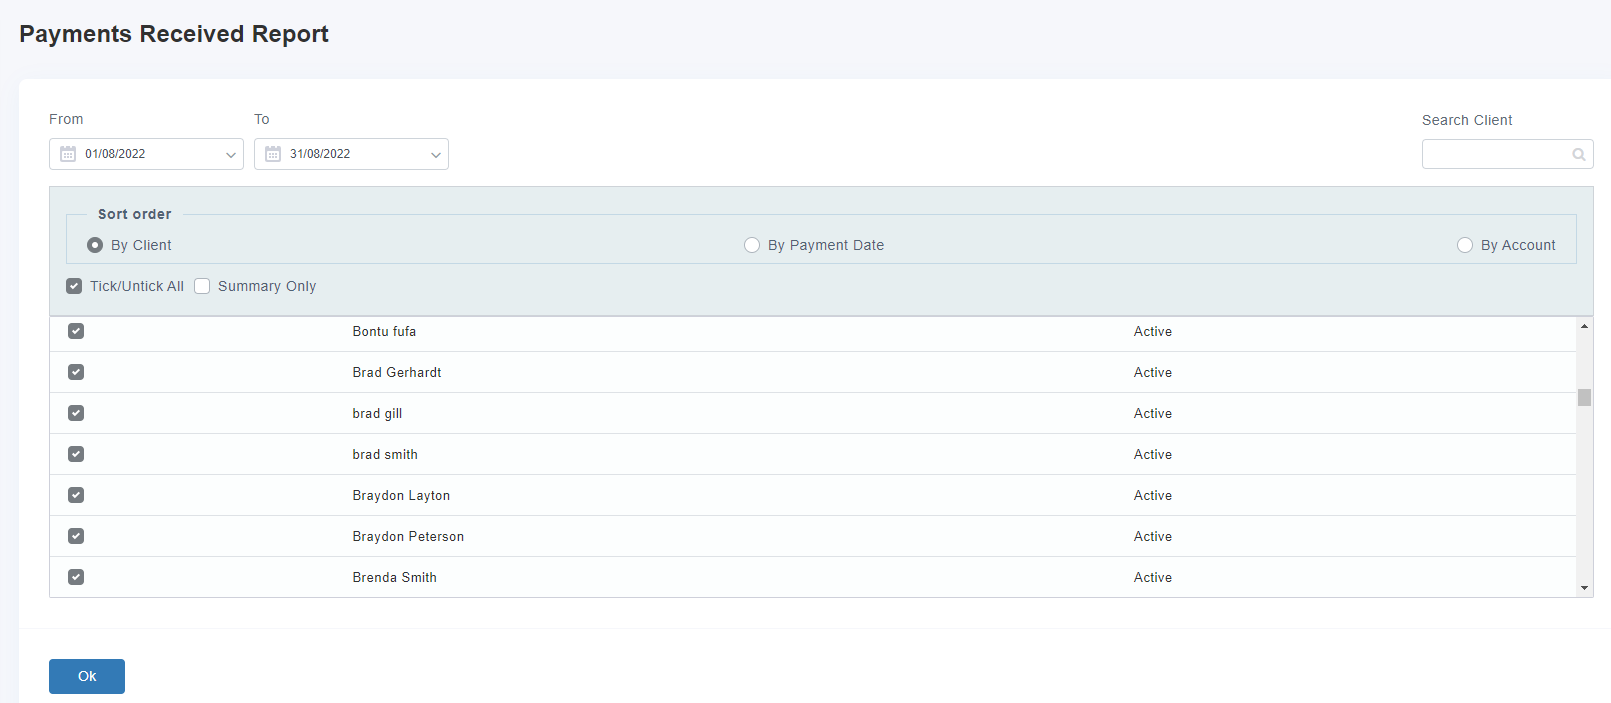
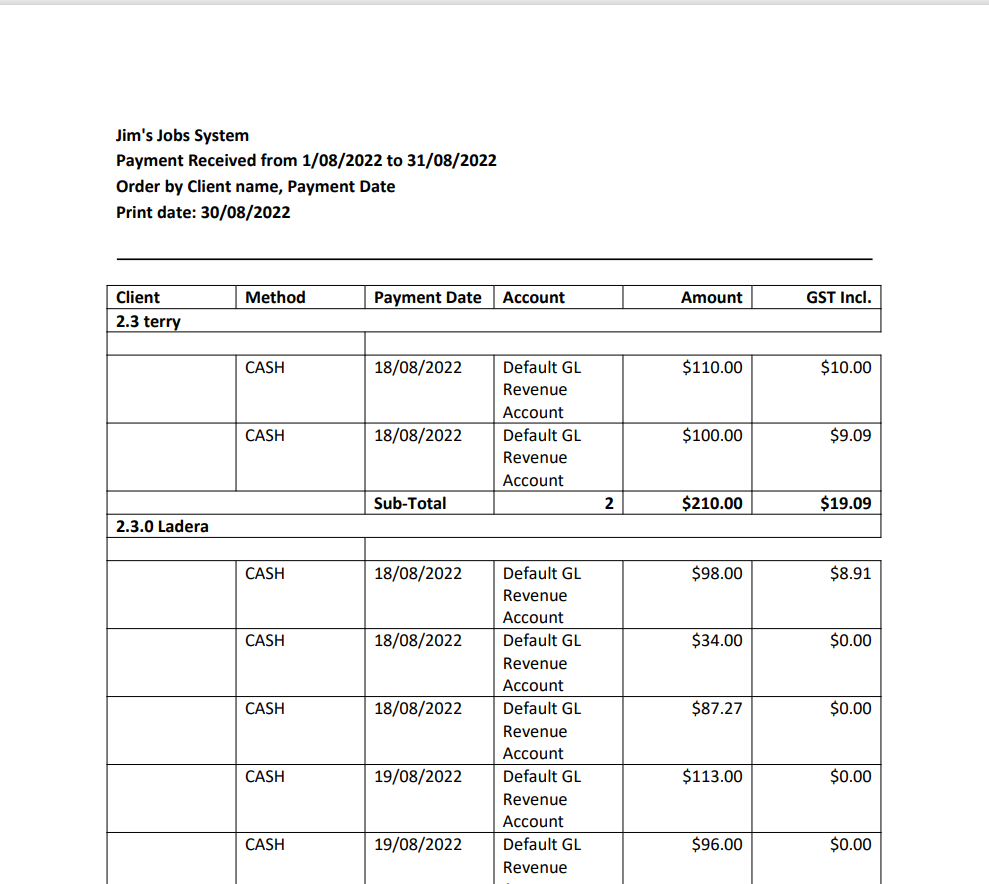
Payments Received
Produce sorted lists of your client payments for any date range, sorted by all clients or only selected clients, or by account, as per examples below:
Work Done for Clients
Select Reports, Select Work done for clients as for Payments Received above, then select Ok. This will display the work undertaken for those clients you have selected for the date range you stipulated.

GST
To view your GST position, click on Reports and select the GST report. This report takes all the payments and purchases you’ve recorded for the date range you have selected and calculates how much GST you must pay or are owed.
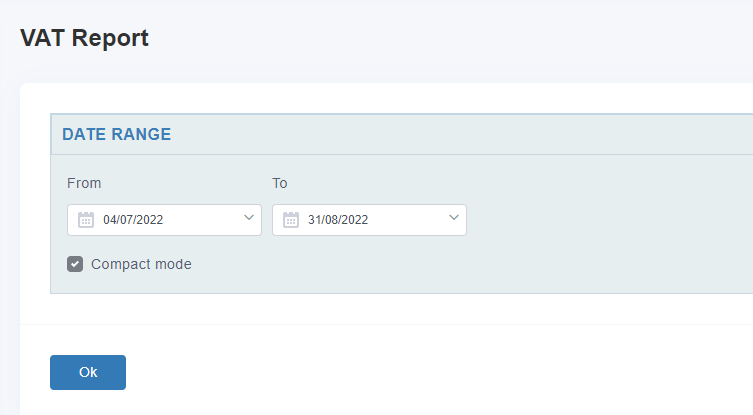
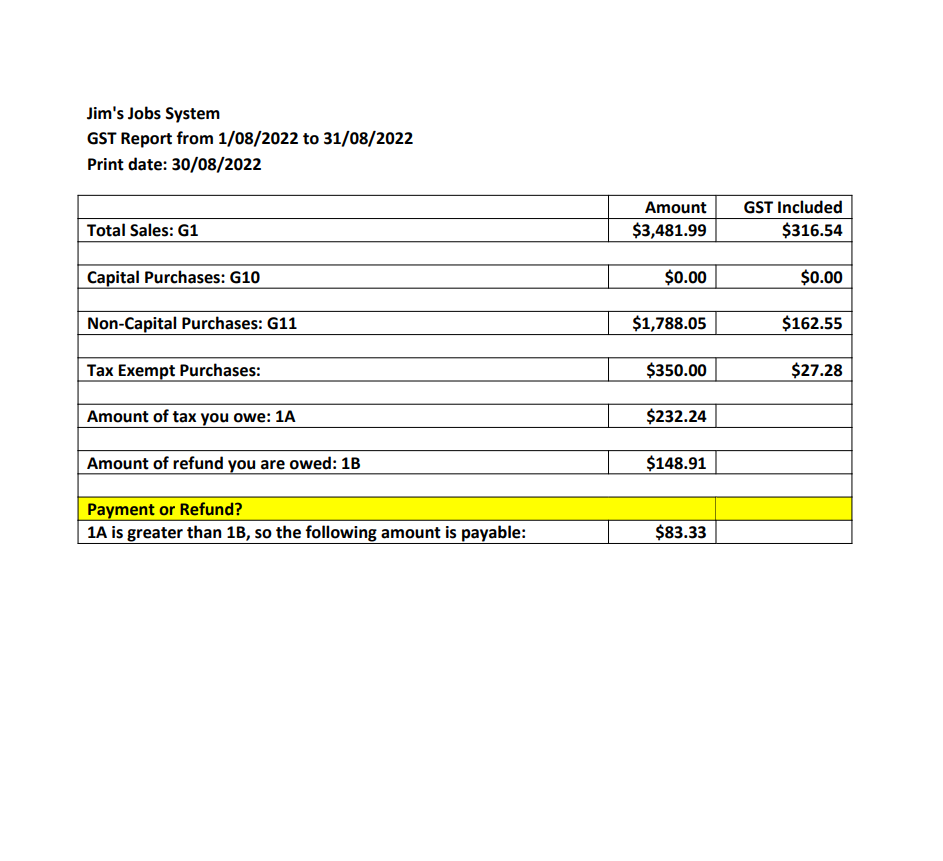
This report can be generated for any period – monthly, quarterly, or yearly, depending on the date range you specify.
The letters G1, G10, and G11 directly match up to the Australian Business Activity Statement fields, so generally, you can copy them directly into the appropriate boxes.
Note: the GST rate is 10% by default. To change this, go to Setup and then Miscellaneous settings and enter the appropriate percentage.
Debtors/Creditors
Produce sorted lists of your Debtors/Creditors for any date range, sorted by Name, Amount owing, or No. of days as debtors, as per examples below: 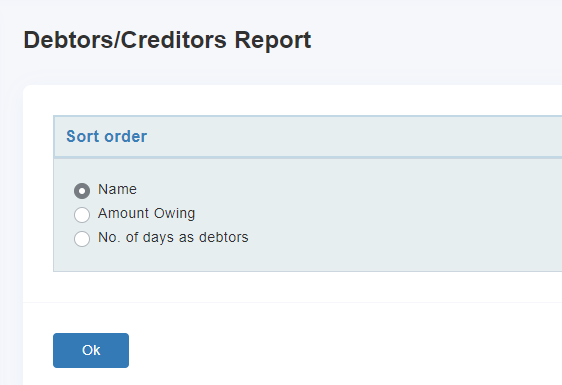

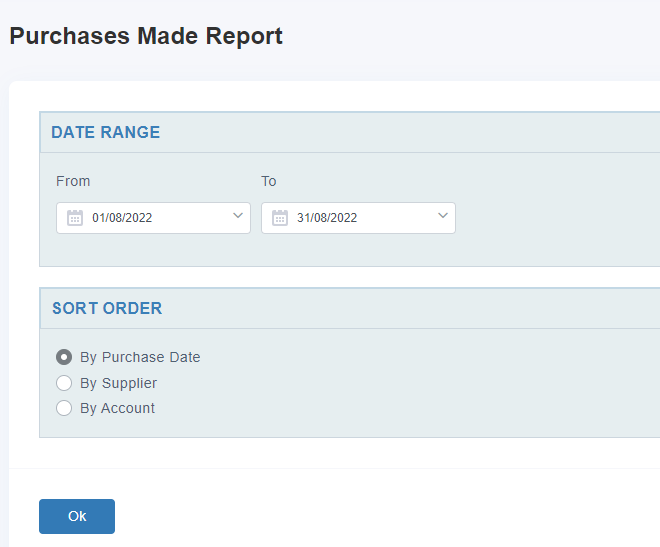
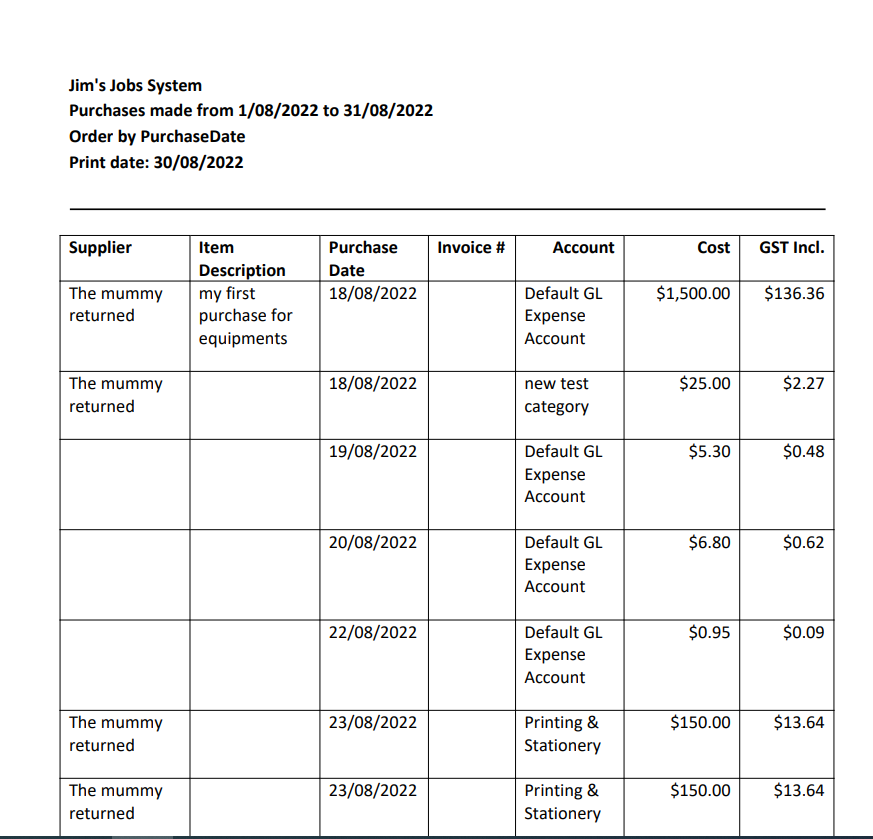
Purchases Made
Review purchases made Weekly, Monthly, Quarterly, or for any date range, by purchase date, by the supplier, or by account.
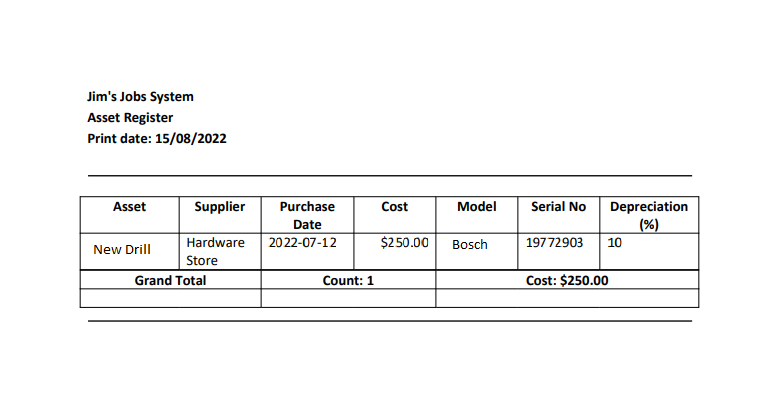
Assets
Review Asset purchases made during the Financial Year.
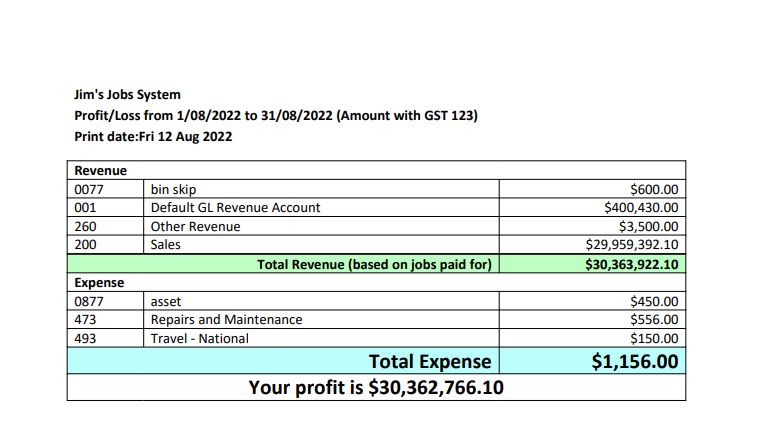
Ledger Accounts (Profit/Loss)
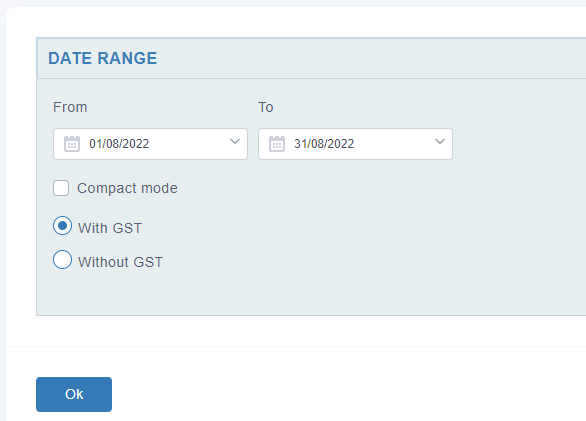
Review your profit/loss with GST or without GST for any specified date range as per the example shown below.
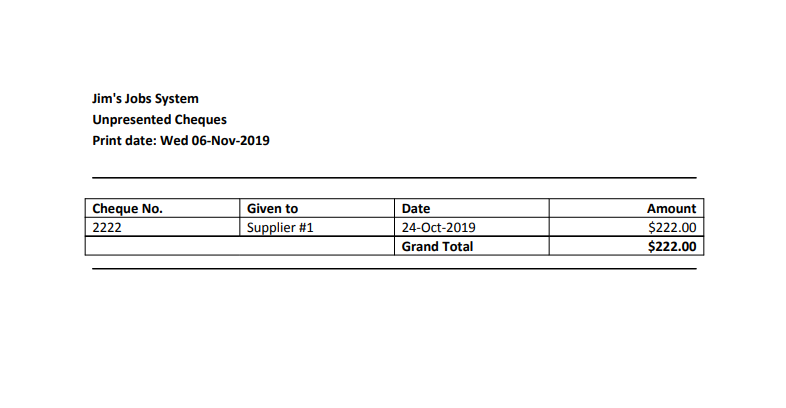
Represented Cheques
Any cheques written by you, against your account will appear in this section until you complete a cheque reconciliation in the Financial section against your checkbook.
11. Functions
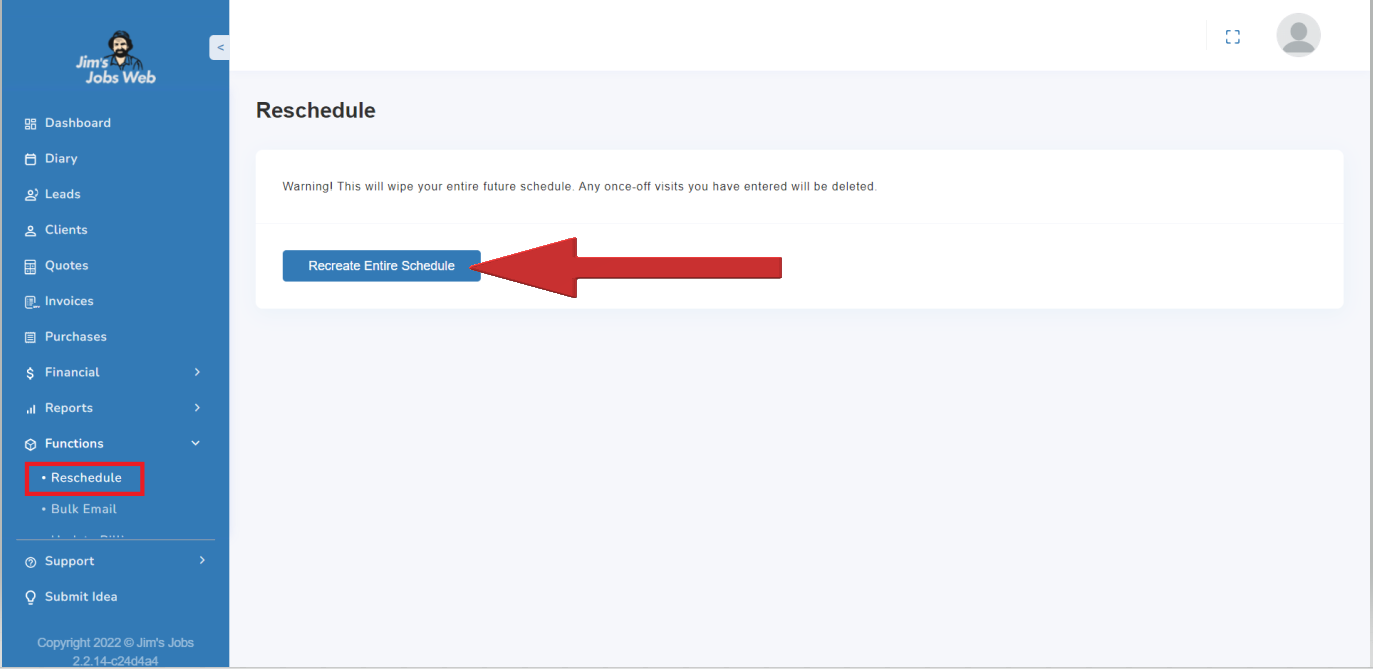
Reschedule
The Functions module contains many features. The Reschedule function recreates the entire job schedule of all clients.
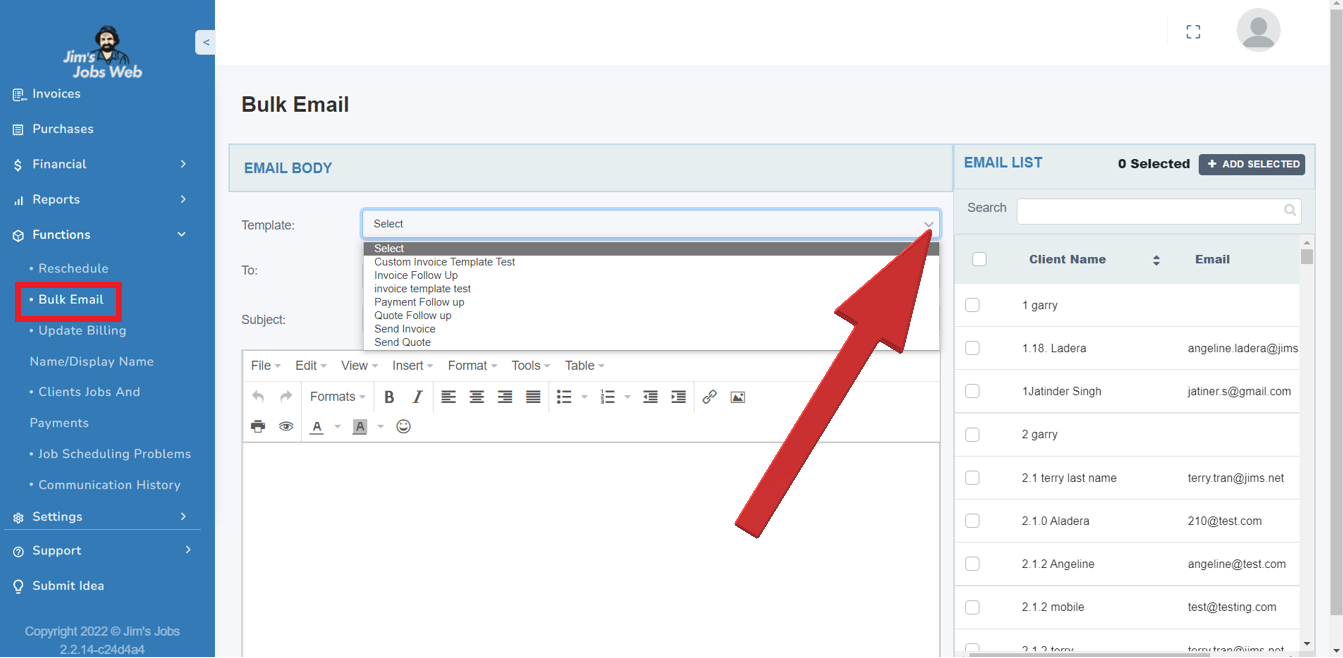
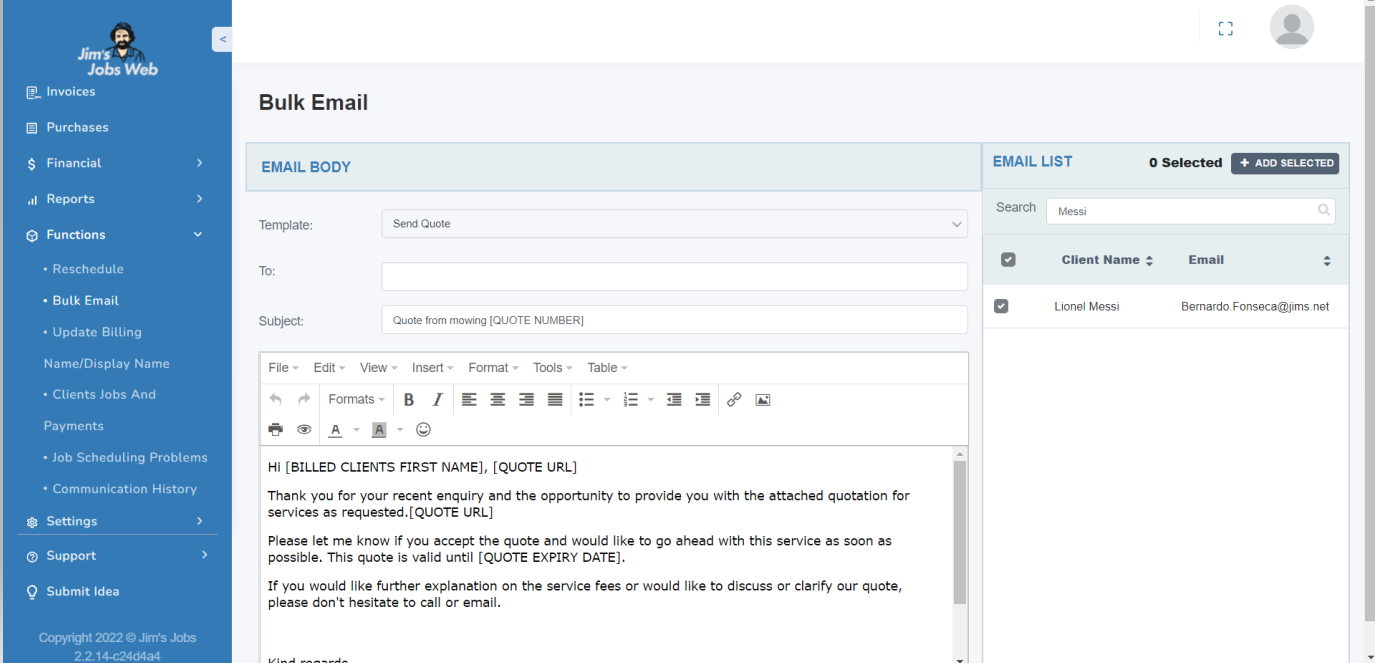
Bulk Email
This feature helps you with time-saving when you need to email your clients, email them individually, and personalize them.
You only need to load the corresponding template. For instance when you want to follow up on and invoice your client
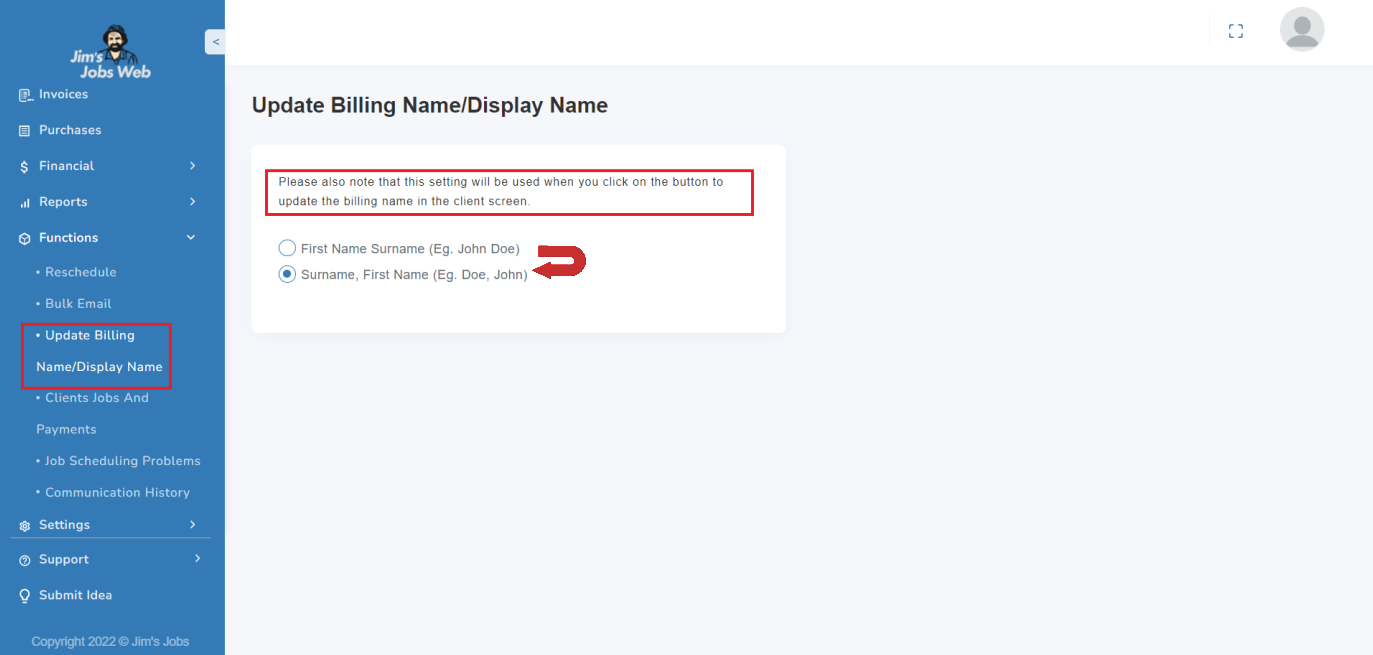
Update Billing Name/Display Name
This updates the Billing Name/Display name of all clients in 2 different formats:
- First name Surname
- Surname, First name
If you omitted to enter a First name or a Surname for any client, then all billing documentation will be blank in that omitted area.
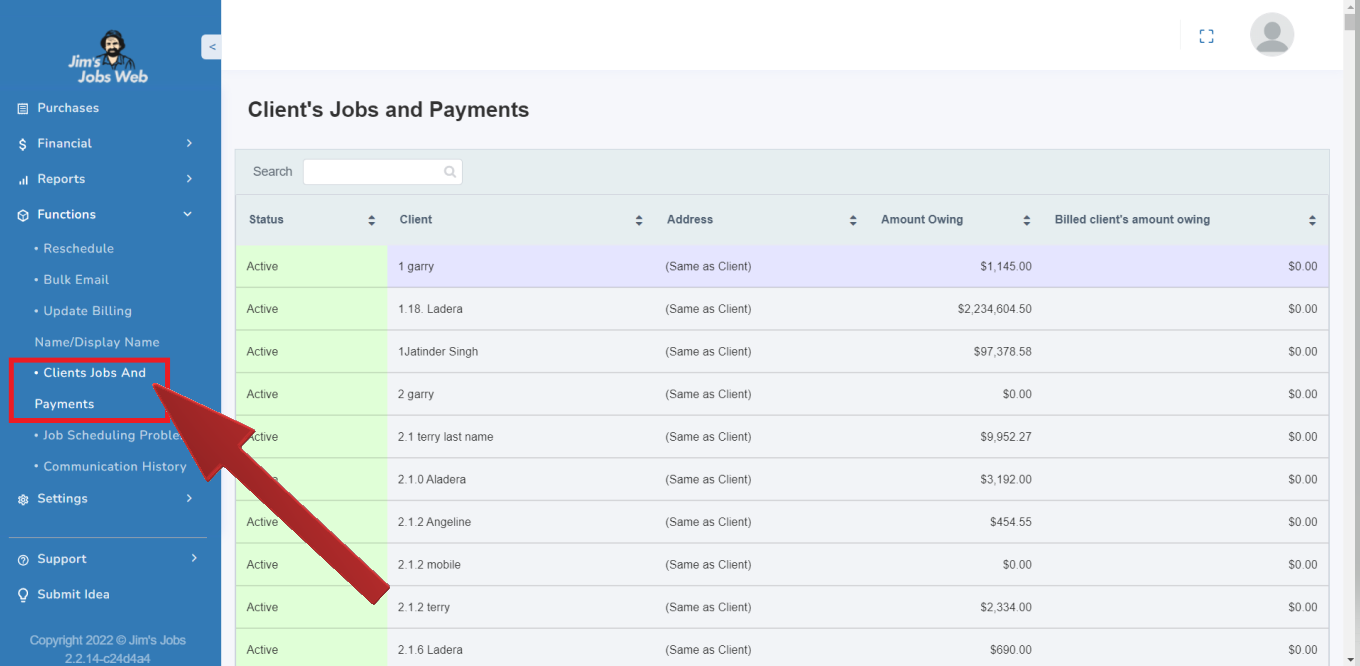
Client’s Jobs and Payments
This screen is useful for matching the total amount of jobs against the total amount of payments received for a client. This can be especially useful when the amount owing for a particular client or date is suspect.
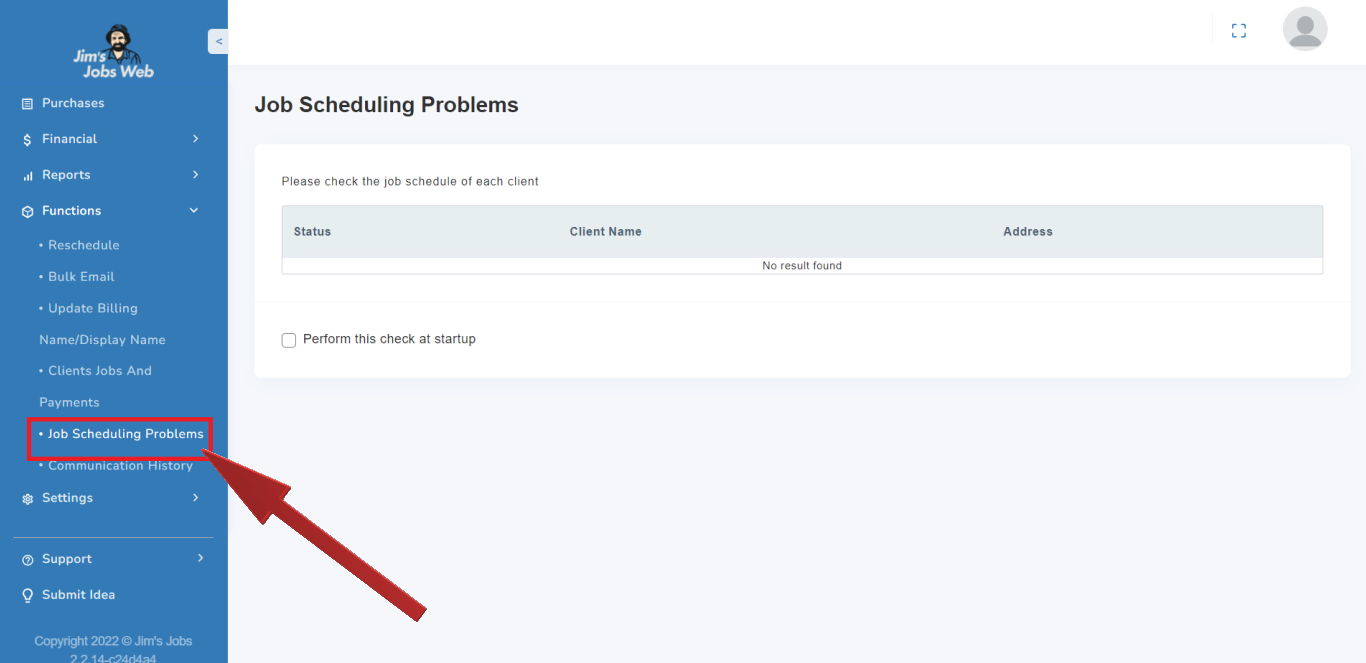
Job Scheduling Problem
One major purpose of this is to avoid getting erratic job schedules. Clients on the list don’t necessarily have erratic schedules. They were added because their schedules don’t match the normal job schedule (e.g. A once-off job or visit was manually added).
Communication History
You can go through the communication you have had in Jim's Job. You can check out the different communication types of your clients with this feature.
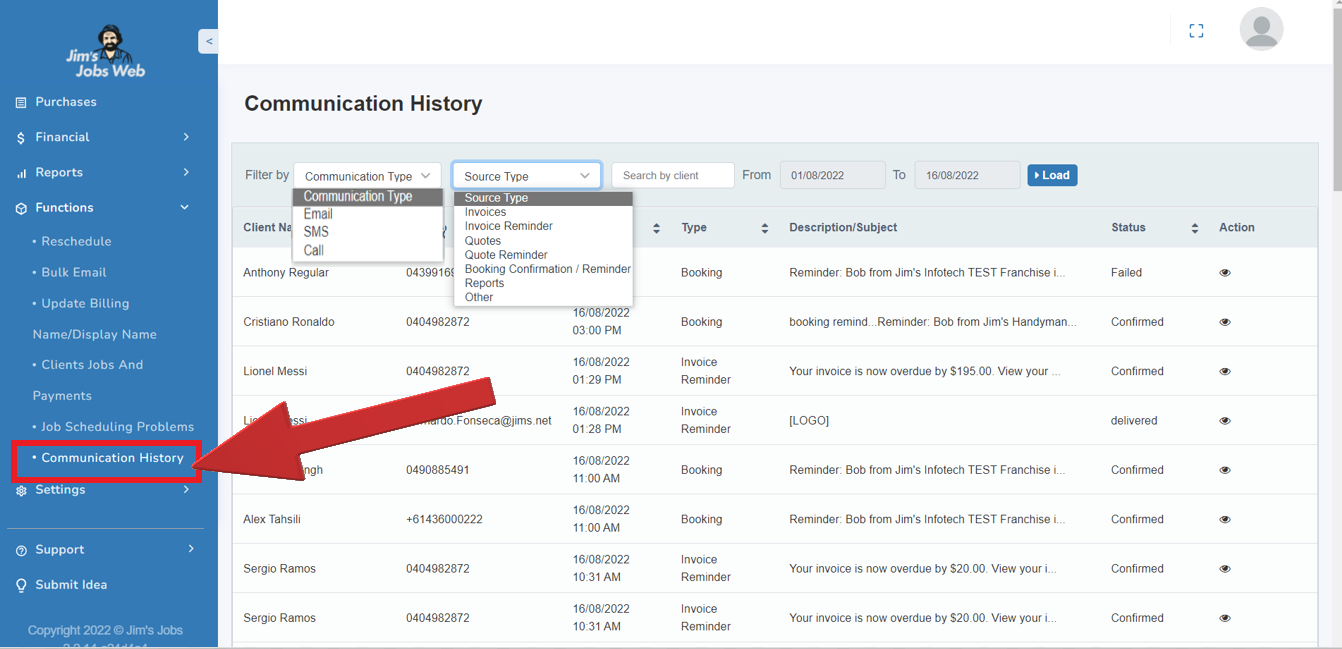
Filters for Communication History feature
You can filter or select by the different communication types in Jim's Job application
- SMS
- Call
Additionally, on the selected communication type, you can filter source type by
- Invoices
- Invoices reminder
- Quotes
- Quotes reminder
- Book confirmation/ Reminder
- Reports
- Other
Search options
You can search all the communication you have had in the system with any client. You just need to type their name and select the data range and hit the "load" button
Email status
These are the possible email statutes.
- "Sent" - Message sent, but still too early to know if it was successful.
- "Bounce" - Message bounced. Contact infotech to investigate.
- "Delivered" - Successfully sent with no bounce.
- "Open" - Client has opened the email (this status can be triggered by some spam filters so is unreliable).
- "Click" - Client has clicked a link inside the email
Call status
For calls that may come from Jim's customer contact center, you can track them down in the communication history. The only status is "called"
SMS status
For SMS these are the possible statuses
- "Failed"- Message fails to be sent to the end-customer
- "Confirmed"- Message was successfully sent
- "Device only"- Message was not delivered by the carrier
12. Settings
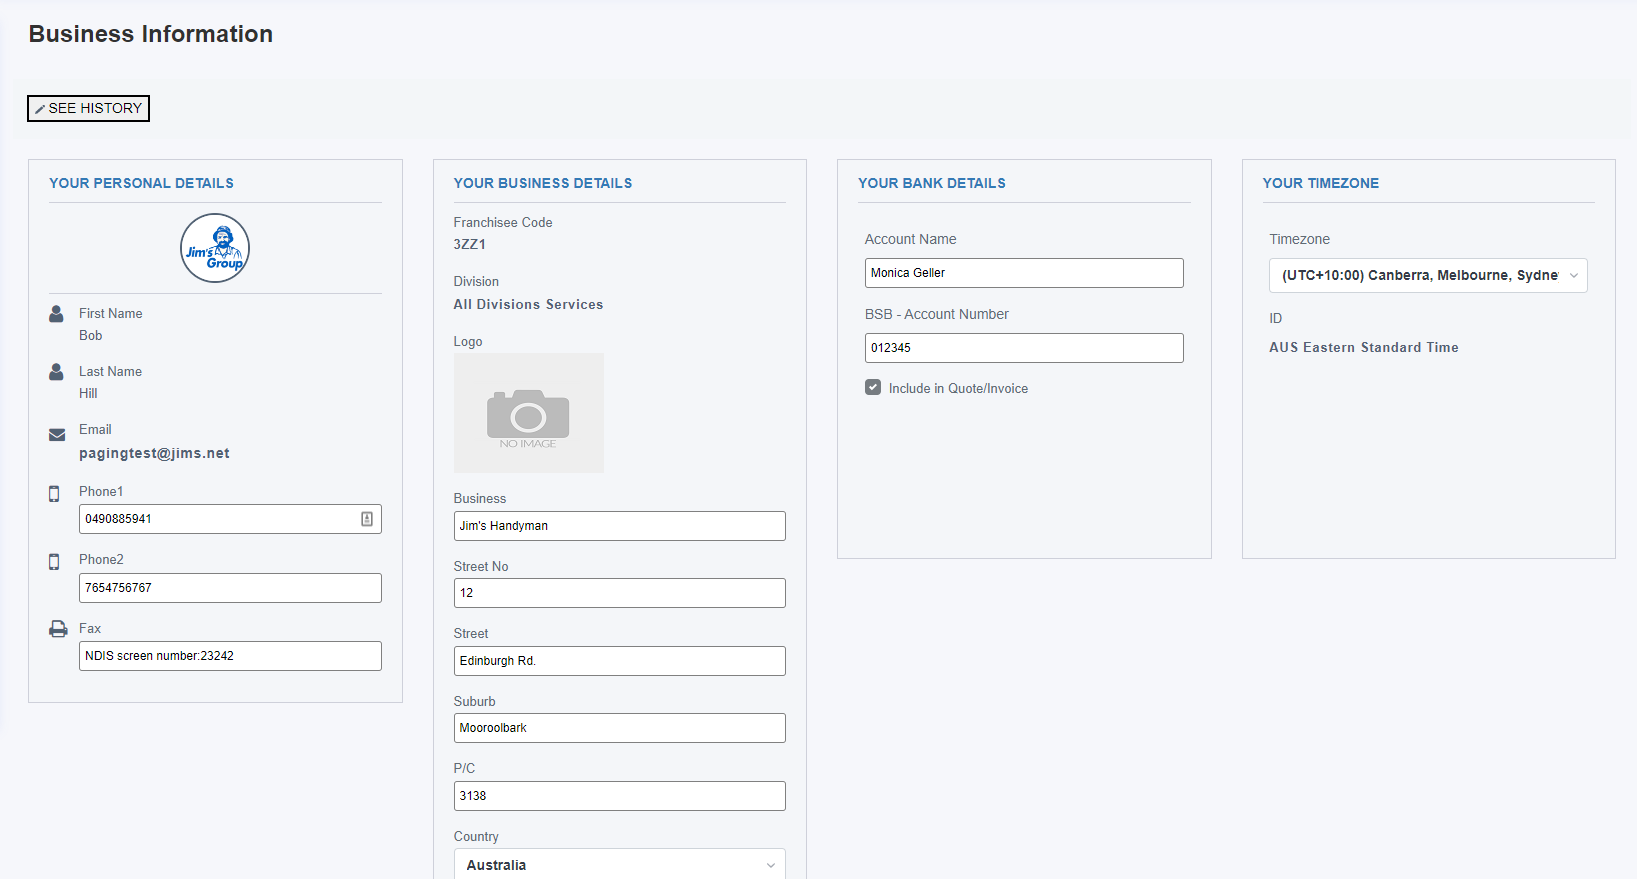
Your Business Information
Invoices generated in Jim's Jobs contain information about yourself and your business in the header. This information can be viewed in Settings → “Business information”.
Your details are also located in Jim's Online, and you can view these in Jim's Online via the "View in Jim's Online" buttons.
You cannot change your personal or company details within Jim's Jobs or Jim's Online. Changing these details will require a call to your FSO / support center to change in FMS.
Your bank details, however, can be viewed and changed in Jim's Jobs whenever you wish.
Items & Services Provided
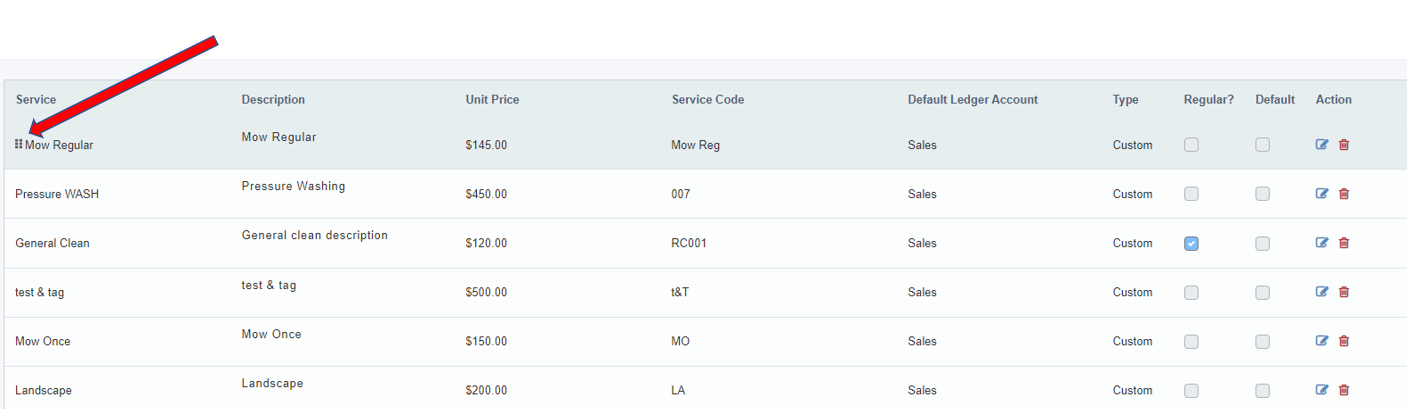
Jim's Jobs is intended to be used by a wide variety of businesses providing a wide range of services. If you need to add your services into the system, you can do that by going to Setup and then Services provided.
Services that you add yourself are "custom" services, and those provided by default from Jim's Group are standard services.
When you first log in, standard services are listed, including those you have been assigned within your division, and those that are available more broadly within Jim's Group.
Leads originating from online booking or the call center will always be linked to a standard service.
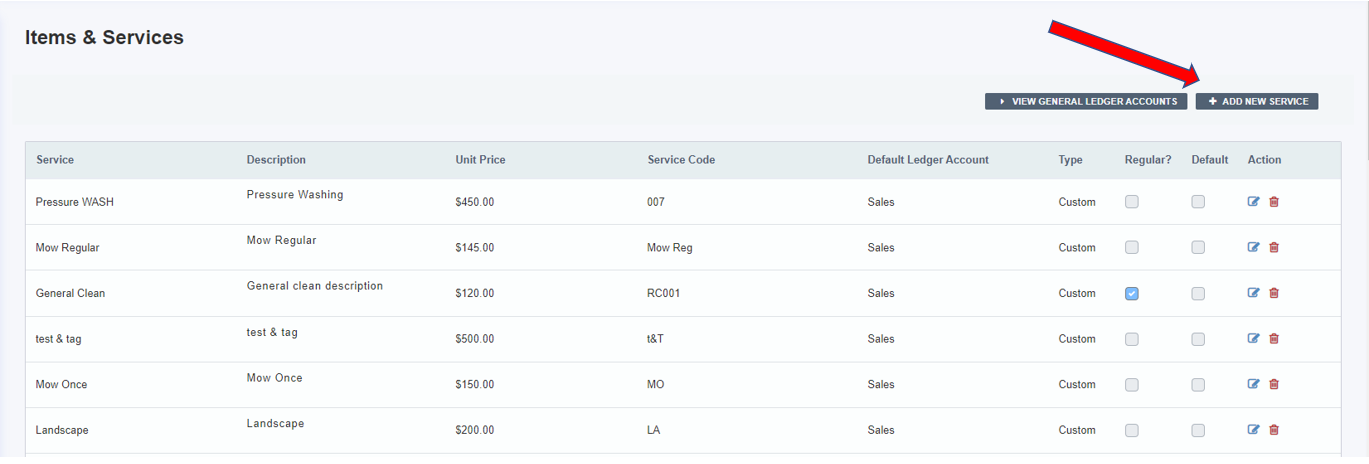
To enter a new service, select +Add New Service and enter all the relevant details.
Before adding in a new service, check if a standard service may meet your needs, so you don't create duplicate/same services in the system.
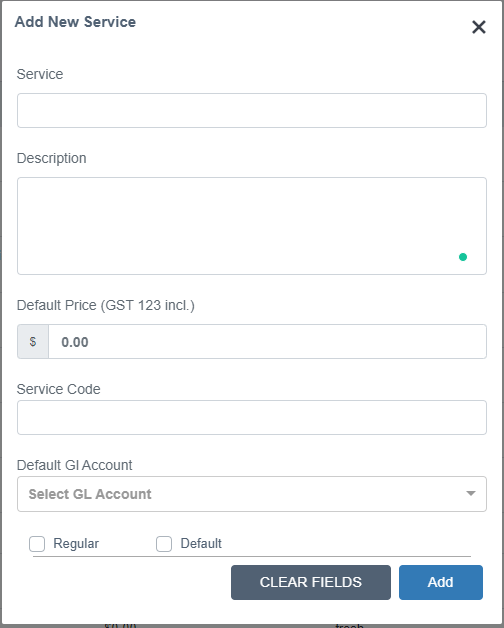
You can sort the order of your Services so the ones you use more frequently go to the top of the Custom/Standard Services list.
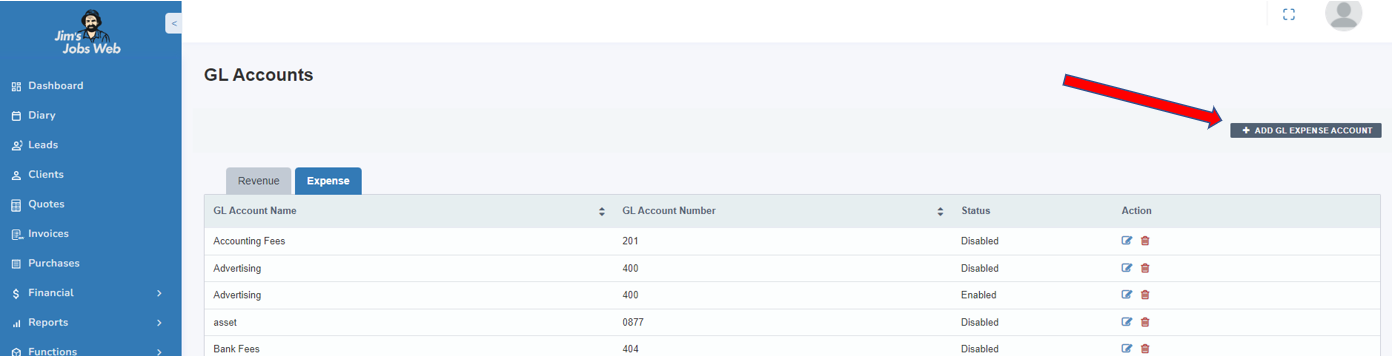
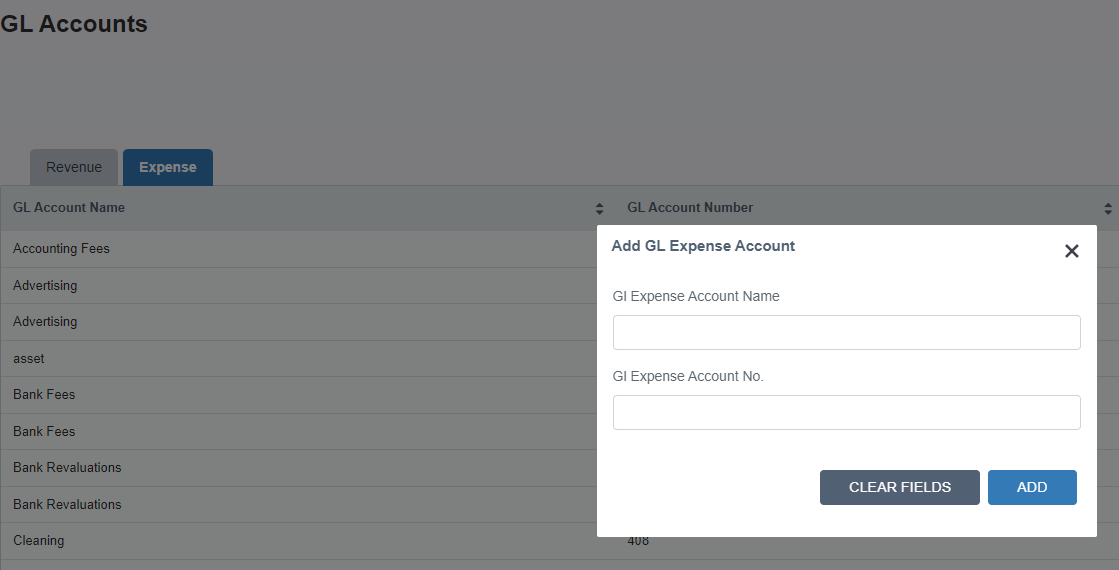
GL Accounts
A general ledger account is an account or record used to sort, store and summarize a company's transactions. You can add a Revenue or Expense account depending on the transactions. To create a GL account please click on + ADD REVENUE ACCOUNT or + ADD EXPENSE ACCOUNT.
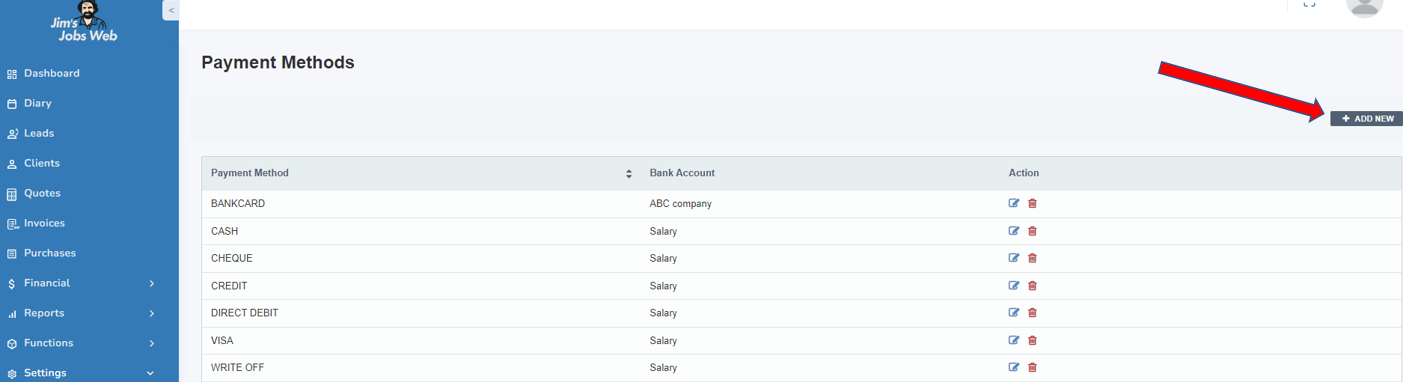
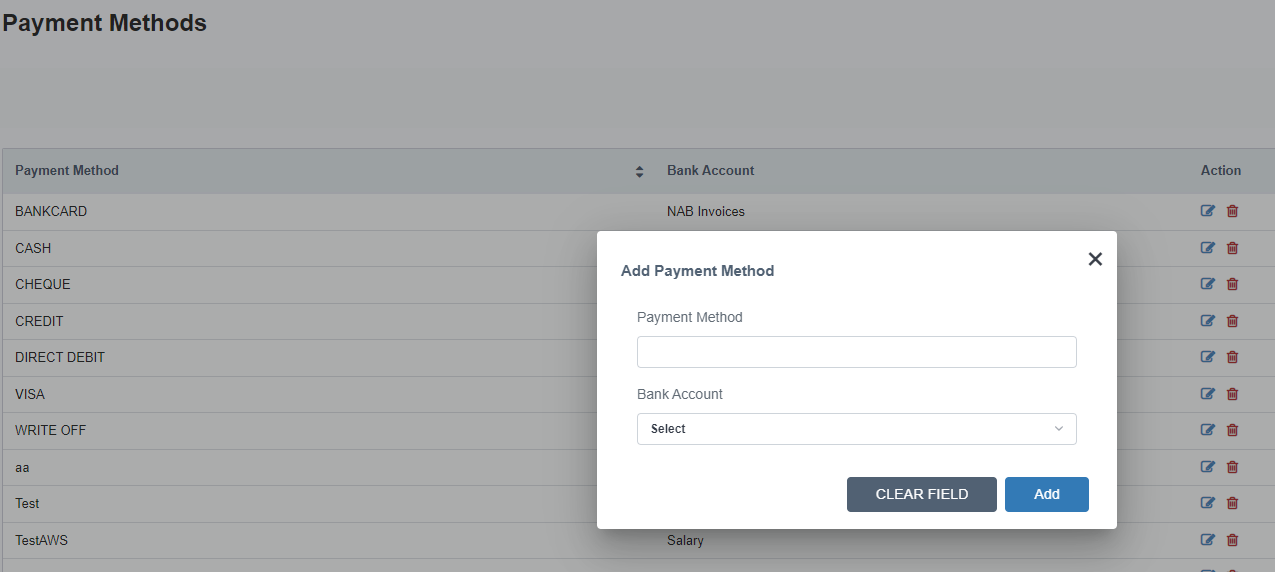
Payment Methods
A payment method is the way that customers pay for a service. To add a new payment method please click on +ADD NEW.
Employees
Jim's Jobs allows you to manage several employees and allocate jobs and clients to them. You can set up your list of employees by going to Settings and then Employees.
To add a new Employee please click on +ADD NEW
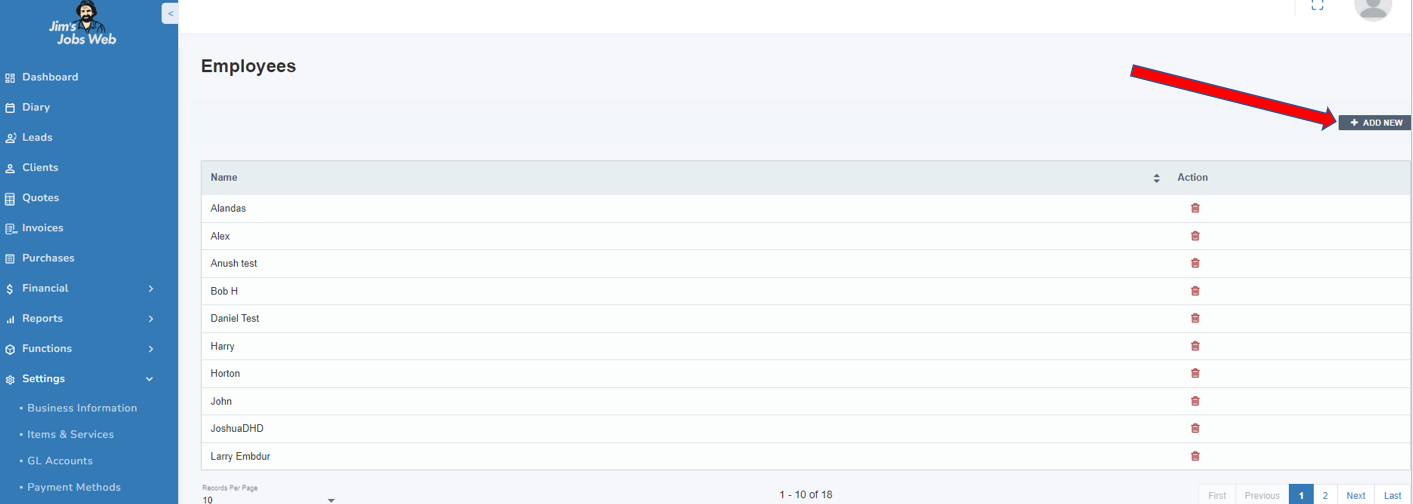

You can assign specific clients and specific jobs to each of the employees in this list.
You can then view separate run sheets from the Diary by selecting them in the drop-down box.
To assign a certain client to an employee, first, locate the client on the Find Clients screen, and then select the Services and Scheduling tab. You can then select the appropriate employee for the job.
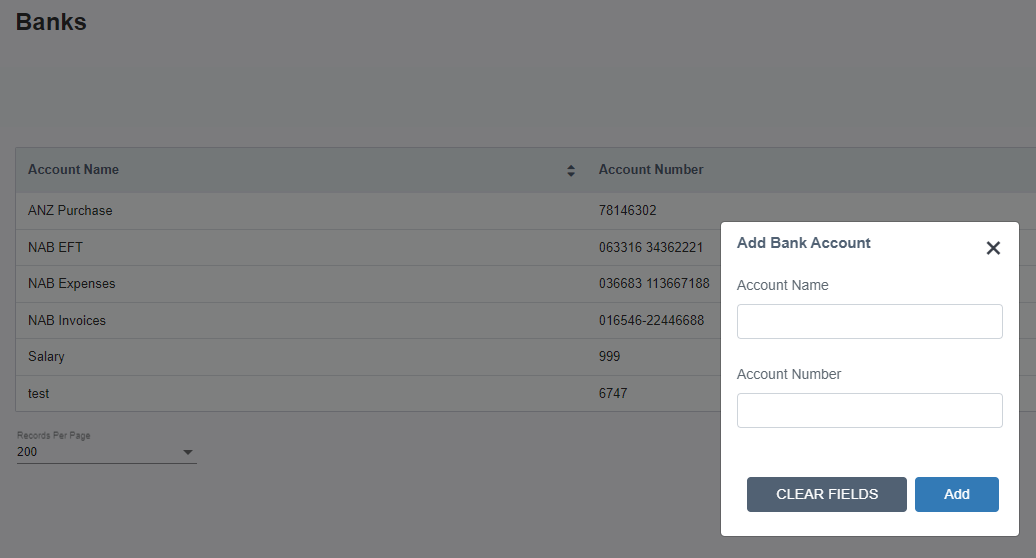
Banks
You can add the Banks related to the business. To add a new bank account please click on + ADD NEW.

Holidays
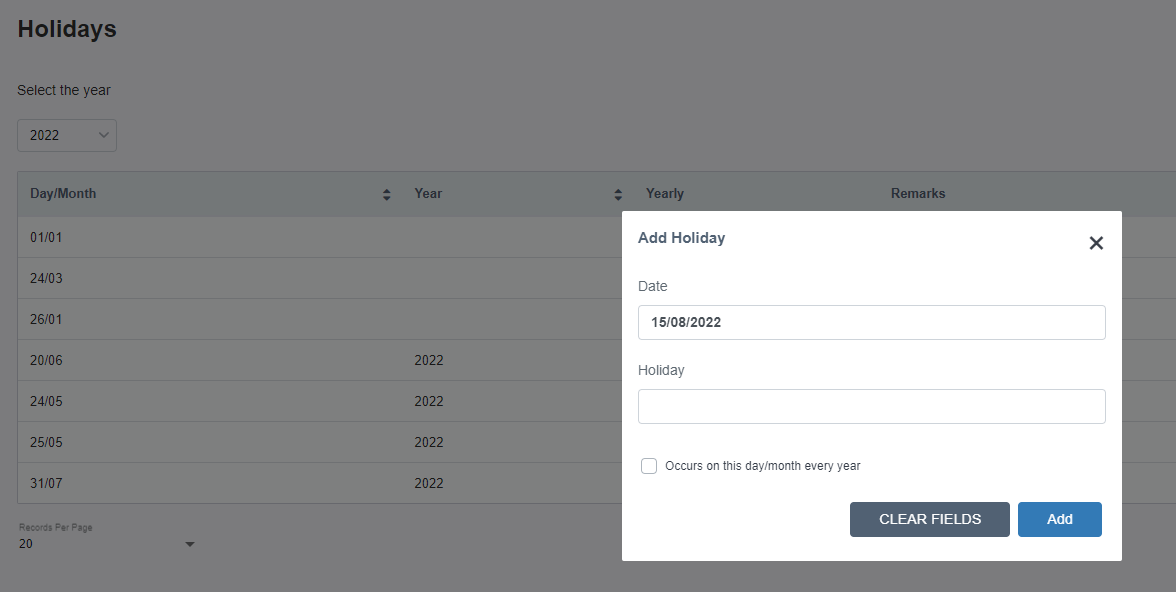
You can capture holidays ( public and your own) to ensure that your job schedule for clients avoids these dates. If a job is scheduled for a Holiday date, it will be moved automatically to the next day. To add a new Holiday please click on + ADD NEW.
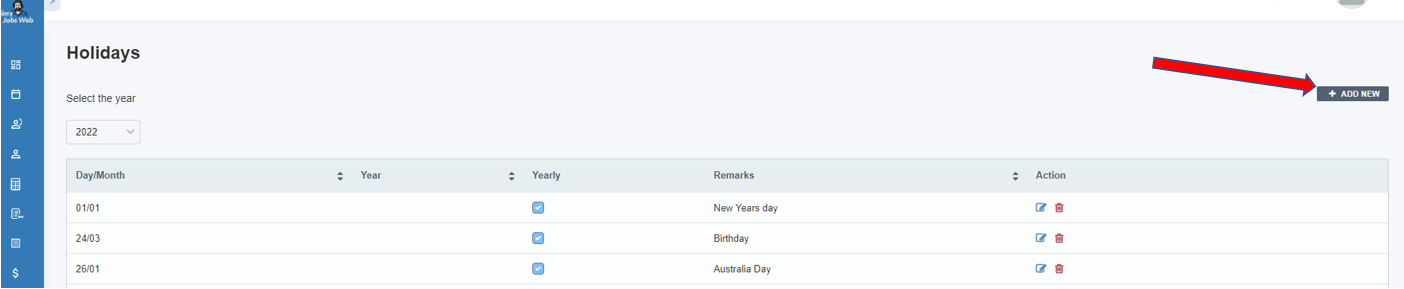
To add a new Holiday please click + ADD NEW.
Schedule Frequencies
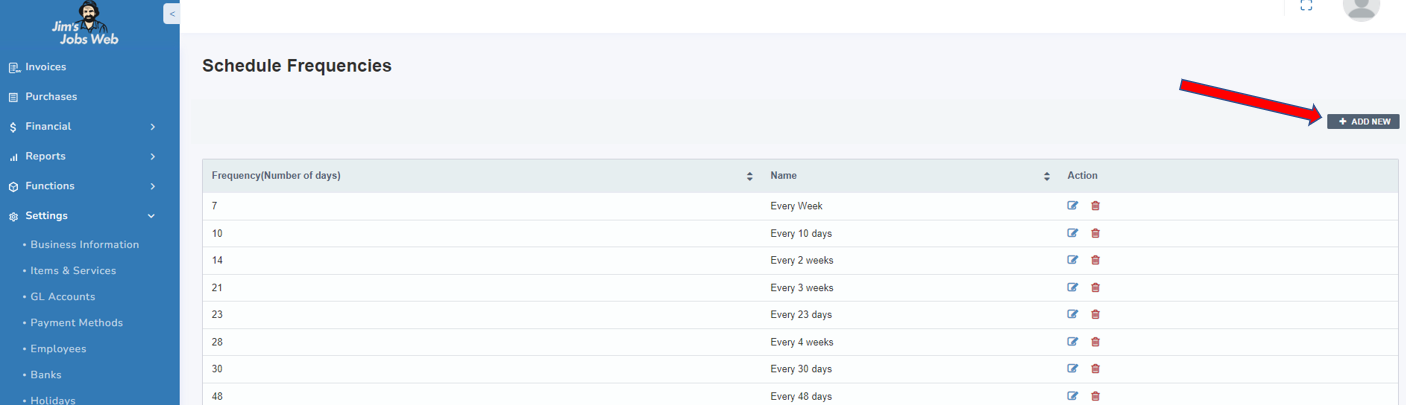
By default, a few frequencies have been added in for your convenience, but you can add in other frequencies as you wish. These frequencies are used to specify the period between Regular Jobs that you add in for clients. To add a new Frequency please click on + ADD NEW.
Countries
By default, countries supported by Jim's Jobs are loaded for your convenience. You can add a new Country where your business is located.
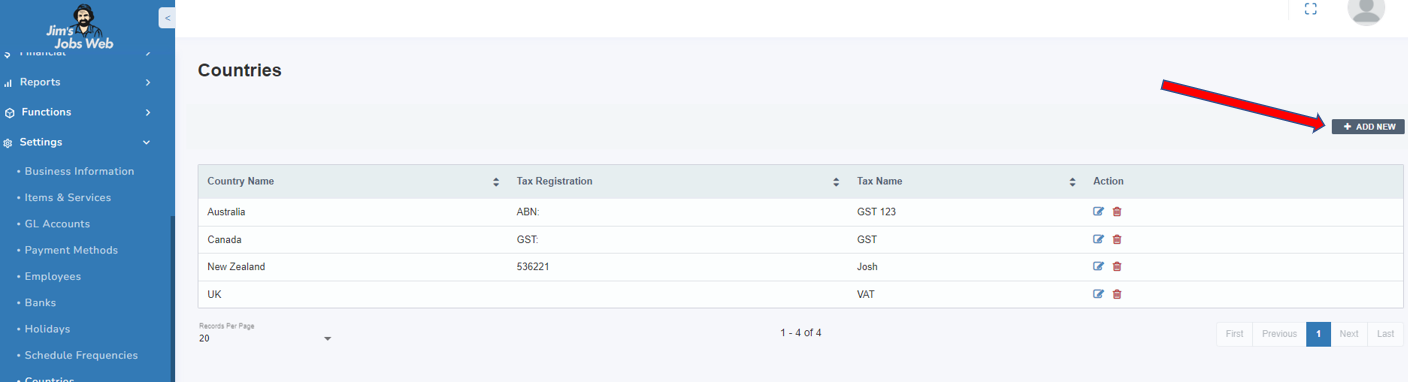
This will replicate on the Business Information page under Settings.

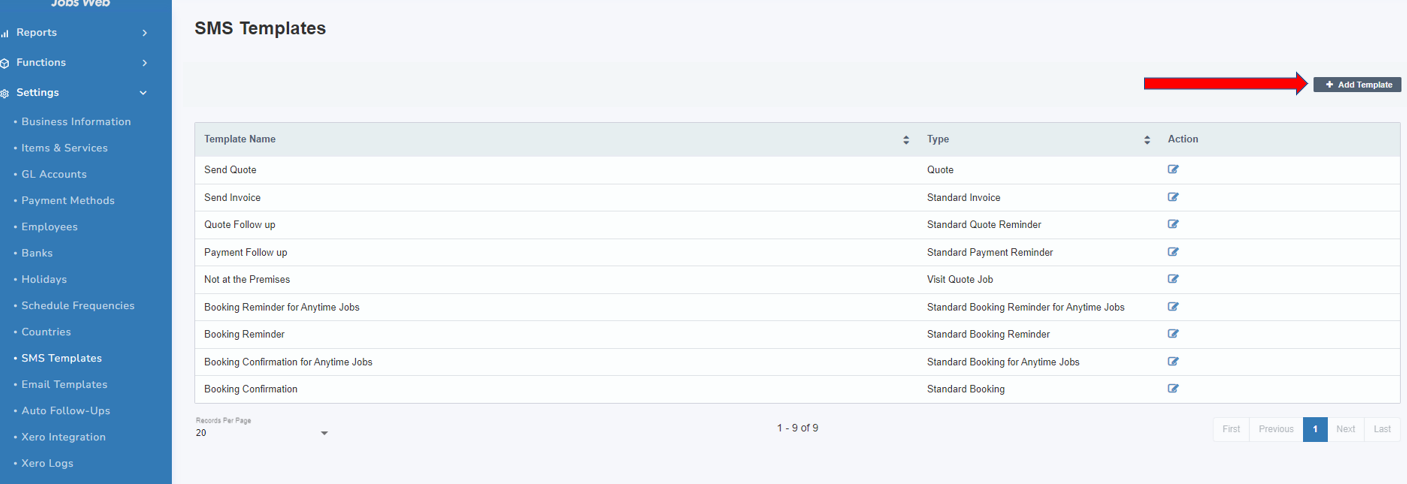
SMS Templates
You can see and edit all your SMS templates under one page and when you try to send an invoice, a quote, or a reminder to any of your clients, you will see your updated email template pre-populated. to add a new Template please click + ADD Template.
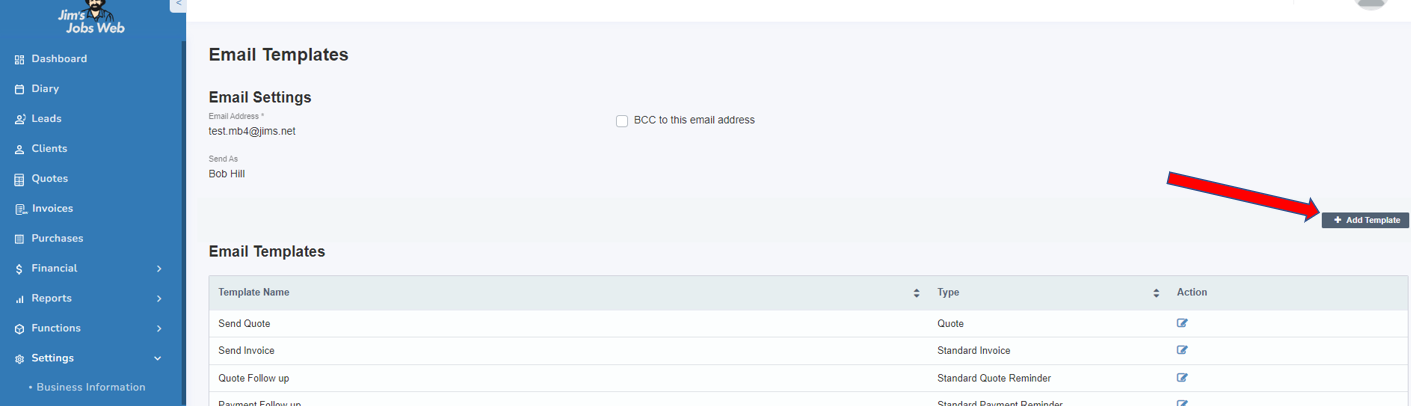
Email Templates
You can see and edit all your Email templates under one page and when you try to send an invoice, a quote, or a reminder to any of your clients, you will see your updated email template pre-populated. to add a new Template please click + ADD Template. Just to clarify this feature allow you to change or create the body or content of the emails that you send to your clients. You are not able to modify the layout of the quote or invoices.
Auto Follow-ups
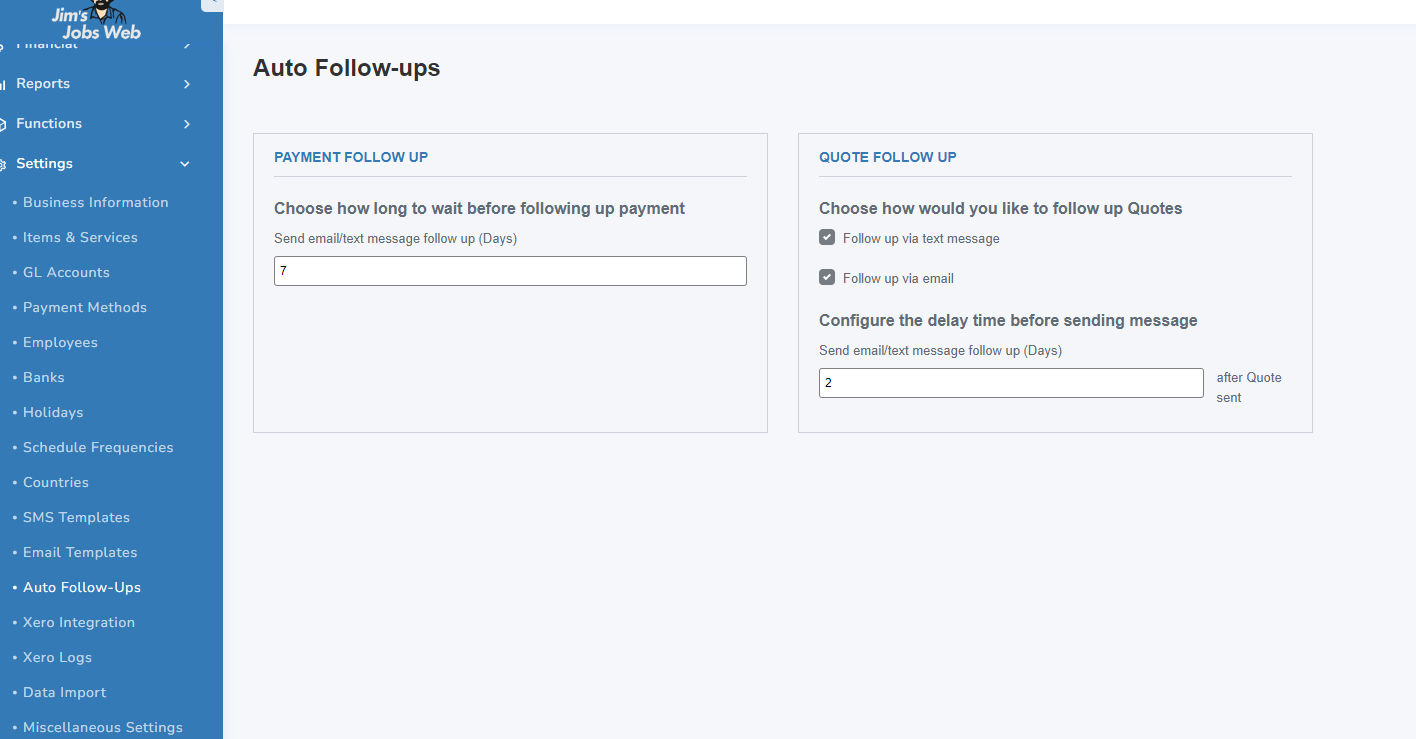
You can also choose how many days to wait before a reminder for payment or Quotes email/SMS is sent to the client from the Settings menu.
The scheduled job will periodically check if there are any quotes with the status 'Active' and send a reminder to the clients between 9 am and 5 pm on weekdays to approve the quote by SMS or Email.
Xero Integration
For those wishing to integrate with XERO, please refer to HERE .
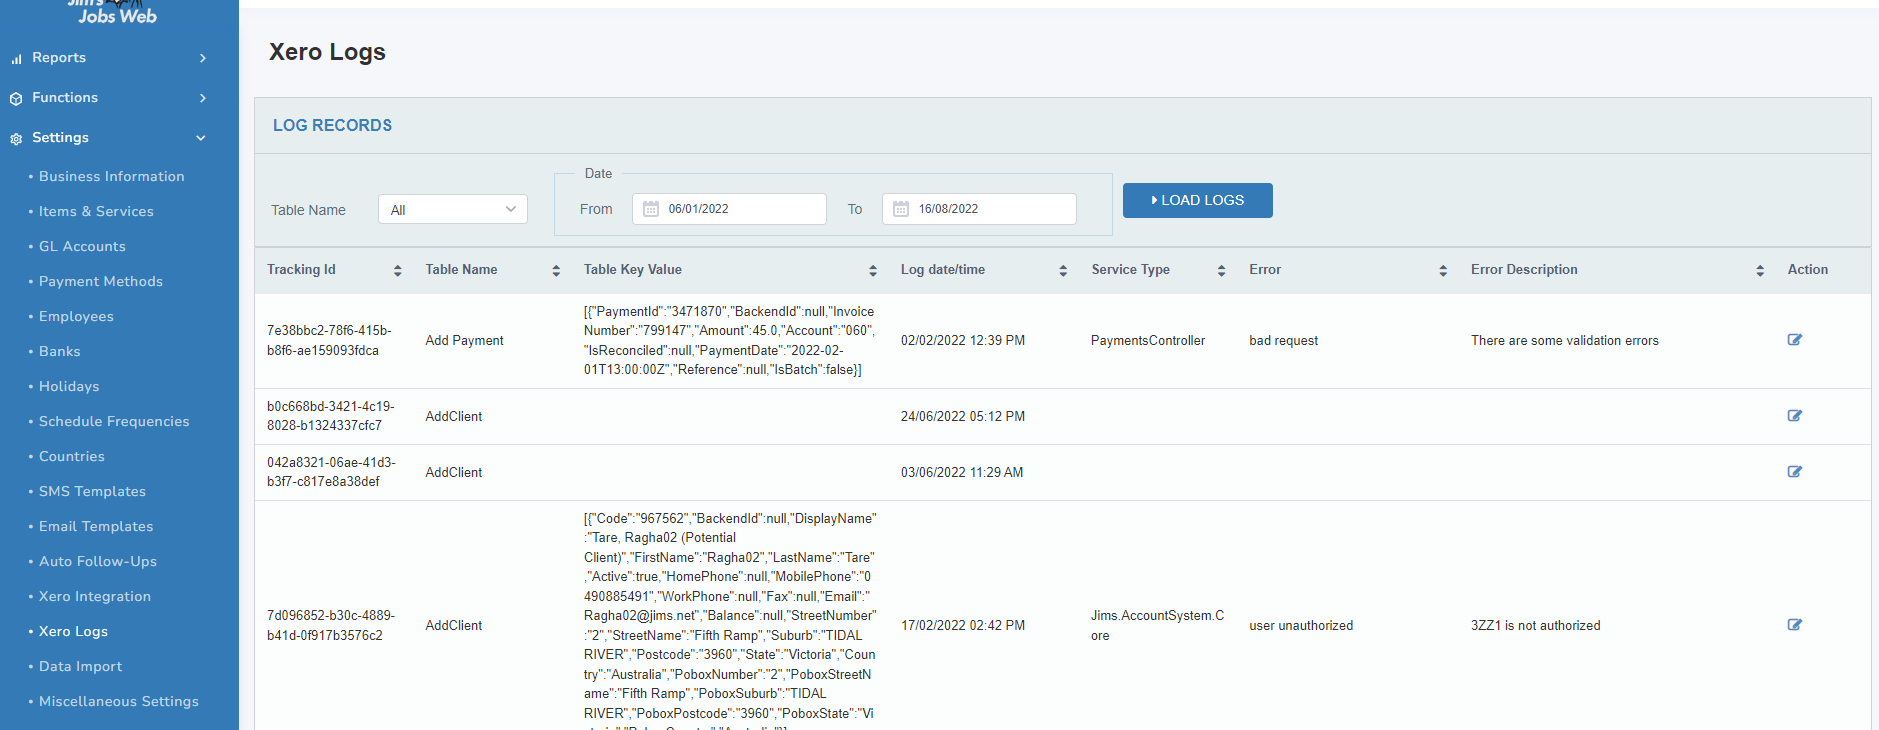
Xero Logs
When users report errors in integrating with Xero, most of the time we can pinpoint the cause of the error by examining the Accounting Integration Logs. The logs can be accessed through Settings > Xero Logs.
Data Import
You can import your data into Jim's Jobs from different sources such as; Jimbo, Jim's Jobs Classic, and Jim's Online. Formitize.
Select the Source.
For those who have issues with XERO, please refer HERE to resolve them.
Miscellaneous Settings
Under Miscellaneous Settings, you can change the Tax Percentage, Auto schedule ahead of days, Invoice expiry days, and Quote expiry.
13. Support
- Phone 1300 130 490 (+61 3 9496 1427) for 24/7 phone support provided by our Front Line team.
- If they are unable to resolve your inquiry, they will escalate your request.
- Contact InfoTech@jims.net for email support.
- Check https://status.jims.net for any outages.
- For urgent "business hours" assistance, call the National Office on 61 3 9780 9998, Monday to Friday, 9 am to 5 pm excluding public holidays.
- If we are unable to take your call, please leave a message and we'll get back to you as soon as we are available.
Jim's Jobs may come across the occasional problem or bug that needs fixing. Please provide your feedback and as much information as possible to enable us to troubleshoot any issues.
Jim's Jobs has been improved upon primarily by feedback from you, the Franchisee, and thus we appreciate everyone’s comments and suggestions.
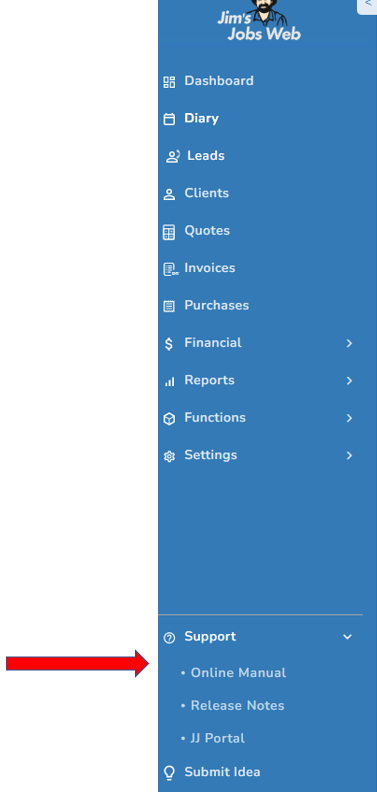
Online Manual
The user manual includes instructions FSE requires, every step on how to install, configure, and other tasks.
Jim's Jobs - User Manual - InfoTech Support Knowledge Base
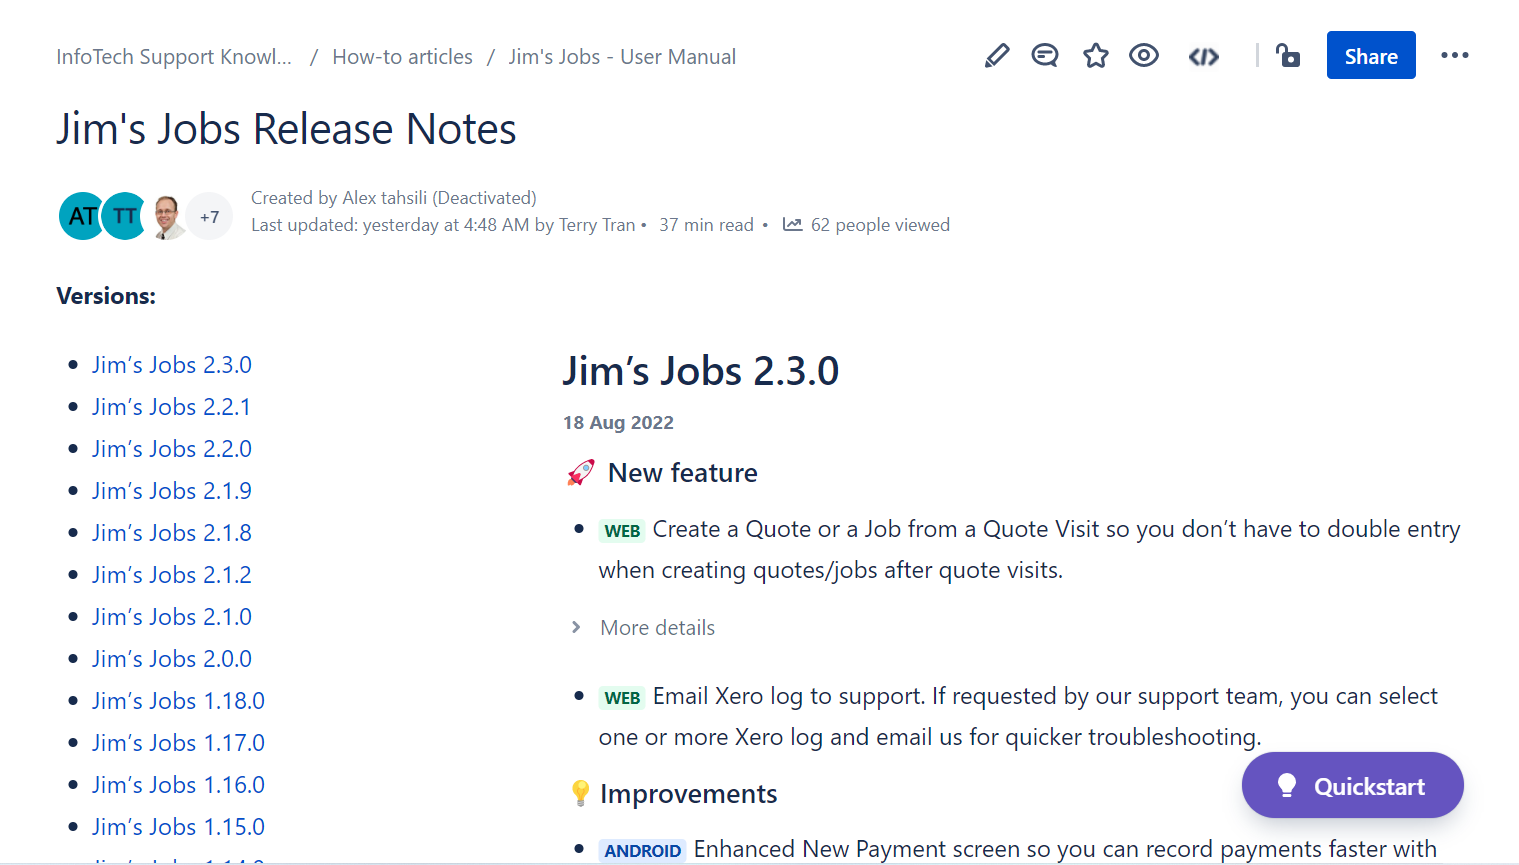
Release Notes
Recent changes, enhancements, and bug fixes in a particular software release.
Jim's Jobs Release Notes - InfoTech Support Knowledge Base
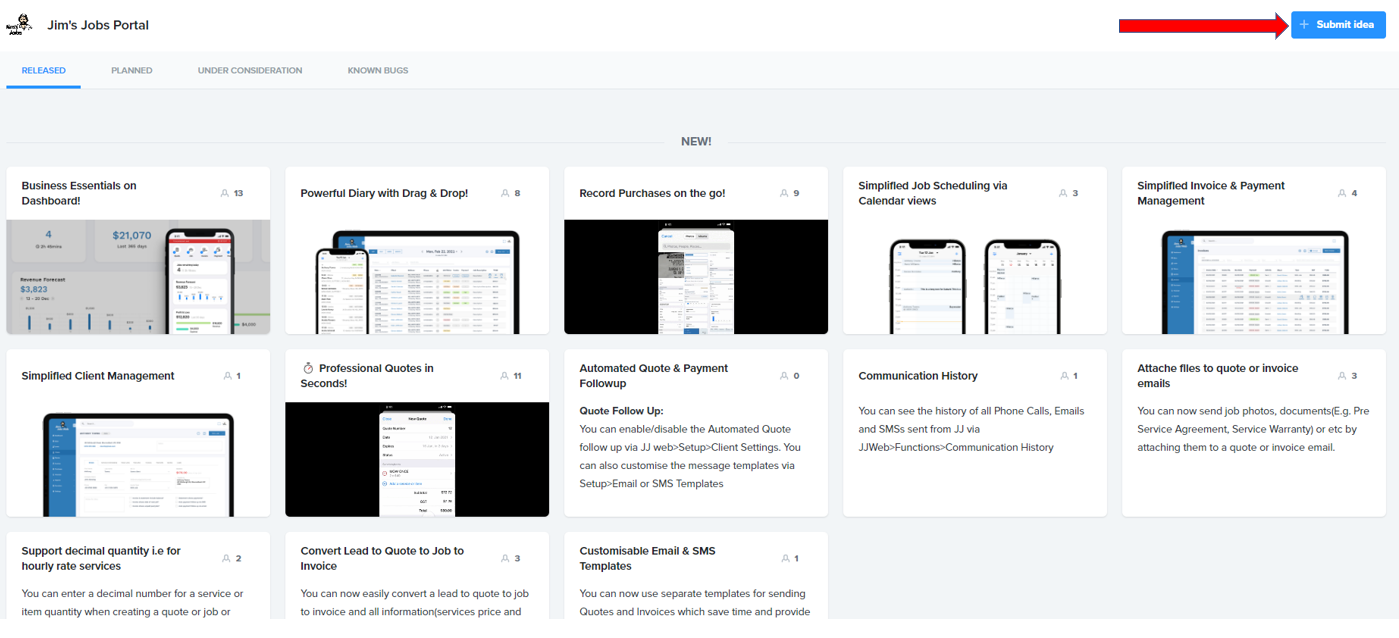
Jim's Jobs Portal
Submit new ideas and have your say on what needs to change. To Submit a new idea please click on + Submit idea.
Click here to /wiki/spaces/~62d4080a3ace3a8e7387c932/pages/2583756813
Related Articles
Jims Jobs - Billing Commercial Clients (e.g. Real Estate Agents) and their Properties